The New Drawing on the Right Side of the Brain (34 page)
Read The New Drawing on the Right Side of the Brain Online
Authors: Betty Edwards

BOOK: The New Drawing on the Right Side of the Brain
3.13Mb size Format: txt, pdf, ePub
Before you start:
 After you have finished:

Tape a stack of several sheets of drawing paper to your drawing board. Draw a format on your drawing paper and tone the paper within the format to a medium gray tone. Draw the crosshairs on the toned paper.
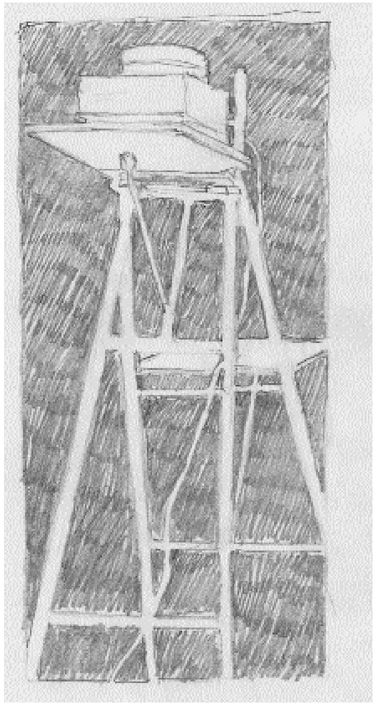
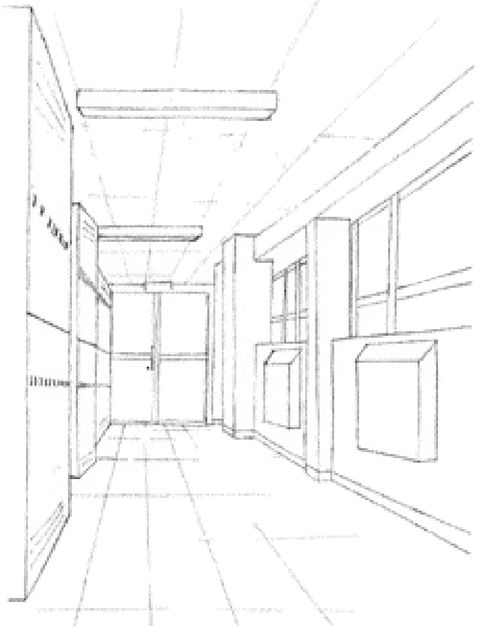
1. Choose your subject. Learning how to draw “in proportion” and “in perspective” are the two great challenges—the Waterloo, even—of most drawing students in art schools. You will want to prove to yourself that you can achieve this skill. Therefore, pick your subject with that objective in mind: Choose a view or a site that you think would be really hard to draw—one with lots of angles or a complicated ceiling or a long view down a hall. See the student drawing on page 153. The best way to choose a site is to walk around, using your Viewfinder to find a composition that pleases you—much in the same way as composing with a camera’s viewfinder.
Possible sites:
• A kitchen corner
• A hallway
• A view through an open doorway
• A corner of any room in your house
• A porch or balcony
• Any street corner where you can sit in your car or on a bench and draw
• An entrance to any public building, inside or out
Set yourself up to draw at your chosen site. You will need two chairs, one for sitting on and one on which to lean your drawing board. If you are drawing outside, folding chairs are convenient. Make sure that you are directly facing your chosen view.
2. Clip your larger Viewfinder and the plastic Picture Plane together. Draw a format edge on the plastic plane by running the felt-tip marker around the inside edge of the Viewfinder opening. Closing one eye, move the Viewfinder/plastic Picture Plane backward and forward to find the best composition—the one you like best.
3. Having found a composition you like, choose your Basic Unit. Your Basic Unit should be of medium size and of a shape that is not too complicated. It might be a window or a picture on the wall or a doorway. It can be a positive form or a negative space. It can be a single line or a shape. Draw your Basic Unit directly on the plastic with your felt-tip marker.
A student’s drawing of an interesting and challenging view.
After you have drawn your Basic Unit on the plastic Picture Plane, you may also wish to draw one or two of the more important edges on the plastic Picture Plane, but be aware that the line will be very shaky and uncertain. The essential piece of information is your Basic Unit, and that is really all you need.
A perspective drawing by Cindy Ball-Kingston. You will find interesting compositions in unexpected places.
4. Set aside your Viewfinder/plastic Picture Plane on a piece of white paper so that you can see what you have drawn on it. You will next draw your Basic Unit on your paper. It will be the same shape but larger, just as your toned format is larger than the Viewfinder opening.
5. Transfer your Basic Unit onto the toned paper using your crosshairs as a guide. On both the Picture Plane and on your toned paper, the crosshairs divide the drawing area into four quadrants. Refer to Figures 8-11 and 8-12 on page 146 for how to transfer your Basic Unit from your Picture Plane to your toned paper by using these quadrants.
How to re-find your composition: Sometimes it is useful to go back to the Picture Plane to check on an angle or proportion. To re-find your composition, simply hold up your Viewfinder/plastic Picture Plane, close one eye and move the plane forward or backward until your Basic Unit “out there” lines up with the felt-tip drawing of Basic Unit on the plastic plane. Then check out any angle or proportion that may be puzzling you.
For most people just learning to draw, the hardest part of drawing is believing their own sights of both angles and proportions. Many times I have watched students take a sight, shake their heads, take the sight again, again shake their heads, even say out loud, “It [an angle] can’t be that steep,” or, “It [a proportion] can’t be that small.”
With a little more experience in drawing, students are able to accept the information they obtain by sighting. You just have to swallow it whole, so to speak, and make a decision not to second-guess your sights. I say to my students, “If you see it so, you draw it so. Don’t argue with yourself about it.”
Of course, the sights have to be taken as correctly and carefully as possible. When I demonstrate drawing in a workshop, students see me making a very careful, deliberate movement to extend my arm, lock my elbow, and close one eye in order to carefully check a proportion or an angle on the plane. But these movements become quite automatic very quickly, just as one quickly learns to brake a car to a smooth stop.
To complete your perspective drawing:1. Again, you will fit the pieces of your drawing together like a fascinating puzzle. Work from part to adjacent part, always checking the relationships of each new part to the parts already drawn. Also, remember the concept of edges as shared edges, with the positive forms and negative spaces fitted into the format to create a composition. Remember that all the information you need for this drawing is right there before your eyes. You now know the strategies artists use to “unlock” that visual information and you have the correct devices to help you.
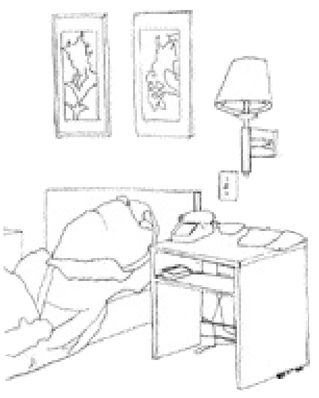
2. Be sure to use negative spaces as an important part of your drawing as in Figure 8-24. You will add strength to your drawing if you use negative space to see and draw small items such as lamps, tables, signs with lettering, and so on. If you do not, and focus only on the positive shapes, they will tend to weaken your drawing. If you are drawing a landscape, trees and foliage in particular are much stronger when their negative spaces are emphasized.
3. Once you have completed the main parts of the drawing, you can focus on the lights and shadows. “Squinting” your eyes a bit will blur the details and allow you to see large shapes of lighted areas and shadowed areas. Again using your new sighting skills, you can erase out the shapes of lights and use your pencil to darken in the shapes of shadows. These shapes are sighted in exactly the same way as you have sighted the other parts of the drawing: “What is the angle of that shadow relative to horizontal? How wide is that streak of light relative to the width of the window?”
4. If any part of the drawing seems “off” or “out of drawing,” as such errors are called, check out the troublesome area with your clear plastic Picture Plane. Look at the image on the plane (with one eye closed, of course) and alternately glance down at your drawing to double-check angles and proportions. Make any corrections that seem reasonably easy to make.
Fig. 8-24. Remember to emphasize negative spaces in your drawing.
Artist/teacher Robert Henri sends a stern warning to his students:
“If in your drawing you habitually disregard proportions you become accustomed to the sight of distortion and lose critical ability. A person living in squalor eventually gets used to it.”
—
The Art Spirit,
1923
.
The Art Spirit,
1923
.
Congratulations! You have just accomplished a task that many university art students would find daunting if not impossible.
Sighting is an aptly named skill. You take a sight and you see things as they really appear on the picture-plane. This skill will enable you to draw anything you can see with your own eyes. You need not search for “easy” subjects. You will be able to draw anything at all.
The skill of sighting takes some practice to master, but very soon you will find yourself “just drawing,” taking sights automatically, at times even without needing to measure proportions or assess angles. I think it’s significant that this is called “eyeballing.” Also, when you come to the difficult foreshortened parts, you will have just the skills needed to make the drawing seem easy.
Fig. 8-25. Charles White,
Preacher
(1952). Courtesy of the Whitney Museum.
Preacher
(1952). Courtesy of the Whitney Museum.
This drawing by Charles White demonstrates a foreshortened view. Study it. Copy it, turning the drawing upside down if necessary. You might use the length of the man’s left hand from the wrist to the tip of the pointing finger as your Basic Unit. Perhaps you’ll be surprised to find that the ratio of the head to the model’s left hand is 1:1.
Each time you experience the fact that drawing just what you see works the wonder of creating the illusion of space and volume on the flat surface of the paper, the methods will become more securely integrated as your way of seeing—the artist’s way of seeing.
Fig. 8-26. Edgar Degas (1834-1917),
Dancer Adjusting Her Slipper
(1873). Courtesy of The Metropolitan Museum of Art, bequest of Mrs. H. O. Havemeyer, 1929. The H. O. Havemeyer Collection
Dancer Adjusting Her Slipper
(1873). Courtesy of The Metropolitan Museum of Art, bequest of Mrs. H. O. Havemeyer, 1929. The H. O. Havemeyer Collection
The Use of Sighting in Figure Drawing
This technique of using the constants, vertical and horizontal, against which to gauge angles is an important basic skill in drawing figures as well as objects. Many artists’ sketches still show traces of sight lines drawn in by the artist, as in the Edgar Degas drawing entitled
Dancer Adjusting Her Slipper
(Figure 8-26). Degas was probably sighting such points as the location of the left toe in relation to the ear and the angle of the arm compared to vertical.
Dancer Adjusting Her Slipper
(Figure 8-26). Degas was probably sighting such points as the location of the left toe in relation to the ear and the angle of the arm compared to vertical.
Other books
His Obsession by Lore, Ava
The Farm by Tom Rob Smith
Parabolis by Eddie Han
Ghost Fleet (The Pike Chronicles Book 4) by G. P. Hudson
Immortal Storm by Bserani, Heather
Bodas de sangre by Federico García Lorca
Playing the Playboy's Sweetheart by Carol Marinelli
The Teacher's Funeral by Richard Peck
Just Another Hero by Sharon M. Draper