The New Drawing on the Right Side of the Brain (38 page)
Read The New Drawing on the Right Side of the Brain Online
Authors: Betty Edwards

BOOK: The New Drawing on the Right Side of the Brain
3.04Mb size Format: txt, pdf, ePub
Fig. 9-16. Albrecht Dürer,
Four Heads
(1513 or 1515). Courtesy of The Nelson Gallery-Atkins Museum. Kansas City, Missouri (Nelson Fund).
Four Heads
(1513 or 1515). Courtesy of The Nelson Gallery-Atkins Museum. Kansas City, Missouri (Nelson Fund).
If it helps you to see, draw in some symbolic shapes for nose, eye, mouth, and chin, making sure that you have first drawn the eye level line at the halfway point on the blank.
Fig. 9-17. The side-view blank. Note that (a) eye level to chin equals (b) eye level to highest part of the skull.
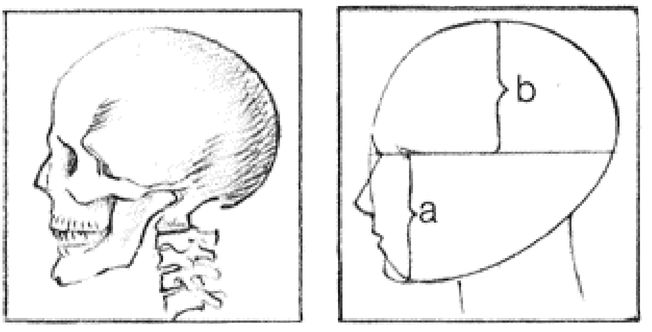
The next measurement is extremely important in helping you perceive correctly the placement of the ear, which in turn will help you perceive correctly the width of the head in profile and prevent chopping off the back of the skull.
On almost every head, the position of the ear doesn’t vary much. On your own face, use your pencil again to measure the length from the inside corner of your eye to the bottom of your chin (Figure 9-18). Now, holding that measurement, lay the pencil horizontally along your eye level line (Figure 9-19) with the eraser end at the outside corner of your eye. That measurement coincides with the back of your ear.
Putting that another way, the length from eye level to chin equals the distance from the back of the eye to the back of the ear. Make a mark for the ear placement on the eye level line of the blank, as in Figure 9-20. This proportion may seem a little complex, but if you will learn the measurement, it will save you from another stubborn problem in drawing the human head: Most beginning students draw the ear too close to the features when drawing a profile. When the ear is placed too close to the features, the skull is once more chopped off, this time at the back. Again, the reason for the problem may be that the expanse of cheek and jaw is uninteresting and boring, and therefore beginning students fail to perceive the width of the space correctly.
You can memorize this important measurement as a saying or mnemonic, similar to “i” before “e,” except after “c.” To place the ear in a profile portrait, memorize this mnemonic: eye level-to-chin equals back-of-the-eye to the back-of-the-ear.
Note that enlarging the features and diminishing the skull produce strong, expressive, symbolic effects, a device you can always use later if you wish. Right now, for this “basic training,” we want you to be able to see things as they really are in their correct proportion.
Visualizing is another useful technique for teaching the correct placement of the ear. Since you now know that two measurements are equal—from eye level to chin, and from the back of the eye to the back of the ear—you can visualize an equal-sided right-angle triangle (an isosceles triangle) connecting these three points, as shown in the drawing in Figure 9-12, page 170. This is an easy way to place the ear correctly. The isosceles triangle can be visualized on the model. See Figure 9-20, page 175.
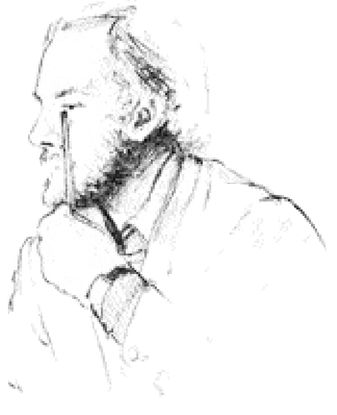
Fig. 9-18.
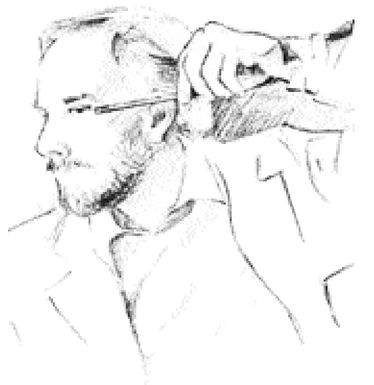
Fig. 9-19.

Fig. 9-20.
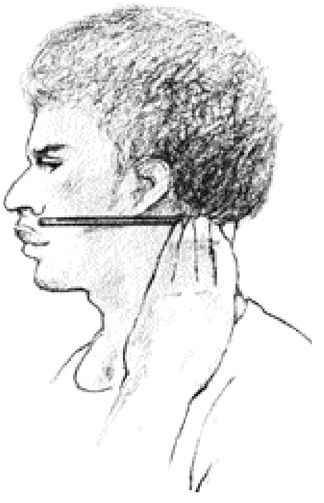
Fig. 9-21. Check the location of the bottom of the ear relative to the upper lip.
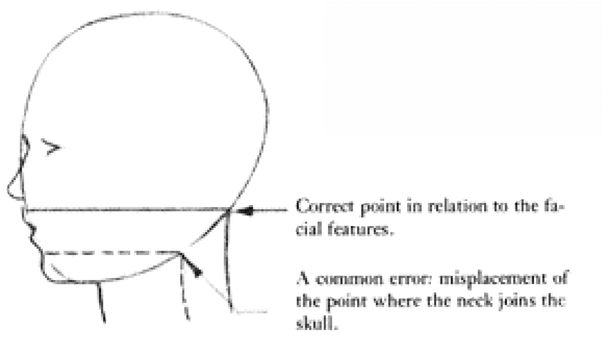
Fig. 9-22. Locate also the point where the neck joins the skull (the place that bends) relative to the upper lip.
Practice seeing proportional relationships now by looking at photographs or drawings of people in the profile view and visualizing the isosceles triangle, as in Figure 9-12. This technique will save you from a lot of problems and errors in your profile drawings.
We still need to make two more measurements on the profile blank. First, holding your pencil horizontally, just under your ear, slide the pencil forward as in Figure 9-21. You come to the space between your nose and mouth. This is the level of the bottom of your ear. Make a mark on the blank.
Again, holding your pencil horizontally just under your ear, slide the pencil backward this time. You will come to the place where your skull and neck connect—the place that bends, as in Figure 9-22. Mark this point on the blank. The point is higher than you think. In symbolic drawing, the neck is usually placed below the circle of the head, with the point that bends on the level of the chin. This will cause problems in your drawing: The neck will be too narrow. Make sure that you perceive on your model the correct place where the neck begins at the back of the skull.
Now you will need to practice these perceptions. Look at people. Practice perceiving faces, observing relationships, seeing the unique forms of each individual face.
You are ready now to draw a profile portrait. You will be using all of the skills you have learned so far:
• Focusing on complex edges and negative spaces until you feel the shift to an alternative state of consciousness, one in which your right hemisphere leads and your left hemisphere is quiet. Remember that this process requires an uninterrupted block of time.
• Estimating angles in relation to the vertical and horizontal edges of the paper
• Drawing just what you see without trying to identify or attach verbal labels to forms (you learned the value of this in the upside-down drawing)
• Drawing just what you see without relying on old stored-and-memorized symbols from your childhood drawing
• Estimating relationships of sizes—how big is this form compared to that one?
And finally:
• Perceiving proportions as they really are, without changing or revising visual information to fit preconceptions about what parts are important. They are all important, and each part must be given its full proportion in relation to the other parts. This requires bypassing the brain’s propensity to change incoming information without “telling” you what it has done. Your sighting tool—your pencil—will enable you to “get at” the true proportions.
If you feel that you need to review any of the techniques at this point, turn to the previous chapters to refresh your memory. Reviewing some of the exercises, in fact, will help to strengthen your new skills. Pure Contour Drawing is particularly useful in strengthening your newfound method of gaining access to your right hemisphere and quieting the left.
If, as occasionally happens, your L-mode remains active as you start to draw, the best remedy is to do a short session of Pure Contour Drawing, drawing any complex object—a crumpled piece of paper is fine. Pure Contour Drawing seems to force the shift to R-mode and therefore is a good warm-up exercise for drawing any subject.
To illuminate for yourself the connection of edges, spaces, and relationships in portrait drawing, I suggest that you copy (make a drawing of) John Singer Sargent’s beautiful profile portrait of Mme. Pierre Gautreau, which Sargent drew in 1883 (Figure 9-23). You may wish turn it upside down.
For the past forty years or so, most art teachers have not recommended copying masterworks as an aid to learning to draw. With the advent of modern art, many art schools rejected traditional teaching methods and copying master drawings went out of favor. Now, copying drawings and paintings is coming back into favor as an effective means of training the eye in art.
Other books
After Nothing by Rachel Mackie
The Imaginary Girlfriend by John Irving
The Red House by Mark Haddon
Dalakis Passion 3 - Stefan's Salvation by N.J. Walters
Paint Your Wife by Lloyd Jones
Robert Ludlum's the Bourne Imperative by Eric van Lustbader
Vanishing Acts by Phillip Margolin, Ami Margolin Rome
The Janson Command by Garrison, Paul
Bitter Gold Hearts by Glen Cook
Always Remembered by Kelly Risser