The New Drawing on the Right Side of the Brain (39 page)
Read The New Drawing on the Right Side of the Brain Online
Authors: Betty Edwards

BOOK: The New Drawing on the Right Side of the Brain
11.04Mb size Format: txt, pdf, ePub
I believe that copying great drawings is very instructive for beginning students. Copying forces one to slow down and really see what the artist saw. I can practically guarantee that carefully copying any masterwork of drawing will forever imprint the image in your memory. Therefore, because copied drawings become an almost permanent file of memorized images, I recommend that you copy only the work of major and minor masters of drawing. We are fortunate these days to have reproductions of great works readily and inexpensively available.
For how to do an exercise copy of Sargent’s profile portrait of
Mme. Pierre Gautreau,
also known as “Madame X,” please read all of the instructions before you begin.
What you’ll need:Mme. Pierre Gautreau,
also known as “Madame X,” please read all of the instructions before you begin.
• Your drawing paper
• Your #2B writing pencil and #4B drawing pencils, sharpened, and your eraser
• Your plastic Picture Plane
• An hour of uninterrupted time
These instructions will be appropriate for either right-side-up or upside-down drawing of the Sargent portrait.

Fig. 9-23. John Singer Sargent.
Mme. Pierre Gautreau,
1883
Mme. Pierre Gautreau,
1883
1. As always, in starting a drawing, you will first draw a format. Center one of the Viewfinders on your drawing paper and use your pencil to draw around the outside edges. Then, lightly draw crosshairs on your paper.
2. You will be using your new skills of seeing edges, spaces, and relationships in this drawing. Since the original is a line drawing, lights and shadows are not relevant in this exercise.
3. Lay your clear plastic Picture Plane directly on top of the Sargent and note where the crosshairs fall on the portrait drawing. You will immediately see how this will help you in deciding on your Basic Unit and starting your copy of the drawing. You can check proportional relationships right on the original drawing and transfer them to your copy.
“People have many illusions which block them from acting in their own best interest as a species, as well as individuals. In dealing with the present problems of life, we must first be able to see the realities of our lives.”
—Jonas Salk
The Anatomy of Reality,
1983
The Anatomy of Reality,
1983
Fig. 9-24.
Ask yourself the following series of questions. (Note that I must name the features in order to give these verbal instructions, but when you are drawing, try to clear your mind of words.) Looking at the Sargent drawing and using the crosshairs as in Figure 9-24, ask yourself the following:
1. Where is the point where the forehead meets the hairline?
2. Where is the outermost curve of the tip of the nose? What are the angles of the forehead?
3. What is the negative shape that lies between those two points?
4. If you draw a line between the tip of the nose and the outermost curve of the chin, what is the angle of that line relative to vertical (or horizontal)?
5. What is the negative shape defined by that line?
6. Relative to the crosshairs, where is the curve of the front of the neck?
7. What is the negative space made by the chin and neck?
8. , 9., and 10. Check the position of the back of the ear, bend of the neck, and the slant of the back.
Continue in this fashion, putting the drawing together like a jigsaw puzzle: Where is the ear? How big is it relative to the profile you have just drawn? What is the angle of the back of the neck? What is the shape of the negative space made by the back of the neck and the hair? And so on. Draw just what you see, nothing more. Notice how small the eye is relative to the nose, and notice the size of the mouth relative to the eye. When you have unlocked the true proportion by sighting, you will be surprised, I feel quite sure. In fact, if you lay one finger over the features in Sargent’s drawing, you will see what a small proportion of the whole form is occupied by the main features. This is often quite surprising to beginning drawing students.
Now, the real thing: A profile portrait of a personNow you are ready to draw a real portrait of a person. You’ll be seeing the wondrous complexity of contours, watching your drawing evolve from the line that is your unique, creative invention, and observing yourself integrating your skills into the drawing process. You will be seeing, in the artist’s mode of seeing, the astounding thing-as-it-is, not a pale, symbolized, categorized, analyzed, memorized shell of itself. Opening the door to see clearly that which is before you, you will draw the image by which you make yourself known to us.
If I were personally demonstrating the process of drawing a portrait profile, I would not be naming parts. I would point to the various areas and refer to features, for example, as “this form, this contour, this angle, the curve of this form,” and so on. For the sake of clarity in writing, unfortunately, I’ll have to name the parts. I fear that the process may seem cumbersome and detailed when written out as verbal instructions. The truth is that your drawing will seem like a wordless, antic dance, an exhilarating investigation, with each new perception miraculously linked to the last and to the next.
With that caution in mind, read through all of the instructions before you start and then try to do the drawing without interruption.
What you’ll need:1. Most important, you’ll need a model—someone who will pose for you in profile view. Finding a model is not easy. Many people strenuously object to sitting perfectly still for any period of time. One solution is to draw someone who is watching television. Another possibility is to catch someone sleeping—preferably upright in a chair, though that doesn’t seem to happen too often!
2. Your clear plastic Picture Plane and your felt-tip marking pen
3. Two or three sheets of your drawing paper, taped in a stack onto your drawing board

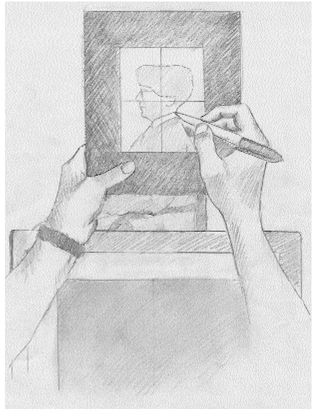
Fig. 9-25.
Fig. 9-26.
4. Your drawing pencils and eraser
5. Two chairs, one to sit on and one on which to lean your drawing board. See Figure 9-25 for setting up to draw. Note that it’s also helpful to have a small table or a stool or even another chair on which to put your pencils, erasers, and other gear.
6. An hour or more of uninterrupted time
What you’ll do:1. As always, start by drawing a format. You may use the outside edge of your Picture Plane as a template.
2. Lightly tone your paper. This will allow you to erase out lighted areas and to add graphite for shadowed areas. I’ll give complete instructions for the fourth perceptual skill, perceiving lights and shadows, in the next chapter. You have already had some experience with “shading,” however, and I find that my students greatly enjoy adding at least some lights and shadows to this exercise. On the other hand, you may prefer to do a line drawing without toning the paper, as John Singer Sargent did in his profile portrait of Mme. Gautreau. Whether you tone the paper or not, be sure to add the crosshairs.
3. Pose your model. The model can be facing either right or left, but in this first profile drawing, I suggest that you place your model facing to your left if you are right-handed, and to the right if you are left-handed. With this arrangement, you will not be covering up the features as you draw the skull, hair, neck and shoulders.
4. Sit as close to your model as possible. Two to four feet is about ideal, and this distance can be managed even with the intervening chair for propping up your drawing board. Check the setup again in Figure 9-25.
5. Next, use your plastic Picture Plane to compose your drawing. Close one eye and hold up the Picture Plane with a clipped-on Viewfinder; move it backward and forward until the head of your model is placed pleasingly within the format—that is, not too crowded on any edge and with enough of the neck and shoulders to provide “support” for the head. A composition you certainly don’t want is one in which the model’s chin is resting on the bottom edge of the format.
6. When you have decided on your composition, hold the plastic Picture Plane as steadily as possible. You will next choose a Basic Unit—a convenient size and shape to guide proportions as you draw. I usually use the span from the model’s eye level to the bottom of the chin. You, however, might prefer to use another Basic Unit—perhaps the length of the nose or the span from the bottom of the nose to the bottom of the chin (Figure 9-27).
7. When you have chosen your Basic Unit, mark the unit with your felt-tip marker directly on your plastic Picture Plane. Then, transfer the Basic Unit to your drawing paper, using the same procedure that you have learned in previous exercises. You may need to review the instructions on pages 126-130 and Figures 8-11 and 8-12, page 146. You may want to also mark the topmost edge of the hair and the back of the head at the point opposite eye level. You can transfer these marks to your paper as a rough guide for the drawing (Figure 9-28).
8. At this point, you can begin to draw, confident that you will end up with the composition you have so carefully chosen.
Other books
No Good to Cry by Andrew Lanh
El caballero Galen by Michael Williams
The Faerie Queen (The Faerie Ring #4) by Kiki Hamilton
Others by James Herbert
Burning Flowers by June Beyoki
Prisons by Kevin J. Anderson, Doug Beason
My Soul to Take by Rachel Vincent
Hunger: Volume 4 by Ella Price
Ethel Merman: A Life by Brian Kellow
A Heart Renewed by Karen Baney