The New Drawing on the Right Side of the Brain (40 page)
Read The New Drawing on the Right Side of the Brain Online
Authors: Betty Edwards

BOOK: The New Drawing on the Right Side of the Brain
8.93Mb size Format: txt, pdf, ePub
Again, I must remind you that although this process seems cumbersome now, later on it becomes so automatic and so rapid that you will hardly be aware of how you start a drawing. Allow your mind to roam over the many complicated processes you accomplish without thinking of the step-by-step methods: making a U-turn on a two-way street; cracking and separating an egg yolk from the white; crossing a busy intersection on foot where there is no stoplight; making a phone call from a pay phone. Imagine how many steps you would need to put instructions into words for any one of those skills.
In time, and with practice, starting a drawing becomes almost completely automatic, allowing you to concentrate on the model and on composing your drawing. You will hardly be aware of choosing a Basic Unit, sizing it and placing it on the drawing paper. I recall an incident when one of my students realized that she was “just drawing.” She exclaimed, “I’m doing it!” The same thing will happen to you—in time, and with practice.
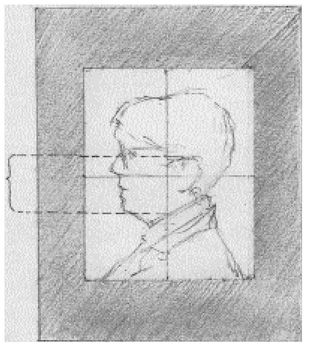
Fig. 9-27.
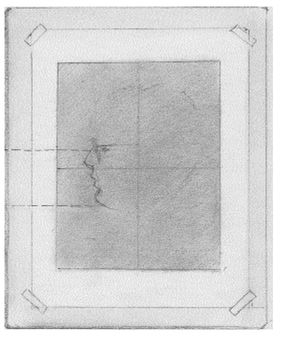
Fig. 9-28.

Fig. 9-29.
Fig. 9-30.
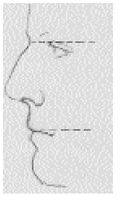
9. Gaze at the negative space in front of the profile and begin to draw that negative shape. Check the angle of the nose relative to vertical. It may help to hold up your pencil vertically to check that shape, or you may want to use one of your Viewfinders. Remember that the outside edge of the negative shape is the outer edge of the format, but to make a negative space easier to see, you may want to make a new, closer edge. See Figure 9-29 for how to check the angle formed by holding your pencil on the plane against the tip of the nose and the outermost curve of the chin.
10. You may choose to erase out the negative space around the head. This will enable you to see the head as a whole, separated from the ground. On the other hand, you may decide to darken the negative spaces around the head or to leave the tone as it is, working only within the head. See the demonstration drawings at the end of the chpter for examples. These are aesthetic choices—some of the many that you’ll make in this drawing.
11. If your model wears glasses, use the negative shapes around the outside edges of the glasses (remembering to close one eye to see a 2-D image of your model). See Figure 9-30.
12. Place the eye in relation to the innermost curve of the bridge of the nose. Check the angle of the eyelid relative to horizontal.
13. Use the shape under the nostril as a negative shape (Figure 9-31).
14. Check the angle of the centerline of the mouth. This is the only true edge of the mouth—the upper and lower contours only mark a color change. It’s usually best to draw this color-change boundary lightly, especially in portraits of males. Note that, in profile, the angle of the centerline of the mouth—the true edge—often descends relative to horizontal. Don’t hesitate to draw this angle just as you see it. See Figure 9-32.
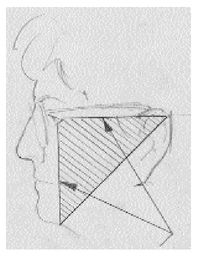
15. Using your pencil to measure (Figure 9-33), you can check the position of the ear (if it is visible). To place the ear in profile portrait, recall our mnemonic: Eye level-to-chin equals back-of-the-eye to the back-of-the-ear. Remember also that this measure forms an isosceles triangle, which can be visualized on the model. See Figure 9-34.
16. Check the length and width of the ear. Ears are nearly always bigger than you expect them to be. Check the size against the features of the profile.
17. Check the height of the topmost curve of the head—that is, the topmost edge of the hair or of the skull if your model happens to have a shaved head or thin hair. See Figure 9-35.
18. In drawing the back of the head, sight as follows:
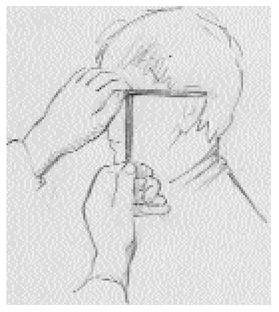

• Close one eye, extend your arm holding your pencil perfectly vertically, lock your elbow, and take a sight on eye level to chin.
• Then, holding that measure, turn your pencil to horizontal and check how far it is to the back of the head. It will be 1 (to the back of the ear) and something more—perhaps 1:1½ or even 1:2 if the hair is very thick. Keep that ratio in your mind.
• Then, turn back to your drawing to transfer the ratio. Using the pencil, re-measure eye level to chin in the drawing. Holding that measure with your thumb, turning your pencil to the horizontal position, measure from the back of the eye to the back of the ear, then to the back of the head (or hair). Make a mark. Perhaps you will not believe your own sights. If carefully taken, they are true, and your job is to believe what your eyes tell you. Learning to have faith in one’s perceptions is one of the principal keys to drawing well. I’m sure you can extrapolate the importance of this to other areas of life.
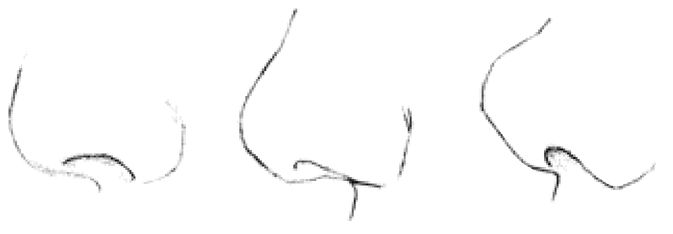
Fig. 9-31. Look for the shape of the space under the nostril. This shape will vary from model to model and should be specifically observed on each individual.
Fig. 9-32.
Fig. 9-33.
Fig. 9-34.
Fig. 9-35.
19. In drawing your model’s hair, what you want not to do is to draw hairs. Students often ask me, “How do you draw hair?” I think the question really means, “Give me a quick and easy way to draw hair that looks good and doesn’t take too long.” But the answer to the question is, “Look carefully at the model’s (unique) hair and draw what you see.” If the model’s hair is a complicated mass of curls, the student is likely to answer, “You can’t be serious! Draw all of that?”
Other books
The Professionals by Owen Laukkanen
The Dark Labyrinth by Lawrence Durrell
McFarlane's Perfect Bride by Christine Rimmer
Inferno by Casey Lane
Home is the Hunter by Helen Macinnes
Holy War by Jack Hight
Déjame entrar by John Ajvide Lindqvist
Stirring the Plot (A Cookbook Nook Mystery) by Daryl Wood Gerber
It's Hell To Choose (The Kurtherian Gambit Book 9) by Michael Anderle
The Summer Guest by Cronin, Justin