The New Drawing on the Right Side of the Brain (33 page)
Read The New Drawing on the Right Side of the Brain Online
Authors: Betty Edwards

BOOK: The New Drawing on the Right Side of the Brain
4.69Mb size Format: txt, pdf, ePub
Fig. 8-18. “. . . to one . . .”

Fig. 8-19. “. . . two . . .”

Fig. 8-20. “. . . and two-thirds.”
As a clever student of mine put it: “You use your pencil to find the ratio ‘out there.’ You remember it, wipe the measure off the pencil, and remeasure with your pencil in the drawing.”
The next step: Sighting anglesRemember, sighting is a two-part skill. You have just learned the first part: sighting proportions. Your pencil, used as a sighting device, enables you to see “How big is this compared to that?” “How wide is that compared to my Basic Unit?” And so on. Proportions are sighted relative to each other and to your Basic Unit.
Sighting angles is different. Angles are sighted relative to vertical and horizontal. Remember, both angles and proportions must be sighted on the plane.
Take up your Viewfinder/Picture Plane and your felt-tip marker again and seat yourself in front of another corner of a room. Hold up the Picture Plane and look at the angle formed where the ceiling meets the two walls. Be sure to keep the Picture Plane vertical in front of your face, on the same plane as the plane of your two eyes. Don’t tilt the plane in any direction.
Again, compose your view, and use your marker on the Picture Plane to draw the corner (a vertical line). Then, on the plane, draw the edges where the ceiling meets the two walls, and, if possible, the edges where the floor meets the walls.
Then, put your Picture Plane down on a piece of paper so you can see the drawing and transfer those lines to a piece of drawing paper.
You have just drawn a corner in perspective. Now, let’s do that without the aid of the Picture Plane.
Move to a different corner or a different position. Tape a piece of paper to your drawing board. Now, take a sight on the vertical corner. Close one eye and hold your pencil perfectly vertically at the corner. Having checked, you can now draw a vertical line for the corner.
Next, hold up your pencil perfectly horizontally, staying on the plane, to see what the angles of the ceiling are relative to horizontal (Figure 8-21). You will see them as angles between the pencil and the edges of the ceiling. Remember these angles as shapes. Then, again estimating, draw the angles into your drawing. Use the same procedure for the floor angles (Figure 8-22).
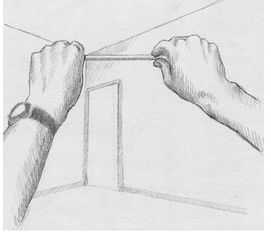
Fig. 8-21.

Fig. 8-22.
Verticals in human-built structures remain vertical. Horizontals—that is, edges parallel to the face of the earth—appear to change and converge and must be sighted. But you can pretty much count on verticals remaining vertical. In your drawing, they will be parallel to the edges of your paper. There are exceptions, of course. If you stand at street level, looking up, to draw a tall building, those vertical edges will converge and must be sighted. This situation, however, is fairly rare in drawing.
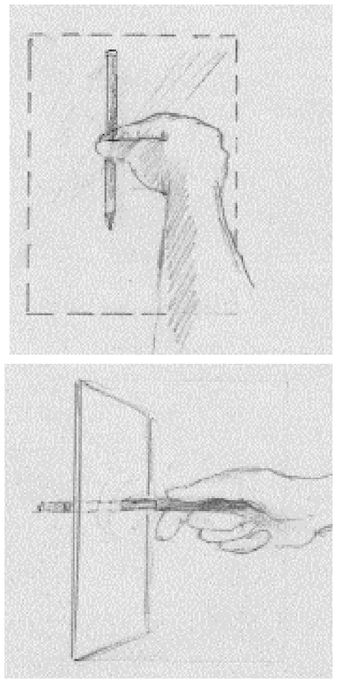
Fig. 8-23. Later, when you have learned to sight and have discarded the actual Picture Plane, you must still remember to sight
on the plane
and be careful to not “poke through” the imaginary plane.
on the plane
and be careful to not “poke through” the imaginary plane.
These fundamental sighting movements or measuring gestures in drawing are not difficult to master, once you have a real understanding of the purpose of the movements.
• The purpose of closing one eye, as I explained earlier, is to see a 2-D image only, not a 3-D binocular image.
• The purpose of locking the elbow is to ensure using a single scale in sighting proportions. Relaxing the elbow even slightly can cause errors by changing the scale of the sights. In sighting angles, it is not necessary to take the sights at arm’s length, but you must stay on the plane.
• The purpose of comparing angles to vertical or horizontal is obvious. Angles can vary infinitely around 360 degrees. Only true vertical and true horizontal are constant and reliable. And since the edges of the paper (and the edges of the format you have drawn) also represent vertical and horizontal, any angle can be assessed on the plane and transferred into the drawing in relation to those constants.
• All angles are sighted relative to the two constants: vertical and horizontal.
• In your drawing, the edges of your format represent the constants vertical and horizontal. Once you have determined an angle “out there” in the real world, you will draw it into the drawing relative to the edges of your format.
• All angles are sighted on the picture-plane. This is a solid plane. You cannot “poke through” it to align your pencil with an edge as it moves through space. You determine the angle as it appears on the plane (Figure 8-23).
• You can sight angles by holding your pencil either vertically or horizontally and comparing the angle with the edge of the pencil. You can also use the crosshairs on your clear plastic Picture Plane or even the edge of one of the Viewfinders. You just need some edge that you can hold up in a vertical or horizontal position on the plane to compare the angle you intend to draw. The pencil is simply the easiest to use and doesn’t interrupt your drawing.
• Visual information seen on the plane is nearly always different from what you know about things. Say you are facing a corner of a room. You know that the ceiling is flat—that is, horizontal—and that it meets the wall at right angles. But if you hold up your pencil perfectly horizontally, close one eye, and, staying on the plane, line up the corner so that it touches the center of your horizontal pencil, you will find that the edges of the ceiling go off at odd angles. Perhaps one angle is steeper than the other. See Figure 8-22, page 149.
• You must draw these angles just as you see them. Only then will the ceiling look flat and the right angles of the walls appear to be correct in your finished drawing. This is one of the great paradoxes of drawing.
• You must put these paradoxical angles into your drawing just as you perceive them. To do this, you remember the shape of one of the triangles made by the edge of the ceiling and your horizontal pencil. Then, imagining a horizontal line in your drawing (parallel to the top and bottom edges of your format), draw the same triangle. Use the same process to draw the other angled edge of the ceiling. See Figure 8-21, page 149, for an illustration of this.
I usually recommend that students not try to designate an angle by degrees: a 45-degree angle; a 30-degree angle; etc. It really is best to simply remember the shape the angle makes when compared to vertical and horizontal and carry that visual shape in your mind to draw it. You may have to double-check angles a few times at first, but my students learn this skill very quickly.
The decision whether to use vertical or horizontal as the constant against which to see a particular angle occasionally puzzles students. I recommend that you choose whichever will produce the smaller angle.
I realize that sighting sounds very “left-brained” at this point. But remember we are searching out relationships. The right hemisphere is specialized for the perception of relationships—how things compare. As I said before, the “counting up” of sighting is just a simple way of “tagging” our perceptions. The Basic Unit is always “One,” because it is the first part of a comparison. After you practice sighting a bit, you are hardly aware of the process and it is very rapid. Also, with practice in drawing, you will be doing a lot of “eyeballing,” meaning estimating rather than needing to sight everything. But for any difficult perception, as in foreshortening, an experienced artist gladly uses sighting. Like negative space, sighting helps to make drawing easy.
Try to remember that drawing always produces an approximate version of the subject, even for a person highly skilled in drawing. Drawing is not photography. The person who is drawing consciously or subconsciously edits, emphasizes (or minimizes), or otherwise slightly changes various aspects of the subject. Students are often very critical of their work because it is not an exact rendition, but the subconscious choices made during drawing are part of the expressiveness of drawings.
Please note that in public places you will attract an audience of viewers who will very likely want to talk with you—not a good situation for maintaining an R-mode, wordless state of mind. On the other hand, if you would like to make some new friends, drawing in a public spot will work every time. For some reason, people who ordinarily would not approach a stranger do not hesitate to talk with someone who is drawing.
What you’ll need:
• Your drawing board
• Several sheets of drawing paper, in a stack for padding
• Your masking tape
• Your drawing pencils, sharpened, and your eraser
• Your graphite stick and several paper towels or paper napkins
• Your plastic Picture Plane and your felt-tip marker
• Your larger Viewfinder
Other books
The Gorging by Thompson, Kirk
Two Against the Odds by Joan Kilby
The Case of the Fire Alarm by Dori Hillestad Butler, Jeremy Tugeau
Romance: Her Fighter by Ward, Penny
Loving Two Doms (Club El Diablo) by Roberts, Holly S.
Flawless Surrender by Lori King
Paris Nocturne by Patrick Modiano
Three Kings, One Night (Lost Kings MC #2.5) by Autumn Jones Lake
Savior in the Saddle by Delores Fossen
Death on the Pont Noir by Adrian Magson