The New Drawing on the Right Side of the Brain (32 page)
Read The New Drawing on the Right Side of the Brain Online
Authors: Betty Edwards

BOOK: The New Drawing on the Right Side of the Brain
13.7Mb size Format: txt, pdf, ePub
Graham Collier, professor of art, states that in the early days of the inception and development of Renaissance perspective it was used creatively and imaginatively to impart what must have been a thrilling sense of space to art.
“Effective as perspective is, however, it becomes a deadening influence on an artist’s natural way of seeing things once it is accepted as a system—as a mechanical formula.”
—Graham Collier
Form, Space, and Vision,
1963
Form, Space, and Vision,
1963
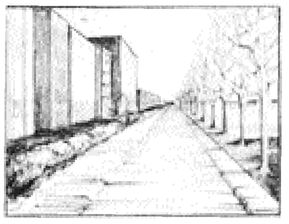
Fig. 8-10. The classic perspective illustration. Note that vertical lines remain vertical; horizontal edges converge at a vanishing point (or points) on the horizon line (which is always at the artist’s eye level). That’s one-point perspective in a nutshell. Two-point and threepoint perspective are complex systems, involving multiple vanishing points that often extend far beyond the edges of the drawing paper and requiring a large drawing table, T-squares, straight-edges, etc., to draw. Informal sighting is much easier and is sufficiently accurate for most drawing.
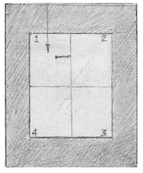
Fig. 8-11. Draw the top of the doorway on your plastic Picture Plane. This is your Basic Unit.
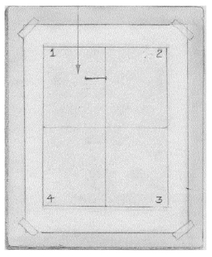
Fig. 8-12. Transfer your Basic Unit to your toned drawing paper. Since the paper is larger than the Picture Plane, you need to scale up (proportionally enlarge) your Basic Unit.
A brief practice in sighting before you do a “real” perspective drawingWhat you’ll need:
• Your drawing board
• Several sheets of scratch paper
• Your drawing pencils, sharpened, and your eraser
• Your plastic Picture Plane and your felt-tip marker
• Your larger Viewfinder
First, you will practice sighting proportions and angles, using your pencil as a sighting device. Once you’ve practiced a bit, then you’ll do your “real” sighting drawing. Begin by seating yourself in front of a doorway, at about ten feet away.
Hold up your Viewfinder/Picture Plane and compose your drawing so that you can see the whole doorway. Hold the Picture Plane very still and use your felt-tip marker to draw the top of the doorway on the plastic plane. See Figure 8-11. (The line will be somewhat shaky.) This is your Basic Unit. Transfer this unit to a piece of paper, estimating the size and position so that it is the same as on your Picture Plane. Set the Picture Plane aside. See Figure 8-12.
Now, pick up your pencil. Hold it at arm’s length toward the top of the doorway with the flat (eraser) end out and with your elbow locked. Close one eye and move the pencil so that the end coincides with one side of the top of the doorway. (Choose either the outside of the molding or the inside edge.) Then, with one eye still closed, move your thumb along the pencil until your thumbnail coincides with the other side of the doorway. Hold that measure. You have “taken a sight” on the width of the doorway.
A test: What happens if you open both eyes or if you relax your elbow?Keep your thumb at the same position and try bending your elbow just slightly, just barely pulling the pencil toward you. What happens? The “measurement” has changed, hasn’t it? Therefore, the reason you must lock your elbow when sighting proportions is to maintain the same scale. When your elbow is locked, you are always taking sights using the same position.
Then, relock your elbow, and resight the width of the doorway on your pencil (Figure 8-13). We’ll call this your Basic Unit, or your “One.” Now, keeping your thumb in the same position, turn your pencil vertically and find the relationship (the ratio or proportion) of width to length.
Still holding the pencil at arm’s length, and still with one eye closed and your elbow locked, measure from the top corner: “One (width), to one (height)” (Figure 8-14), then drop down, measure “One to two” (Figure 8-15), drop it again and measure the remainder, “One to two and two-thirds” (Figure 8-16). You have now “taken a sight” on the proportion of the width relative to the height of the doorway. This proportion is expressed as a ratio: 1:2, or, in words, “One to two and two-thirds.”

Fig. 8-13. Measure “One . . .”
Now, turn back to your sketchBy sighting the doorway, you determined that the width-to-height proportion of the doorway was 1:2. That is the proportion of the doorway “out there” in the real world. Your job is to transfer that proportion from “out there” into your drawing. Obviously, the door in your drawing will be smaller—much smaller—than the real doorway. But it must be proportionally the same, width to length.
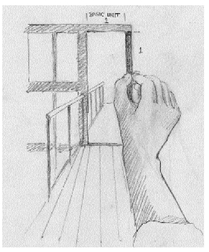
Fig. 8-14. “. . . to one . . .”
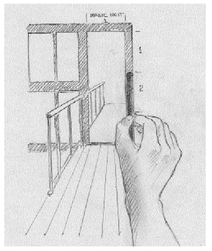
Fig. 8-15. “. . . two . . .”
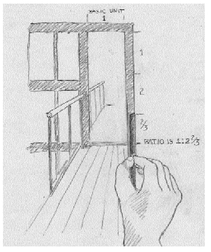
Fig. 8-16. “. . . and two-thirds.”

Fig. 8-17. Measure “One . . .”
Now, therefore, use your pencil and thumb to take a new measure: the width you have drawn on your paper (Figure 8-17). Then turn the pencil to vertical on your paper and measure off “One to one, two, and two-thirds” (Figures 8-18, 8-19, and 8-20). Make a mark and draw in the two sides of the doorway. The doorway you have just drawn has the same proportion—width to height—as the real doorway you were looking at.
To set this idea, draw a new “One,” smaller than the first one. Now, measure that width with your pencil and again mark off the proportional height. This doorway will be smaller, but it will be proportionally the same as your first drawing and the real doorway.
Summing up: In sighting proportions, you find out what the proportions are “out there” in the real world and then, holding the proportion in your mind as a ratio (your Basic Unit or “One”—in relation to something else), remeasure in the drawing to transfer the proportion to the drawing. Obviously, in drawings, sizes are almost always on a different scale (smaller or larger) than what we see “out there,” but the proportions are the same.

Other books
Friend & Foe by Shirley McKay
Shanghai Girls by Lisa See
Golden Ghost by Terri Farley
Lake Wobegon Days by Garrison Keillor
Training the Warrior by Jaylee Davis
Teaching Molly by Desiree Holt
Cheryl Reavis by Harrigans Bride
Between Friends by Cowen, Amanda
How to Learn a Foreign Language by Graham E. Fuller
Bare Your Soul by Rochelle Paige