Programming Python (74 page)

[
35
]
Animation techniques are covered at the end of this tour. As
a use case example, because you can embed other widgets in a
canvas’s drawing area, their coordinate system also makes them
ideal for implementing GUIs that let users design other GUIs by
dragging embedded widgets around on the canvas—a useful canvas
application we would explore in this book if I had a few hundred
pages to spare.
So far, we’ve mostly
been arranging widgets in displays by calling theirpackmethods—
an interface to the packer geometry
manager in tkinter. We’ve also used absolute coordinates in canvases,
which are a kind of layout scheme, too, but not a high-level managed one
like the packer. This section introducesgrid, the most commonly used alternative to the
packer. We previewed this alternative in
Chapter 8
when discussing input forms and
arranging image thumbnails. Here, we’ll study gridding in its full
form.
As we learned earlier, tkinter geometry managers work by arranging
child widgets within a parent container widget (parents are typicallyFramesor top-level windows). When we
ask a widget to pack or grid itself, we’re really asking its parent to
place it among its siblings. Withpack,
we provide constraints or sides and let the geometry manager lay out
widgets appropriately. Withgrid, we
arrange widgets in rows and columns in their parent, as though the parent
container widget was a table.
Gridding is an entirely distinct geometry management system in
tkinter. In fact, at this writing,packandgridare mutually exclusive for
widgets that have the same parent—within a given parent container, we can
either pack widgets or grid them, but we cannot do both. That makes sense,
if you realize that geometry managers do their jobs as parents, and a
widget can be arranged by only one geometry manager.
At least within
one container, though, that means you must pick eithergridorpackand stick with it. So why grid, then? In
general,gridis handy for displays
in which otherwise unrelated widgets must line up horizontally. This
includes both tabular displays and form-like displays; arranging input
fields in row/column grid fashion can be at least as easy as laying out
the display with nested frames.
As mentioned in the preceding chapter,
input
forms
are generally best arranged either as grids or as row
frames with fixed-width labels, so that labels and entry fields line up
horizontally as expected on all platforms (as we learned, column frames
don’t work reliably, because they may misalign rows). Although grids and
row frames are roughly the same amount of work, grids are useful if
calculating maximum label width is inconvenient. Moreover, grids also
apply to tables more complex than forms.
As we’ll see, though, for input forms,griddoesn’t offer substantial code or
complexity savings compared to equivalent packer solutions, especially
when things like resizability are added to the GUI picture. In other
words, the choice between the two layout schemes is often largely one of
style, not technology.
Let’s start off with
the basics;
Example 9-18
lays out a table ofLabelsandEntryfields—
widgets we’ve already met. Here,
though, they are arrayed on a grid.
Example 9-18. PP4E\Gui\Tour\Grid\grid1.py
from tkinter import *
colors = ['red', 'green', 'orange', 'white', 'yellow', 'blue']
r = 0
for c in colors:
Label(text=c, relief=RIDGE,  width=25).grid(row=r, column=0)
Entry(bg=c,   relief=SUNKEN, width=50).grid(row=r, column=1)
r += 1
mainloop()
Gridding assigns widgets to row and column numbers, which both
begin at number 0; tkinter uses these coordinates, along with widget
size in general, to lay out the container’s display automatically. This
is similar to the packer, except that rows and columns replace the
packer’s notion of sides and packing order.
When run, this script creates the window shown in
Figure 9-29
, pictured with
data typed into a few of the input fields. Once again, this book won’t
do justice to the colors displayed on the right, so you’ll have to
stretch your imagination a little (or run this script on a computer of
your own).
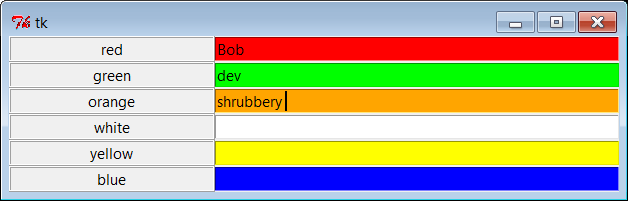
Figure 9-29. The grid geometry manager in pseudoliving color
Despite its colors, this is really just a classic
input
form
layout again, of the same kind we met in the prior
chapter. Labels on the left describe data to type into entry fields on
the right. Here, though, we achieve the layout with gridding instead of
packed frames.
Just for fun, this script displays color names on the left and the
entry field of the corresponding color on the right. It achieves its
table-like layout with these lines:
Label(...).grid(row=r, column=0)
Entry(...).grid(row=r, column=1)
From the perspective of the container window, the label is gridded
to column 0 in the current row number (a counter that starts at 0) and
the entry is placed in column 1. The upshot is that the grid system lays
out all the labels and entries in a two-dimensional table automatically,
with both evenly sized rows and evenly sized columns large enough to
hold the largest item in each column.
That is, because widgets are arranged by
both
row and column when gridded, they align properly in both dimensions.
Although packed row frames can achieve the same effect if labels are
fixed width (as we learned in
Chapter 8
), grids directly reflect the
structure of tabular displays; this includes input forms, as well as
larger tables in general. The next section illustrates this difference
in code.
Time for some
compare-and-contrast:
Example 9-19
implements the same
sort of
colorized
input form with
bothgridandpack, to make it easy to see the differences
between the two approaches.
Example 9-19. PP4E\Gui\Tour\Grid\grid2.py
"""
add equivalent pack window using row frames and fixed-width labels;
Labels and Entrys in packed column frames may not line up horizontally;
same length code, though enumerate built-in could trim 2 lines off grid;
"""
from tkinter import *
colors = ['red', 'green', 'orange', 'white', 'yellow', 'blue']
def gridbox(parent):
"grid by row/column numbers"
row = 0
for color in colors:
lab = Label(parent, text=color, relief=RIDGE,  width=25)
ent = Entry(parent, bg=color,   relief=SUNKEN, width=50)
lab.grid(row=row, column=0)
ent.grid(row=row, column=1)
ent.insert(0, 'grid')
row += 1
def packbox(parent):
"row frames with fixed-width labels"
for color in colors:
row = Frame(parent)
lab = Label(row, text=color, relief=RIDGE,  width=25)
ent = Entry(row, bg=color,   relief=SUNKEN, width=50)
row.pack(side=TOP)
lab.pack(side=LEFT)
ent.pack(side=RIGHT)
ent.insert(0, 'pack')
if __name__ == '__main__':
root = Tk()
gridbox(Toplevel())
packbox(Toplevel())
Button(root, text='Quit', command=root.quit).pack()
mainloop()
The pack version here uses row frames with fixed-width labels
(again, column frames can skew rows). The basic label and entry widgets
are created the same way by these two functions, but they are arranged
in very different ways:
With
pack, we usesideoptions to attach labels and rows on
the left and right, and create aFramefor each row (itself attached to the
parent’s current top).With
grid, we instead
assign each widget arowandcolumnposition in the implied
tabular grid of the parent, using options of the same name.
As we’ve learned, withpack,
the
packing order
can matter, too: a widget gets an
entire side of the remaining space (mostly irrelevant here), and items
packed first are clipped last (labels and topmost rows disappear last
here). Thegridalternative achieves
the same clipping effect by virtue of grid behavior. Running the script
makes the windows in
Figure 9-30
—one window for each
scheme.
If you study this example closely, you’ll find that the difference
in the amount of code required for each layout scheme is roughly a wash,
at least in this simple form. Thepackscheme must create aFrameper row, but thegridscheme must keep track of the current row
number.
In fact, both schemes require the same number of code lines as
shown, though to be fair we could shave one line from each by packing or
gridding the label immediately, and could shave two more lines from the
grid layout by using the built-inenumeratefunction to avoid manual counting.
Here’s a minimalist’s version of the grid box function for
reference:
def gridbox(parent):
for (row, color) in enumerate(colors):
Label(parent, text=color, relief=RIDGE,  width=25).grid(row=row, column=0)
ent = Entry(parent, bg=color, relief=SUNKEN, width=50)
ent.grid(row=row, column=1)
ent.insert(0, 'grid')
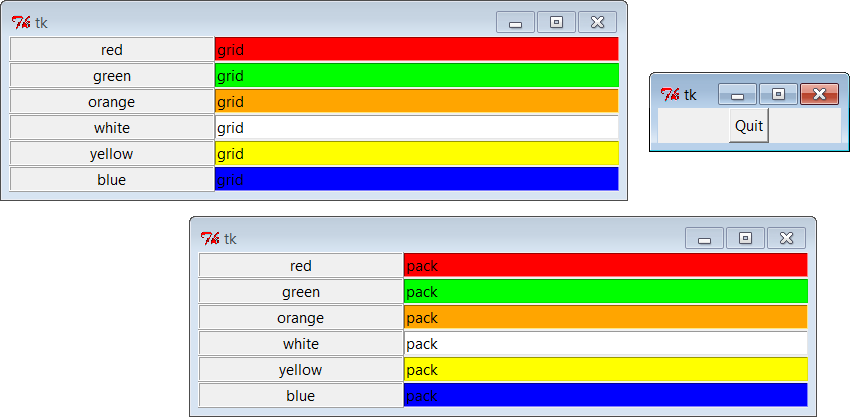
Figure 9-30. Equivalent grid and pack windows
We’ll leave further code compaction to the more serious sports
fans in the audience (this code isn’t too horrific, but making your code
concise in general is not always in your coworkers’ best interest!).
Irrespective of coding tricks, the complexity of packing and gridding
here seems similar. As we’ll see later, though, gridding can require
more code when widget resizing is factored into the
mix.
Notice that the
prior section’s
Example 9-19
passes a brand-newToplevelto each form constructor
function so that thegridandpackversions wind up in distinct
top-level windows. Because the two geometry managers are mutually
exclusive within a given parent container, we have to be careful not to
mix them improperly. For instance,
Example 9-20
is able to put both
the packed and the gridded widgets on the same window, but only by
isolating each in its ownFramecontainer widget.
Example 9-20. PP4E\Gui\Tour\Grid\grid2-same.py
"""
build pack and grid forms on different frames in same window;
can't grid and pack in same parent container (e.g., root window)
but can mix in same window if done in different parent frames;
"""
from tkinter import *
from grid2 import gridbox, packbox
root = Tk()
Label(root, text='Grid:').pack()
frm = Frame(root, bd=5, relief=RAISED)
frm.pack(padx=5, pady=5)
gridbox(frm)
Label(root, text='Pack:').pack()
frm = Frame(root, bd=5, relief=RAISED)
frm.pack(padx=5, pady=5)
packbox(frm)
Button(root, text='Quit', command=root.quit).pack()
mainloop()
When this runs we get a composite window with two forms that look
identical (
Figure 9-31
), but the
two nested frames are actually controlled by completely different
geometry managers.
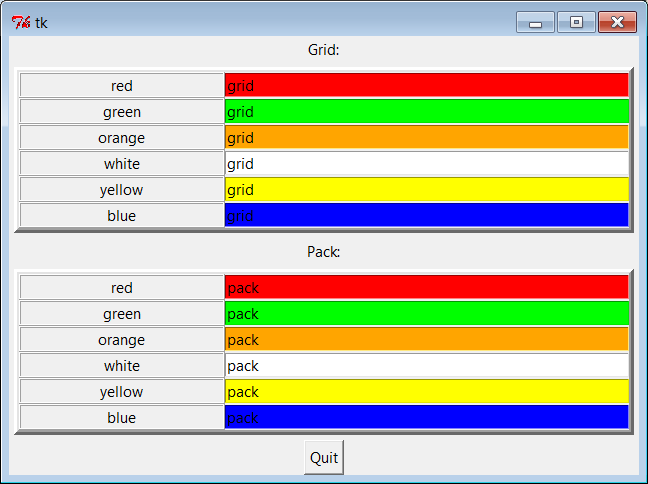
Figure 9-31. grid and pack in the same window
On the other hand, the sort of code in
Example 9-21
fails badly, because
it attempts to usepackandgridwithin the same parent—only one geometry
manager can be used on any one parent.
Example 9-21. PP4E\Gui\Tour\Grid\grid2-fails.py
"""
FAILS-- can't grid and pack in same parent container (here, root window)
"""
from tkinter import *
from grid2 import gridbox, packbox
root = Tk()
gridbox(root)
packbox(root)
Button(root, text='Quit', command=root.quit).pack()
mainloop()
This script passes the same parent (the top-level window) to each
function in an effort to make both forms appear in one window. It also
utterly hangs the Python process on my machine, without ever showing any
windows at all (on some versions of Windows, I’ve had to resort to
Ctrl-Alt-Delete to kill it; on others, the Command Prompt shell window
must sometimes be restarted altogether).
Geometry manager combinations can be subtle until you get the hang
of this. To make this example work, for instance, we simply need to
isolate the grid box in a parent container all its own to keep it away
from the packing going on in the root window—as in the following bold
alternative code:
root = Tk()
frm = Frame(root)
frm.pack()            # this works
gridbox(frm)          # gridbox must have its own parent in which to grid
packbox(root)
Button(root, text='Quit', command=root.quit).pack()
mainloop()
Again, today you must eitherpackorgridwithin one parent, but not both. It’s
possible that this restriction may be lifted in the future, but it’s
been a long-lived constraint, and it seems unlikely to be removed, given
the disparity in the two window manager schemes; try your Python to be
sure.