Programming Python (75 page)

And now, some
practical bits: the grids we’ve seen so far are fixed in
size; they do not grow when the enclosing window is resized by a user.
Example 9-22
implements an
unreasonably patriotic input form with bothgridandpackagain, but adds the configuration steps
needed to make all widgets in both windows expand along with their
window on a resize.
Example 9-22. PP4E\Gui\Tour\Grid\grid3.py
"add a label on the top and form resizing"
from tkinter import *
colors = ['red',  'white',  'blue']
def gridbox(root):
Label(root, text='Grid').grid(columnspan=2)
row = 1
for color in colors:
lab = Label(root, text=color, relief=RIDGE,  width=25)
ent = Entry(root, bg=color,   relief=SUNKEN, width=50)
lab.grid(row=row, column=0, sticky=NSEW)
ent.grid(row=row, column=1, sticky=NSEW)
root.rowconfigure(row, weight=1)
row += 1
root.columnconfigure(0, weight=1)
root.columnconfigure(1, weight=1)
def packbox(root):
Label(root, text='Pack').pack()
for color in colors:
row = Frame(root)
lab = Label(row, text=color, relief=RIDGE,  width=25)
ent = Entry(row, bg=color,   relief=SUNKEN, width=50)
row.pack(side=TOP,   expand=YES, fill=BOTH)
lab.pack(side=LEFT,  expand=YES, fill=BOTH)
ent.pack(side=RIGHT, expand=YES, fill=BOTH)
root = Tk()
gridbox(Toplevel(root))
packbox(Toplevel(root))
Button(root, text='Quit', command=root.quit).pack()
mainloop()
When run, this script makes the scene in
Figure 9-32
. It builds distinct
pack and grid windows again, with entry fields on the right colored red,
white, and blue (or for readers not working along on a computer, gray,
white, and a marginally darker gray).
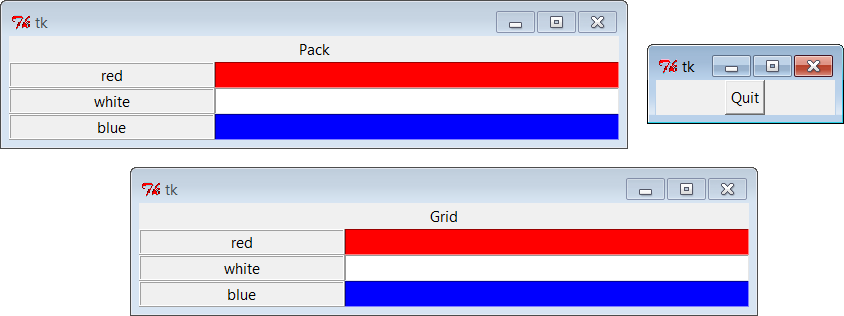
Figure 9-32. grid and pack windows before resizing
This time, though, resizing both windows with mouse drags makes
all their embedded labels and entry fields expand along with the parent
window, as we see in
Figure 9-33
(with text typed into the form).
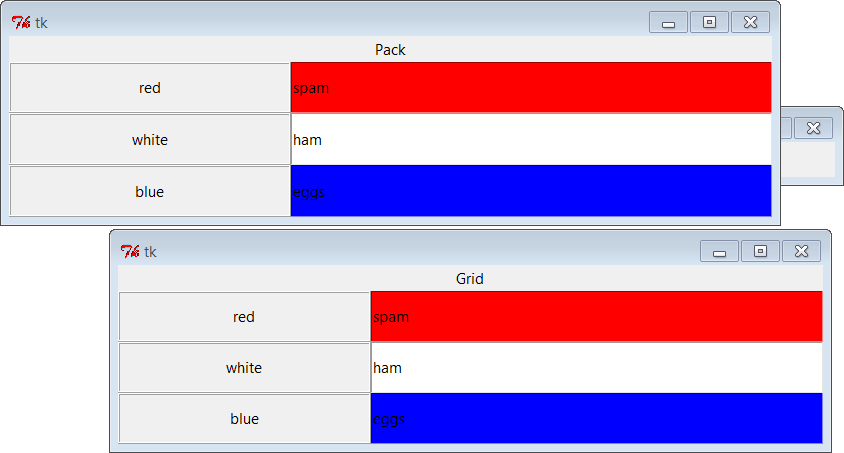
Figure 9-33. grid and pack windows resized
As coded, shrinking the pack window clips items packed last;
shrinking the grid window shrinks all labels and entries together unlikegrid2’s default behavior (try this on
your own).
Now that I’ve shown you
what these windows do, I need to explain how they do it.
We learned in
Chapter 7
how to make
widgets expand withpack: we useexpandandfilloptions to increase space allocations
and stretch into them, respectively. To make expansion work for
widgets arranged bygrid, we need
to use different protocols. Rows and columns must be marked with a
weight
to make them expandable, and widgets must
also be made
sticky
so that they are stretched
within their allocated grid cell:
- Heavy rows and columns
With
pack, we make each
row expandable by making the correspondingFrameexpandable, withexpand=YESandfill=BOTH. Gridders must be a bit more
specific: to get full expandability, call the grid container’srowconfiguremethod for each
row and itscolumnconfigurefor each column. To both methods, pass a weight option with a
value greater than zero to enable rows and columns to expand.
Weight defaults to zero (which means no expansion), and the grid
container in this script is just the top-level window. Using
different weights for different rows and columns makes them grow
at proportionally different rates.- Sticky widgets
With
pack, we usefilloptions to stretch
widgets to fill their allocated space horizontally or
vertically, andanchoroptions to position widgets within their allocated space. Withgrid, thestickyoption serves the roles of bothfillandanchorin the packer. Gridded widgets
can optionally be made sticky on one side of their allocated
cell space (such asanchor)
or on more than one side to make them stretch (such asfill). Widgets can be made sticky in
four directions—N,S,E, andW, and concatenations of these letters
specify multiple-side stickiness. For instance, a sticky setting
ofWleft justifies the
widget in its allocated space (such as a packeranchor=W), andNSstretches the widget vertically
within its allocated space (such as a packerfill=Y).Widget stickiness hasn’t been useful in examples thus far
because the layouts were regularly sized (widgets were no
smaller than their allocated grid cell space), and resizes
weren’t supported at all. Here, though,
Example 9-22
specifiesNSEWstickiness to make
widgets stretch in all directions with their allocated
cells.
Different combinations of row and column weights and sticky
settings generate different resize effects. For instance, deleting thecolumnconfiglines in thegrid3script makes the display expand
vertically but not horizontally. Try changing some of these settings
yourself to see the sorts of effects they produce.
There is one
other big difference in how thegrid3script configures its windows. Both
thegridand thepackwindows display a label on the top that
spans the entire window. For the packer scheme, we simply make a label
attached to the top of the window at large (remember,sidedefaults toTOP):
Label(root, text='Pack').pack()
Because this label is attached to the window’s top before any
row frames are, it appears across the entire window top as expected.
But laying out such a label takes a bit more work in the rigid world
of grids; the first line of the grid implementation function does it
like this:
Label(root, text='Grid').grid(columnspan=2)
To make a widget span across multiple columns, we passgridacolumnspanoption with a spanned-column
count. Here, it just specifies that the label at the top of the window
should stretch over the entire window—across both the label and the
entry columns. To make a widget span across multiple rows, pass arowspanoption instead. The regular
layouts of grids can be either an asset or a liability, depending on
how regular your user interface will be; these two span settings let
you specify exceptions to the rule when needed.
So which geometry manager comes out on top here? When resizing
is factored in, as in the script in
Example 9-22
, gridding actually
becomes slightly more complex; in fact, gridding requires three extra
lines of code. On the other hand,enumeratecould again make the race close,gridis still convenient for simple
forms, and your grids and packs may
vary.
For more on input form layout, stay tuned for the form builder
utilities we’ll code near the end of
Chapter 12
and use again in
Chapter 13
, when developing a file transfer
and FTP client user interface. As we’ll see, doing forms well once
allows us to skip the details later. We’ll also use more custom form
layout code in the PyEdit program’s change dialog in
Chapter 11
, and the PyMailGUI example’s
email header fields in
Chapter 14
.
So far, we’ve been
building two-column arrays of labels and input fields.
That’s typical of input forms, but the tkinter grid manager is capable
of configuring much grander matrixes. For instance,
Example 9-23
builds a five-row by
four-column array of labels, where each label simply displays its row
and column number (row.col). When
run, the window in
Figure 9-34
appears on-screen.
Example 9-23. PP4E\Gui\Tour\Grid\grid4.py
# simple 2D table, in default Tk root window
from tkinter import *
for i in range(5):
for j in range(4):
lab = Label(text='%d.%d' % (i, j), relief=RIDGE)
lab.grid(row=i, column=j, sticky=NSEW)
mainloop()
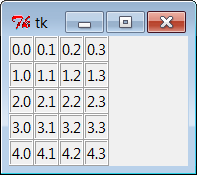
Figure 9-34. A 5 × 4 array of coordinate labels
If you think this is starting to look like it might be a way to
program spreadsheets, you may be on to something.
Example 9-24
takes this idea a bit
further and adds a button that prints the table’s current input field
values to thestdoutstream (usually,
to the console window).
Example 9-24. PP4E\Gui\Tour\Grid\grid5.py
# 2D table of input fields, default Tk root window
from tkinter import *
rows = []
for i in range(5):
cols = []
for j in range(4):
ent = Entry(relief=RIDGE)
ent.grid(row=i, column=j, sticky=NSEW)
ent.insert(END, '%d.%d' % (i, j))
cols.append(ent)
rows.append(cols)
def onPress():
for row in rows:
for col in row:
print(col.get(), end=' ')
print()
Button(text='Fetch', command=onPress).grid()
mainloop()
When run, this script creates the window in
Figure 9-35
and saves away all the grid’s
entry field widgets in a two-dimensional list of lists. When its Fetch
button is pressed, the script steps through the saved list of lists of
entry widgets, to fetch and display all the current values in the grid.
Here is the output of two Fetch presses—one before I made input field
changes, and one after:
C:\...\PP4E\Gui\Tour\Grid>python grid5.py0.0 0.1 0.2 0.3
1.0 1.1 1.2 1.3
2.0 2.1 2.2 2.3
3.0 3.1 3.2 3.3
4.0 4.1 4.2 4.3
0.0 0.1 0.2 42
1.0 1.1 1.2 43
2.0 2.1 2.2 44
3.0 3.1 3.2 45
4.0 4.1 4.2 46
Now that we know how to build and step through arrays of input
fields, let’s add a few more useful buttons.
Example 9-25
adds another row to
display column sums and adds buttons to clear all fields to zero and
calculate column sums.
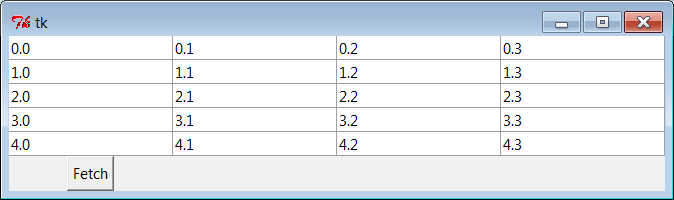
Figure 9-35. A larger grid of input fields
Example 9-25. PP4E\Gui\Tour\Grid\grid5b.py
# add column sums, clearing
from tkinter import *
numrow, numcol = 5, 4
rows = []
for i in range(numrow):
cols = []
for j in range(numcol):
ent = Entry(relief=RIDGE)
ent.grid(row=i, column=j, sticky=NSEW)
ent.insert(END, '%d.%d' % (i, j))
cols.append(ent)
rows.append(cols)
sums = []
for i in range(numcol):
lab = Label(text='?', relief=SUNKEN)
lab.grid(row=numrow, column=i, sticky=NSEW)
sums.append(lab)
def onPrint():
for row in rows:
for col in row:
print(col.get(), end=' ')
print()
print()
def onSum():
tots = [0] * numcol
for i in range(numcol):
for j in range(numrow):
tots[i] += eval(rows[j][i].get())        # sum column
for i in range(numcol):
sums[i].config(text=str(tots[i]))            # display in GUI
def onClear():
for row in rows:
for col in row:
col.delete('0', END)
col.insert(END, '0.0')
for sum in sums:
sum.config(text='?')
import sys
Button(text='Sum',   command=onSum).grid(row=numrow+1, column=0)
Button(text='Print', command=onPrint).grid(row=numrow+1, column=1)
Button(text='Clear', command=onClear).grid(row=numrow+1, column=2)
Button(text='Quit',  command=sys.exit).grid(row=numrow+1, column=3)
mainloop()
Figure 9-36
shows this script at work
summing up four columns of numbers; to get a different-size table,
change thenumrowandnumcolvariables at the top of the
script.
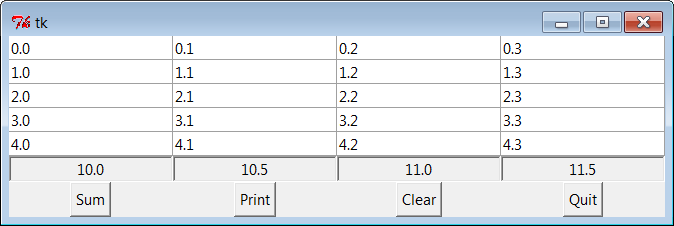
Figure 9-36. Adding column sums
And finally,
Example 9-26
is one last extension
that is coded as a class for reusability, and it adds a button to load
the table’s data from a file. Data files are assumed to be coded as one
line per row, with whitespace (spaces or tabs) between each column
within a row line. Loading a file of data automatically resizes the
table GUI to accommodate the number of columns in the table based upon
the file’s content.
Example 9-26. PP4E\Gui\Tour\Grid\grid5c.py
# recode as an embeddable class
from tkinter import *
from tkinter.filedialog import askopenfilename
from PP4E.Gui.Tour.quitter import Quitter          # reuse, pack, and grid
class SumGrid(Frame):
def __init__(self, parent=None, numrow=5, numcol=5):
Frame.__init__(self, parent)
self.numrow = numrow                       # I am a frame container
self.numcol = numcol                       # caller packs or grids me
self.makeWidgets(numrow, numcol)           # else only usable one way
def makeWidgets(self, numrow, numcol):
self.rows = []
for i in range(numrow):
cols = []
for j in range(numcol):
ent = Entry(self, relief=RIDGE)
ent.grid(row=i+1, column=j, sticky=NSEW)
ent.insert(END, '%d.%d' % (i, j))
cols.append(ent)
self.rows.append(cols)
self.sums = []
for i in range(numcol):
lab = Label(self, text='?', relief=SUNKEN)
lab.grid(row=numrow+1, column=i, sticky=NSEW)
self.sums.append(lab)
Button(self, text='Sum',   command=self.onSum).grid(row=0, column=0)
Button(self, text='Print', command=self.onPrint).grid(row=0, column=1)
Button(self, text='Clear', command=self.onClear).grid(row=0, column=2)
Button(self, text='Load',  command=self.onLoad).grid(row=0, column=3)
Quitter(self).grid(row=0, column=4)    # fails: Quitter(self).pack()
def onPrint(self):
for row in self.rows:
for col in row:
print(col.get(), end=' ')
print()
print()
def onSum(self):
tots = [0] * self.numcol
for i in range(self.numcol):
for j in range(self.numrow):
tots[i] += eval(self.rows[j][i].get())        # sum current data
for i in range(self.numcol):
self.sums[i].config(text=str(tots[i]))
def onClear(self):
for row in self.rows:
for col in row:
col.delete('0', END)                          # delete content
col.insert(END, '0.0')                        # preserve display
for sum in self.sums:
sum.config(text='?')
def onLoad(self):
file = askopenfilename()
if file:
for row in self.rows:
for col in row: col.grid_forget()             # erase current gui
for sum in self.sums:
sum.grid_forget()
filelines   = open(file, 'r').readlines()         # load file data
self.numrow = len(filelines)                      # resize to data
self.numcol = len(filelines[0].split())
self.makeWidgets(self.numrow, self.numcol)
for (row, line) in enumerate(filelines):          # load into gui
fields = line.split()
for col in range(self.numcol):
self.rows[row][col].delete('0', END)
self.rows[row][col].insert(END, fields[col])
if __name__ == '__main__':
import sys
root = Tk()
root.title('Summer Grid')
if len(sys.argv) != 3:
SumGrid(root).pack()    # .grid() works here too
else:
rows, cols = eval(sys.argv[1]), eval(sys.argv[2])
SumGrid(root, rows, cols).pack()
mainloop()
Notice that this module’sSumGridclass is careful not to either grid or pack itself. In
order to be attachable to containers where other widgets are being
gridded or packed, it leaves its own geometry management ambiguous and
requires callers to pack or grid its instances. It’s OK for containers
to pick either scheme for their own children because they effectively
seal off the pack-or-grid choice. But attachable component classes that
aim to be reused under both geometry managers cannot manage themselves
because they cannot predict their parent’s policy.
This is a fairly long example that doesn’t say much else about
gridding or widgets in general, so I’ll leave most of it as suggested
reading and just show what it does.
Figure 9-37
shows the initial window created by
this script after changing the last column and requesting a sum; make
sure the directory containing the PP4E examples root is on your module
search path (e.g., PYTHONPATH) for the package import.
By default, the class makes the 5 × 5 grid here, but we can pass
in other dimensions to both the class constructor and the script’s
command line. When you press the Load button, you get the standard file
selection dialog we met earlier on this tour
(
Figure 9-38
).
The datafile
grid-data1.txt
contains seven
rows and six columns of data:
C:\...\PP4E\Gui\Tour\Grid>type grid5-data1.txt1 2 3 4 5 6
1 2 3 4 5 6
1 2 3 4 5 6
1 2 3 4 5 6
1 2 3 4 5 6
1 2 3 4 5 6
1 2 3 4 5 6
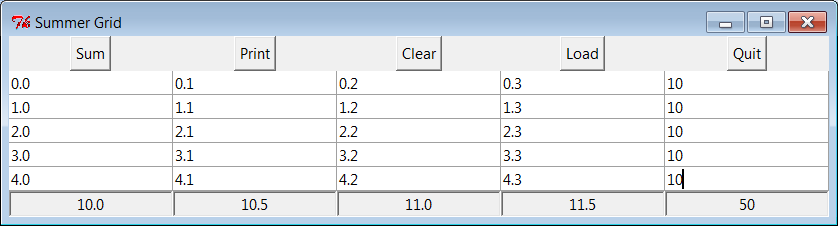
Figure 9-37. Adding datafile loads
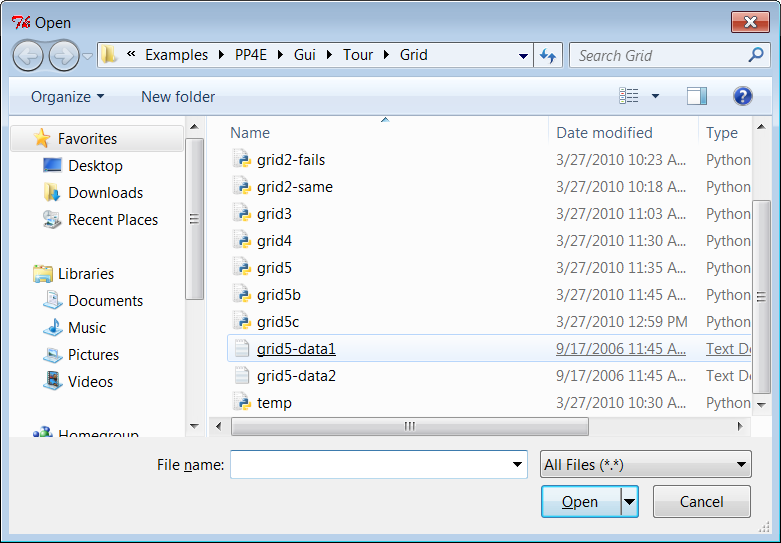
Figure 9-38. Opening a data file for SumGrid