Programming Python (73 page)

At the end of
Chapter 8
, we
looked at a collection of scripts that display thumbnail
image links for all photos in a directory. There, we noted that
scrolling is a major requirement for large photo collections. Now that
we know about canvases and scrollbars, we can finally put them to work
to implement this much-needed extension, and conclude the image viewer
story we began in
Chapter 8
(well,
almost).
Example 9-15
is a
mutation of the last chapter’s code, which displays thumbnails in a
scrollable canvas. See the prior chapter for more details on its
operation, including theImageTkmodule
imported from the required Python Imaging Library (PIL)
third-party extension (needed for thumbnails and JPEG
images).
In fact, to fully understand
Example 9-15
, you must also refer
to
Example 8-45
, since we’re
reusing that module’s thumbnail creator and photo viewer tools. Here, we
are just adding a canvas, positioning the fixed-size thumbnail buttons
at absolute coordinates in the canvas, and computing the scrollable size
using concepts outlined in the prior section. Both horizontal and
vertical scrollbars allow us to move through the canvas of image buttons
freely, regardless of how many there may be.
Example 9-15. PP4E\Gui\PIL\viewer_thumbs_scrolled.py
"""
image viewer extension: uses fixed-size thumbnail buttons for uniform layout, and
adds scrolling for large image sets by displaying thumbs in a canvas widget with
scroll bars;  requires PIL to view image formats such as JPEG, and reuses thumbs
maker and single photo viewer in viewer_thumbs.py;  caveat/to do: this could also
scroll popped-up images that are too large for the screen, and are cropped on
Windows as is;  see PyPhoto later in Chapter 11 for a much more complete version;
"""
import sys, math
from tkinter import *
from PIL.ImageTk import PhotoImage
from viewer_thumbs import makeThumbs, ViewOne
def viewer(imgdir, kind=Toplevel, numcols=None, height=300, width=300):
"""
use fixed-size buttons, scrollable canvas;
sets scrollable (full) size, and places thumbs at absolute x,y
coordinates in canvas;  caveat: assumes all thumbs are same size
"""
win = kind()
win.title('Simple viewer: ' + imgdir)
quit = Button(win, text='Quit', command=win.quit, bg='beige')
quit.pack(side=BOTTOM, fill=X)
canvas = Canvas(win, borderwidth=0)
vbar = Scrollbar(win)
hbar = Scrollbar(win, orient='horizontal')
vbar.pack(side=RIGHT,  fill=Y)                  # pack canvas after bars
hbar.pack(side=BOTTOM, fill=X)                  # so clipped first
canvas.pack(side=TOP, fill=BOTH, expand=YES)
vbar.config(command=canvas.yview)               # call on scroll move
hbar.config(command=canvas.xview)
canvas.config(yscrollcommand=vbar.set)          # call on canvas move
canvas.config(xscrollcommand=hbar.set)
canvas.config(height=height, width=width)       # init viewable area size
# changes if user resizes
thumbs = makeThumbs(imgdir)                     # [(imgfile, imgobj)]
numthumbs = len(thumbs)
if not numcols:
numcols = int(math.ceil(math.sqrt(numthumbs)))  # fixed or N x N
numrows = int(math.ceil(numthumbs / numcols))       # 3.x true div
linksize = max(thumbs[0][1].size)                   # (width, height)
fullsize = (0, 0,                                   # upper left  X,Y
(linksize * numcols), (linksize * numrows) )    # lower right X,Y
canvas.config(scrollregion=fullsize)                # scrollable area size
rowpos = 0
savephotos = []
while thumbs:
thumbsrow, thumbs = thumbs[:numcols], thumbs[numcols:]
colpos = 0
for (imgfile, imgobj) in thumbsrow:
photo   = PhotoImage(imgobj)
link    = Button(canvas, image=photo)
handler = lambda savefile=imgfile: ViewOne(imgdir, savefile)
link.config(command=handler, width=linksize, height=linksize)
link.pack(side=LEFT, expand=YES)
canvas.create_window(colpos, rowpos, anchor=NW,
window=link, width=linksize, height=linksize)
colpos += linksize
savephotos.append(photo)
rowpos += linksize
return win, savephotos
if __name__ == '__main__':
imgdir = 'images' if len(sys.argv) < 2 else sys.argv[1]
main, save = viewer(imgdir, kind=Tk)
main.mainloop()
To see this program in action, make sure you’ve installed the PIL
extension described near the end of
Chapter 8
and launch the script from a
command line, passing the name of the image directory to be viewed as a
command-line argument:
...\PP4E\Gui\PIL>viewer_thumbs_scrolled.py C:\Users\mark\temp\101MSDCF
As before, clicking on a thumbnail image opens the corresponding
image at its full size in a new pop-up window.
Figure 9-25
shows the viewer at work on
a large directory copied from my digital camera; the initial run must
create and cache thumbnails, but later runs start quickly.
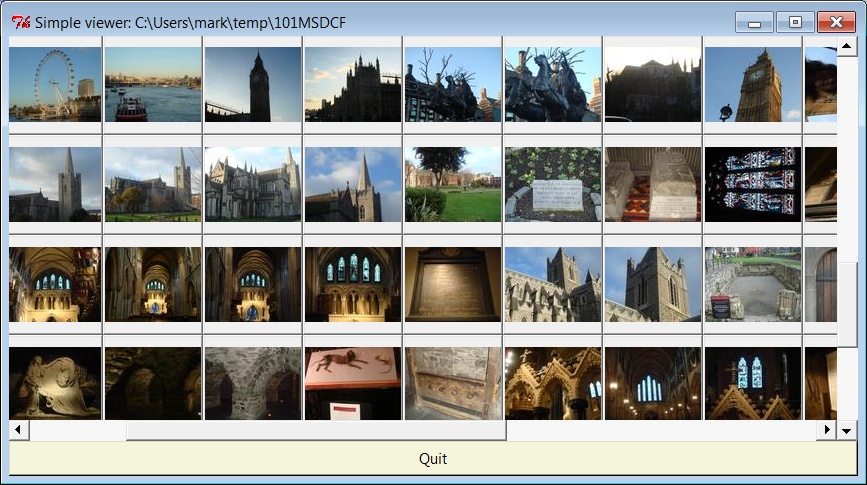
Figure 9-25. Scrolled thumbnail image viewer
Or simply run the script as is from a command line, by clicking
its file icon, or within IDLE—without command-line arguments, it
displays the contents of the default sample
images
subdirectory in the book’s source code tree, as captured in
Figure 9-26
.
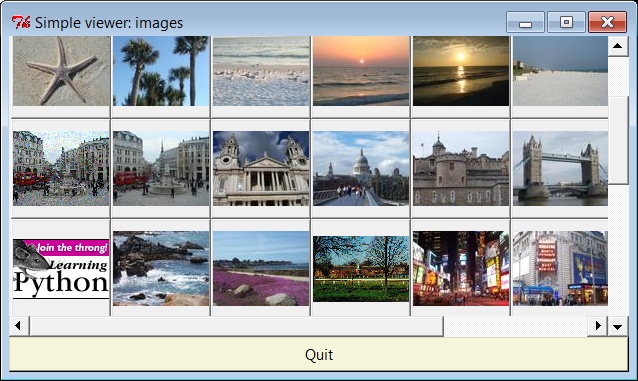
Figure 9-26. Displaying the default images directory
Despite its evolutionary twists,
the scrollable thumbnail viewer in
Example 9-15
still has one major
limitation remaining: images that are larger than the physical screen
are simply truncated on Windows when popped up. This becomes glaringly
obvious when opening large photos copied from a digital camera like
those in
Figure 9-25
. Moreover,
there is no way to resize images once opened, to open other
directories, and so on. It’s a fairly simplistic demonstration of
canvas programming.
In
Chapter 11
, we’ll learn how to
do better when we meet the PyPhoto example program. PyPhoto will
scroll the full size of images as well. In addition, it has tools for
a variety of resizing effects, and it supports saving images to files
and opening other image directories on the fly. At its core, though,
PyPhoto will reuse the techniques of our simple browser here, as well
as the thumbnail generation code we wrote in the prior chapter; much
like our simple text editor earlier in the chapter, the code here is
essentially a prototype for the more complete PyPhoto program we’ll
put together later in
Chapter 11
. Stay
tuned for the thrilling conclusion of the PyPhoto story (or flip ahead
now if the suspense is too much to bear).
For the purposes of this chapter, notice how in
Example 9-15
the thumbnail
viewer’s actions are associated with embedded button widgets, not with
the canvas itself. In fact, the canvas isn’t much but a display
device. To see how to enrich it with events of its own, let’s move on
to the next
section.
LikeTextandListbox, there is no
notion of a singlecommandcallback forCanvas. Instead, canvas programs generally use
other widgets (as we did with
Example 9-15
’s thumbnail buttons)
or the lower-levelbindcall to set
up handlers for mouse clicks, key presses, and the like (as we did for
Example 9-14
’s scrolling
canvas).
Example 9-16
takes
the latter approach further, showing how to bind additional events for
the canvas itself, in order to implement a few of the more common canvas
drawing operations.
Example 9-16. PP4E\Gui\Tour\canvasDraw.py
"""
draw elastic shapes on a canvas on drag, move on right click;
see canvasDraw_tags*.py for extensions with tags and animation
"""
from tkinter import *
trace = False
class CanvasEventsDemo:
def __init__(self, parent=None):
canvas = Canvas(width=300, height=300, bg='beige')
canvas.pack()
canvas.bind('', self.onStart)      # click
canvas.bind('',     self.onGrow)       # and drag
canvas.bind('',      self.onClear)      # delete all
canvas.bind('', self.onMove)       # move latest
self.canvas = canvas
self.drawn  = None
self.kinds = [canvas.create_oval, canvas.create_rectangle]
def onStart(self, event):
self.shape = self.kinds[0]
self.kinds = self.kinds[1:] + self.kinds[:1]      # start dragout
self.start = event
self.drawn = None
def onGrow(self, event):                              # delete and redraw
canvas = event.widget
if self.drawn: canvas.delete(self.drawn)
objectId = self.shape(self.start.x, self.start.y, event.x, event.y)
if trace: print(objectId)
self.drawn = objectId
def onClear(self, event):
event.widget.delete('all')                        # use tag all
def onMove(self, event):
if self.drawn:                                    # move to click spot
if trace: print(self.drawn)
canvas = event.widget
diffX, diffY = (event.x - self.start.x), (event.y - self.start.y)
canvas.move(self.drawn, diffX, diffY)
self.start = event
if __name__ == '__main__':
CanvasEventsDemo()
mainloop()
This script intercepts and processes three mouse-controlled
actions:
- Clearing the canvas
To erase everything
on the canvas, the script binds the double
left-click event to run the canvas’sdeletemethod with thealltag—again, a built-in tag that
associates every object on the screen. Notice that theCanvaswidget clicked is available in
the event object passed in to the callback handler (it’s also
available asself.canvas).- Dragging out object shapes
Pressing the left
mouse button and dragging (moving it while the
button is still pressed) creates a rectangle or oval shape as you
drag. This is often called dragging out an object—the shape grows
and shrinks in an elastic rubber-band fashion as you drag the
mouse and winds up with a final size and location given by the
point where you release the mouse button.To make this work in tkinter, all you need to do is delete
the old shape and draw another as each drag event fires; both
delete and draw operations are fast enough to achieve the elastic
drag-out effect. Of course, to draw a shape to the current mouse
location, you need a starting point; to delete before a redraw,
you also must remember the last drawn object’s identifier. Two
events come into play: the initial button press event saves the
start coordinates (really, the initial press event object, which
contains the start coordinates), and mouse movement events erase
and redraw from the start coordinates to the new mouse coordinates
and save the new object ID for the next event’s erase.- Object moves
When you
click the right mouse button (button 3), the script
moves the most recently drawn object to the spot you clicked in a
single step. Theeventargument
gives the (X,Y) coordinates of the spot clicked, and we subtract
the saved starting coordinates of the last drawn object to get the
(X,Y) offsets to pass to the canvasmovemethod (again,movedoes not take positions). Remember
to scale event coordinates first if your canvas is
scrolled.
The net result creates a window like that shown in
Figure 9-27
after user
interaction. As you drag out objects, the script alternates between
ovals and rectangles; set the script’straceglobal to watch object identifiers
scroll onstdoutas new objects are
drawn during a drag. This screenshot was taken after a few object
drag-outs and moves, but you’d never tell from looking at it; run this
example on your own computer to get a better feel for the operations it
supports.
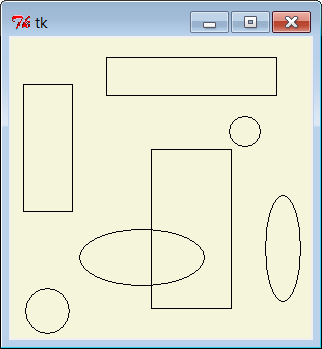
Figure 9-27. canvasDraw after a few drags and moves
Much like we
did for theTextwidget, it is also possible to bind events for one or more specific
objects drawn on aCanvaswith
itstag_bindmethod.
This call accepts either a tag name string or an object ID in its
first argument. For instance, you can register a different callback
handler for mouse clicks on every drawn item or on any in a group of
drawn and tagged items, rather than for the entire canvas at large.
Example 9-17
binds a
double-click handler on both the canvas itself and on two specific
text items within it, to illustrate the interfaces. It generates
Figure 9-28
when run.
Example 9-17. PP4E\Gui\Tour\canvas-bind.py
# bind events on both canvas and its items
from tkinter import *
def onCanvasClick(event):
print('Got canvas click', event.x, event.y, event.widget)
def onObjectClick(event):
print('Got object click', event.x, event.y, event.widget, end=' ')
print(event.widget.find_closest(event.x, event.y))  # find text object's ID
root = Tk()
canv = Canvas(root, width=100, height=100)
obj1 = canv.create_text(50, 30, text='Click me one')
obj2 = canv.create_text(50, 70, text='Click me two')
canv.bind('', onCanvasClick)                  # bind to whole canvas
canv.tag_bind(obj1, '', onObjectClick)        # bind to drawn item
canv.tag_bind(obj2, '', onObjectClick)        # a tag works here too
canv.pack()
root.mainloop()
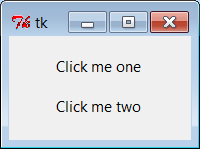
Figure 9-28. Canvas-bind window
Object IDs are passed totag_bindhere, but a tag name string would
work too, and would allow you to associate multiple canvas objects as
a group for event purposes. When you click outside the text items in
this script’s window, the canvas event handler fires; when either text
item is clicked, both the canvas and the text object handlers fire.
Here is thestdoutresult after
clicking on the canvas twice and on each text item once; the script
uses the canvasfind_closestmethod
to fetch the object ID of the particular text item clicked (the one
closest to the click spot):
C:\...\PP4E\Gui\Tour>python canvas-bind.pyGot canvas click 3 6 .8217952
canvas clicks
Got canvas click 46 52 .8217952
Got object click 51 33 .8217952 (1,)
first text click
Got canvas click 51 33 .8217952
Got object click 55 69 .8217952 (2,)
second text click
Got canvas click 55 69 .8217952
We’ll revisit the notion of events bound to canvases in the
PyDraw example in
Chapter 11
, where
we’ll use them to implement a feature-rich paint and motion program.
We’ll also return to thecanvasDrawscript later in this chapter, to add tag-based moves and simple
animation with time-based tools, so keep this page bookmarked for
reference. First, though, let’s follow a promising side road to
explore another way to lay out widgets within windows—the gridding
layout
model.