Programming Python (66 page)

Gridding helps—
rows and columns align regularly now—but image shape
still makes this less than ideal. We can achieve a layout that is
perhaps even more uniform than gridding by giving each thumbnail
button a fixed size. Buttons are sized to their images (or text) by
default, but we can always override this if needed.
Example 8-48
does the trick. It
sets the height and width of each button to match the maximum
dimension of the thumbnail icon, so it is neither too thin nor too
high. Assuming all thumbnails have the same maximum dimension
(something our thumb-maker ensures), this will achieve the desired
layout.
Example 8-48. PP4E\Gui\PIL\viewer-thumbs-fixed.py
"""
use fixed size for thumbnails, so align regularly; size taken from image
object, assume all same max; this is essentially what file selection GUIs do;
"""
import sys, math
from tkinter import *
from PIL.ImageTk import PhotoImage
from viewer_thumbs import makeThumbs, ViewOne
def viewer(imgdir, kind=Toplevel, cols=None):
"""
custom version that lays out with fixed-size buttons
"""
win = kind()
win.title('Viewer: ' + imgdir)
thumbs = makeThumbs(imgdir)
if not cols:
cols = int(math.ceil(math.sqrt(len(thumbs))))      # fixed or N x N
savephotos = []
while thumbs:
thumbsrow, thumbs = thumbs[:cols], thumbs[cols:]
row = Frame(win)
row.pack(fill=BOTH)
for (imgfile, imgobj) in thumbsrow:
size    = max(imgobj.size)                     # width, height
photo   = PhotoImage(imgobj)
link    = Button(row, image=photo)
handler = lambda savefile=imgfile: ViewOne(imgdir, savefile)
link.config(command=handler, width=size, height=size)
link.pack(side=LEFT, expand=YES)
savephotos.append(photo)
Button(win, text='Quit', command=win.quit, bg='beige').pack(fill=X)
return win, savephotos
if __name__ == '__main__':
imgdir = (len(sys.argv) > 1 and sys.argv[1]) or 'images'
main, save = viewer(imgdir, kind=Tk)
main.mainloop()
Figure 8-48
shows the results of applying a fixed size to our buttons; all are the
same size now, using a size taken from the images themselves. The
effect is to display all thumbnails as same-size tiles regardless of
their shape, so they are easier to view. Naturally, other layout
schemes are possible as well; experiment with some of the
configuration options in this code on your own to see their effect on
the display.
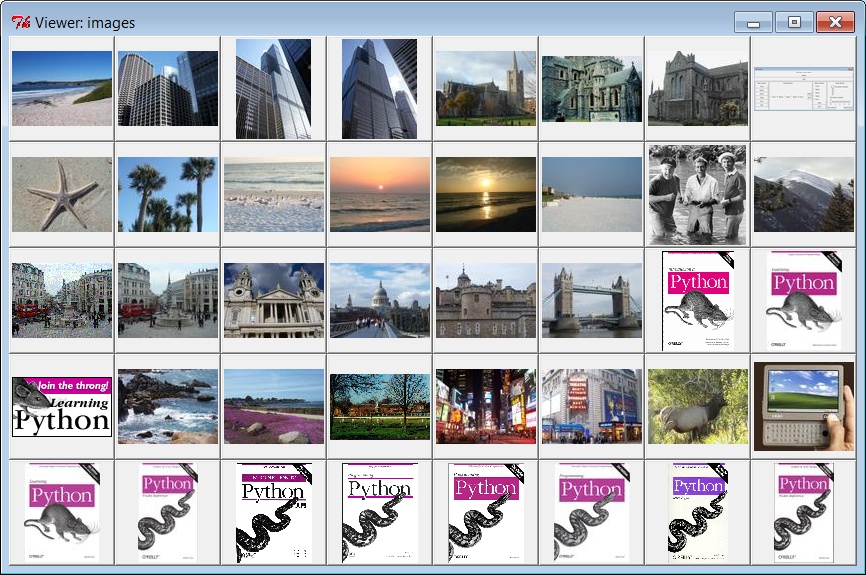
Figure 8-48. Fixed-size thumbnail selection GUI, row frames
The thumbnail viewer scripts presented in this section work well
for reasonably sized image directories, and you can use smaller
thumbnail size settings for larger image collections. Perhaps the
biggest limitation of these programs, though, is that the thumbnail
windows they create will become too large to handle (or display at
all) if the image directory contains very many files.
Even with the sample images directory used for this book, we
lost the Quit button at the bottom of the display in the last two
figures because there are too many thumbnail images to show. To
illustrate the difference, the original
Example 8-45
packs the Quit
button first for this very reason—so it is clipped last, after all
thumbnails, and thus remains visible when there are many photos. We
could do a similar thing for the other versions, but we’d still lose
thumbnails if there were too many. A directory from your camera with
many images might similarly produce a window too large to fit on your
computer’s screen.
To do better, we could arrange the thumbnails on a widget that
supports
scrolling
. The open source
Pmw package includes a handy scrolled frame that may
help. Moreover, the standard tkinterCanvaswidget gives us more control over image displays
(including placement by absolute pixel coordinates) and supports
horizontal and vertical scrolling of its content.
In fact, in the next chapter, we’ll code one final extension to
our script which does just that—it displays thumbnails in a scrolled
canvas, and so it handles large collections much better. Its thumbnail
buttons are fixed-size as in our last example here, but are positioned
at computed coordinates. I’ll defer further details here, though,
because we’ll study that extension in conjunction with canvases in the
next chapter. And in
Chapter 11
, we’ll
apply this technique to an even more full-featured image program
called PyPhoto.
To learn how these programs do their jobs, though, we need to
move on to the next chapter, and the second
half of our widget tour.
This chapter is the second in a two-part tour of the tkinter
library. It picks up where
Chapter 8
left off and covers some of the more advanced widgets and tools in the
tkinter arsenal. Among the topics presented in this chapter:
Menu,Menubutton, andOptionMenuwidgetsThe
Scrollbarwidget: for
scrolling text, lists, and canvasesThe
Listboxwidget: a list of
multiple selectionsThe
Textwidget: a general
text display and editing toolThe
Canvaswidget: a general
graphical drawing toolThe
gridtable-based geometry
managerTime-based tools:
after,update,wait, and threadsBasic tkinter animation techniques
Clipboards, erasing widgets and windows, and so on
By the time you’ve finished this chapter, you will have seen the
bulk of the tkinter library, and you will have all the information you
need to compose larger, portable user interfaces of your own. You’ll also
be ready to tackle the larger GUI techniques and more complete examples
presented in Chapters
10
and
11
. For
now, let’s resume the widget show.
Menus
are the pull-down lists you’re accustomed to seeing at the
top of a window (or the entire display, if you’re accustomed to seeing
them that way on a Macintosh). Move the mouse cursor to the menu bar at
the top and click on a name (e.g., File), and a list of selectable options
pops up under the name you clicked (e.g., Open, Save). The options within
a menu might trigger actions, much like clicking on a button; they may
also open other “cascading” submenus that list more options, pop up dialog
windows, and so on. In tkinter, there are two kinds of menus you can add
to your scripts: top-level window menus and frame-based menus. The former
option is better suited to whole windows, but the latter also works as a
nested component.
In all recent
Python releases (using Tk 8.0 and later), you can
associate a horizontal menu bar with a top-level window object (e.g., aTkorToplevel). On Windows and Unix (X Windows),
this menu bar is displayed along the top of the window; on some
Macintosh machines, this menu replaces the one shown at the top of the
screen when the window is selected. In other words, window menus look
like you would expect on whatever underlying platform your script runs
upon.
This scheme is based on building trees ofMenuwidget objects. Simply associate one
top-levelMenuwith the window, add
other pull-downMenuobjects as
cascades of the top-levelMenu, and
add entries to each of the pull-down objects.Menus are cross-linked with the next higher
level, by using parent widget arguments and theMenuwidget’sadd_cascademethod. It works like
this:
Create a topmost
Menuas
the child of the window widget and configure the window’smenuattribute to be the newMenu.For each pull-down object, make a new
Menuas the child of the topmostMenuand add the child as a cascade of the
topmostMenuusingadd_cascade.Add menu selections to each pull-down
Menufrom step 2, using thecommandoptions ofadd_commandto register selection callback
handlers.Add a cascading submenu by making a new
Menuas the child of theMenuthe cascade extends and usingadd_cascadeto link the parent to
the child.
The end result is a tree ofMenuwidgets with associatedcommandcallback handlers. This is probably
simpler in code than in words, though.
Example 9-1
makes a main menu
with two pull downs, File and Edit; the Edit pull down in turn has a
nested submenu of its own.
Example 9-1. PP4E\Gui\Tour\menu_win.py
# Tk8.0 style top-level window menus
from tkinter import *                              # get widget classes
from tkinter.messagebox import *                   # get standard dialogs
def notdone():
showerror('Not implemented', 'Not yet available')
def makemenu(win):
top = Menu(win)                                # win=top-level window
win.config(menu=top)                           # set its menu option
file = Menu(top)
file.add_command(label='New...',  command=notdone,  underline=0)
file.add_command(label='Open...', command=notdone,  underline=0)
file.add_command(label='Quit',    command=win.quit, underline=0)
top.add_cascade(label='File',     menu=file,        underline=0)
edit = Menu(top, tearoff=False)
edit.add_command(label='Cut',     command=notdone,  underline=0)
edit.add_command(label='Paste',   command=notdone,  underline=0)
edit.add_separator()
top.add_cascade(label='Edit',     menu=edit,        underline=0)
submenu = Menu(edit, tearoff=True)
submenu.add_command(label='Spam', command=win.quit, underline=0)
submenu.add_command(label='Eggs', command=notdone,  underline=0)
edit.add_cascade(label='Stuff',   menu=submenu,     underline=0)
if __name__ == '__main__':
root = Tk()                                        # or Toplevel()
root.title('menu_win')                             # set window-mgr info
makemenu(root)                                     # associate a menu bar
msg = Label(root, text='Window menu basics')       # add something below
msg.pack(expand=YES, fill=BOTH)
msg.config(relief=SUNKEN, width=40, height=7, bg='beige')
root.mainloop()
A lot of code in this file is devoted to setting callbacks and
such, so it might help to isolate the bits involved with the menu
tree-building process. For the File menu, it’s done like this:
top = Menu(win)                            # attach Menu to window
win.config(menu=top)                       # cross-link window to menu
file = Menu(top)                           # attach a Menu to top Menu
top.add_cascade(label='File', menu=file)   # cross-link parent to child
Apart from building up the menu object tree, this script also
demonstrates some of the most common menu configuration options:
- Separator lines
The script makes a separator in the Edit menu with
add_separator; it’s just a line used to
set off groups of related entries.- Tear-offs
The script also disables menu tear-offs in the Edit pull
down by passing atearoff=Falsewidget option toMenu. Tear-offs are dashed lines that
appear by default at the top of tkinter menus and create a new
window containing the menu’s contents when clicked. They can be a
convenient shortcut device (you can click items in the tear-off
window right away, without having to navigate through menu trees),
but they are not widely used on all platforms.- Keyboard shortcuts
The script uses the
underlineoption to make a unique letter
in a menu entry a keyboard shortcut. It gives the offset of the
shortcut letter in the entry’s label string. On Windows, for
example, the Quit option in this script’s File menu can be
selected with the mouse but also by pressing Alt, then “f,” and
then “q.” You don’t strictly have to useunderline—on Windows, the first letter
of a pull-down name is a shortcut automatically, and arrow and
Enter keys can be used to select pull-down items. But explicit
keys can enhance usability in large menus; for instance, the key
sequence Alt-E-S-S runs the quit action in this script’s nested
submenu.
Let’s see what this translates to in the realm of the pixel.
Figure 9-1
shows the window
that first appears when this script is run on Windows 7 with my system
settings; it looks different, but similar, on Unix, Macintosh, and other
Windows configurations.
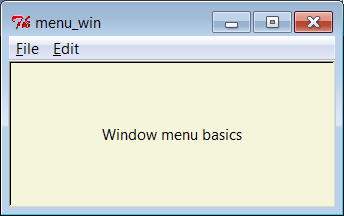
Figure 9-1. menu_win: a top-level window menu bar
Figure 9-2
shows the scene when
the File pull down is selected. Notice thatMenuwidgets are linked, not packed (or
gridded)—the geometry manager doesn’t really come into play here. If you
run this script, you’ll also notice that all of its menu entries either
quit the program immediately or pop up a “Not Implemented” standard
error dialog. This example is about menus, after all, but menu selection
callback handlers generally do more useful work in practice.
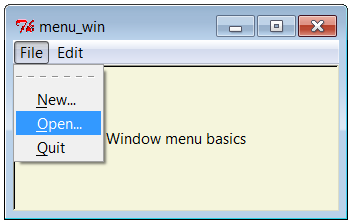
Figure 9-2. The File menu pull down
And finally,
Figure 9-3
shows what happens after clicking the File menu’s tear-off line and
selecting the cascading submenu in the Edit pull down. Cascades can be
nested as deep as you like (though your users probably won’t be happy if
this gets silly).
In tkinter, every top-level window can have a menu bar, including
pop ups you create with theToplevelwidget.
Example 9-2
makes
three pop-up windows with the same menu bar as the one we just met; when
run, it constructs the scene
in
Figure 9-4
.
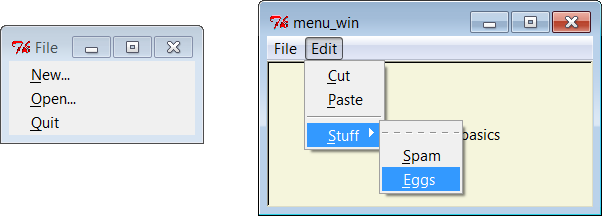
Figure 9-3. A File tear-off and Edit cascade
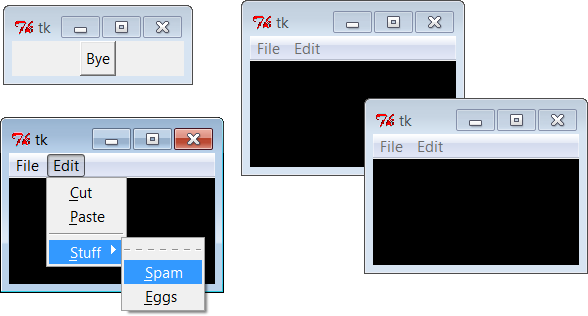
Figure 9-4. Multiple Toplevels with menus
Example 9-2. PP4E\Gui\Tour\menu_win-multi.py
from menu_win import makemenu       # reuse menu maker function
from tkinter import *
root = Tk()
for i in range(3):                  # three pop-up windows with menus
win = Toplevel(root)
makemenu(win)
Label(win, bg='black', height=5, width=25).pack(expand=YES, fill=BOTH)
Button(root, text="Bye", command=root.quit).pack()
root.mainloop()
Although these are less
commonly used for top-level windows, it’s also possible to
create a menu bar as a horizontalFrame. Before I show you how, though, let me
explain why you should care. Because this frame-based scheme doesn’t
depend on top-level window protocols, it can also be used to add menus
as nested components of larger displays. In other words, it’s not just
for top-level windows. For example,
Chapter 11
’s PyEdit text editor
can be used both as a program and as an attachable
component. We’ll use window menus to implement PyEdit selections when
PyEdit is run as a standalone program, but we’ll use frame-based menus
when PyEdit is embedded in the
PyMailGUI and PyView displays. Both schemes are worth
knowing.
Frame-based menus require a few more lines of code, but they
aren’t much more complex than window menus. To make one, simply packMenubuttonwidgets within aFramecontainer, associateMenuwidgets with theMenubuttons, and associate theFramewith the top of a container window.
Example 9-3
creates the
same menu as
Example 9-2
,
but using the frame-based approach.
Example 9-3. PP4E\Gui\Tour\menu_frm.py
# Frame-based menus: for top-levels and components
from tkinter import *                              # get widget classes
from tkinter.messagebox import *                   # get standard dialogs
def notdone():
showerror('Not implemented', 'Not yet available')
def makemenu(parent):
menubar = Frame(parent)                        # relief=RAISED, bd=2...
menubar.pack(side=TOP, fill=X)
fbutton = Menubutton(menubar, text='File', underline=0)
fbutton.pack(side=LEFT)
file = Menu(fbutton)
file.add_command(label='New...',  command=notdone,     underline=0)
file.add_command(label='Open...', command=notdone,     underline=0)
file.add_command(label='Quit',    command=parent.quit, underline=0)
fbutton.config(menu=file)
ebutton = Menubutton(menubar, text='Edit', underline=0)
ebutton.pack(side=LEFT)
edit = Menu(ebutton, tearoff=False)
edit.add_command(label='Cut',     command=notdone,     underline=0)
edit.add_command(label='Paste',   command=notdone,     underline=0)
edit.add_separator()
ebutton.config(menu=edit)
submenu = Menu(edit, tearoff=True)
submenu.add_command(label='Spam', command=parent.quit, underline=0)
submenu.add_command(label='Eggs', command=notdone,     underline=0)
edit.add_cascade(label='Stuff',   menu=submenu,        underline=0)
return menubar
if __name__ == '__main__':
root = Tk()                                        # or TopLevel or Frame
root.title('menu_frm')                             # set window-mgr info
makemenu(root)                                     # associate a menu bar
msg = Label(root, text='Frame menu basics')        # add something below
msg.pack(expand=YES, fill=BOTH)
msg.config(relief=SUNKEN, width=40, height=7, bg='beige')
root.mainloop()
Again, let’s isolate the linkage logic here to avoid getting
distracted by other details. For the File menu case, here is what this
boils down to:
menubar = Frame(parent)                     # make a Frame for the menubar
fbutton = Menubutton(menubar, text='File')  # attach a Menubutton to Frame
file    = Menu(fbutton)                     # attach a Menu to Menubutton
fbutton.config(menu=file)                   # crosslink button to menu
There is an extraMenubuttonwidget in this scheme, but it’s not much more complex than making
top-level window menus. Figures
9-5
and
9-6
show this script in action on Windows.
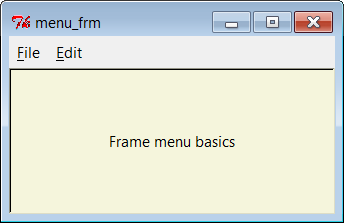
Figure 9-5. menu_frm: Frame and Menubutton menu bar
The menu widgets in this script provide a default set of event
bindings that automatically pop up menus when selected with a mouse.
This doesn’t look or behave exactly like the top-level window menu
scheme shown earlier, but it is close, can be configured in any way that
frames can (i.e., with colors and borders), and will look similar on
every platform (though this may or may not be a feature in all
contexts).
The biggest advantage of frame-based menu bars, though, is that
they can also be attached as nested components in larger displays.
Example 9-4
and its resulting
interface (
Figure 9-7
) show
how—both menu bars are completely functional in the same single
window.
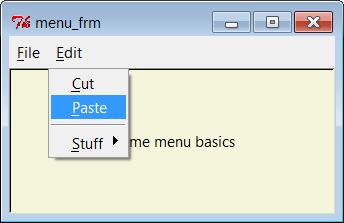
Figure 9-6. With the Edit menu selected
Example 9-4. PP4E\Gui\Tour\menu_frm-multi.py
from menu_frm import makemenu         # can't use menu_win here--one window
from tkinter import *                 # but can attach frame menus to windows
root = Tk()
for i in range(2):                    # 2 menus nested in one window
mnu = makemenu(root)
mnu.config(bd=2, relief=RAISED)
Label(root, bg='black', height=5, width=25).pack(expand=YES, fill=BOTH)
Button(root, text="Bye", command=root.quit).pack()
root.mainloop()
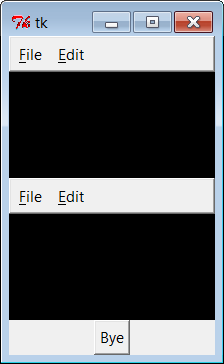
Figure 9-7. Multiple Frame menus on one window
Because they are not tied to the enclosing window, frame-based
menus can also be used as part of another attachable component’s widget
package. For example, the menu-embedding behavior in
Example 9-5
works even if the
menu’s parent is anotherFramecontainer and not the top-level window; this script is similar to the
prior, but creates three fully functional menu bars attached to frames
nested in a window.
Example 9-5. PP4E\Gui\Tour\menu_frm-multi2.py
from menu_frm import makemenu         # can't use menu_win here--root=Frame
from tkinter import *
root = Tk()
for i in range(3):                    # three menus nested in the containers
frm = Frame()
mnu = makemenu(frm)
mnu.config(bd=2, relief=RAISED)
frm.pack(expand=YES, fill=BOTH)
Label(frm, bg='black', height=5, width=25).pack(expand=YES, fill=BOTH)
Button(root, text="Bye", command=root.quit).pack()
root.mainloop()
In fact, menus based onMenubuttonare even more general than
Example 9-3
implies—they can
actually show up anywhere on a display that normal buttons can, not
just within a menu barFrame.
Example 9-6
makes aMenubuttonpull-down list that simply shows
up by itself, attached to the root window;
Figure 9-8
shows the GUI it
produces.
Example 9-6. PP4E\Gui\Tour\mbutton.py
from tkinter import *
root    = Tk()
mbutton = Menubutton(root, text='Food')     # the pull-down stands alone
picks   = Menu(mbutton)
mbutton.config(menu=picks)
picks.add_command(label='spam',  command=root.quit)
picks.add_command(label='eggs',  command=root.quit)
picks.add_command(label='bacon', command=root.quit)
mbutton.pack()
mbutton.config(bg='white', bd=4, relief=RAISED)
root.mainloop()
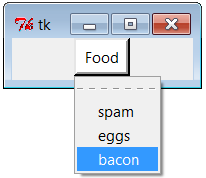
Figure 9-8. A Menubutton all by itself
The related tkinterOptionmenuwidget
displays an item selected from a pull-down menu. It’s roughly like aMenubuttonplus a display label,
and it displays a menu of choices when clicked, but you must link
tkinter variables (described in
Chapter 8
) to fetch the choice after
the fact instead of registering callbacks, and menu entries are passed
as arguments in the widget constructor call after the variable.
Example 9-7
illustrates typicalOptionmenuusage and builds the interface captured in
Figure 9-9
. Clicking on either of the first
two buttons opens a pull-down menu of options; clicking on the third
“state” button fetches and prints the current values displayed in the
first two.
Example 9-7. PP4E\Gui\Tour\optionmenu.py
from tkinter import *
root = Tk()
var1 = StringVar()
var2 = StringVar()
opt1 = OptionMenu(root, var1, 'spam', 'eggs',  'toast')     # like Menubutton
opt2 = OptionMenu(root, var2, 'ham',  'bacon', 'sausage')   # but shows choice
opt1.pack(fill=X)
opt2.pack(fill=X)
var1.set('spam')
var2.set('ham')
def state(): print(var1.get(), var2.get())                  # linked variables
Button(root, command=state, text='state').pack()
root.mainloop()
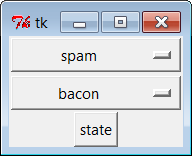
Figure 9-9. An Optionmenu at work
There are other menu-related topics that we’ll skip here in the
interest of space. For instance, scripts can add entries to system
menus and can generate pop-up menus (posted in response to events,
without an associated button). Refer to Tk and tkinter resources for
more details on this front.
In addition to simple selections and cascades, menus can also
contain disabled entries, check button and radio button selections,
and bitmap and photo images. The next section demonstrates how some of
these special menu entries
are programmed.