Programming Python (61 page)

Entrywidgets (among others)
support the notion of an associated variable—changing the
associated variable changes the text displayed in theEntry, and changing the text in theEntrychanges the value of the variable. These
aren’t normal Python variable names, though. Variables tied to widgets
are instances of variable classes in the tkinter module library. These
classes are
namedStringVar,IntVar,DoubleVar, andBooleanVar; you pick one based on the context
in which it is to be used. For example, aStringVarclass instance can be associated
with anEntryfield, as demonstrated
in
Example 8-20
.
Example 8-20. PP4E\Gui\Tour\entry3.py
"""
use StringVar variables
lay out by columns: this might not align horizontally everywhere (see entry2)
"""
from tkinter import *
from quitter import Quitter
fields = 'Name', 'Job', 'Pay'
def fetch(variables):
for variable in variables:
print('Input => "%s"' % variable.get())     # get from var
def makeform(root, fields):
form = Frame(root)                              # make outer frame
left = Frame(form)                              # make two columns
rite = Frame(form)
form.pack(fill=X)
left.pack(side=LEFT)
rite.pack(side=RIGHT, expand=YES, fill=X)       # grow horizontal
variables = []
for field in fields:
lab = Label(left, width=5, text=field)      # add to columns
ent = Entry(rite)
lab.pack(side=TOP)
ent.pack(side=TOP, fill=X)                  # grow horizontal
var = StringVar()
ent.config(textvariable=var)                # link field to var
var.set('enter here')
variables.append(var)
return variables
if __name__ == '__main__':
root = Tk()
vars = makeform(root, fields)
Button(root, text='Fetch', command=(lambda: fetch(vars))).pack(side=LEFT)
Quitter(root).pack(side=RIGHT)
root.bind('', (lambda event: fetch(vars)))
root.mainloop()
Except for the fact that this script initializes input fields with
the string'enter here', it makes a
window virtually identical in appearance and function to that created by
the scriptentry2(see Figures
8-23
and
8-24
). For illustration purposes, the
window is laid out differently—as aFramecontaining two nested subframes used to
build the left and right columns of the form area—but the end result is
the same when it is displayed on screen (for some GUIs on some
platforms, at least: see the note at the end of this section for a
discussion of why layout by rows instead of columns is generally
preferred).
The main thing to notice here, though, is the use ofStringVarvariables. Instead of using a list
ofEntrywidgets to fetch input
values, this version keeps a list ofStringVarobjects that have been associated
with theEntrywidgets, like
this:
ent = Entry(rite)
var = StringVar()
ent.config(textvariable=var)                # link field to var
Once you’ve tied variables in this way, changing and fetching the
variable’s value:
var.set('text here')
value = var.get()
will really change and fetch the
corresponding display’s input field value.
[
32
]
The variable objectgetmethod returns as a string forStringVar, an integer forIntVar, and a floating-point number forDoubleVar.
Of course, we’ve already seen that it’s easy to set and fetch text
inEntryfields directly, without
adding extra code to use variables. So, why the bother about variable
objects? For one thing, it clears up that nasty fetch-after-destroy
peril we met in the prior section. BecauseStringVars live on after theEntrywidgets they are tied to have been
destroyed, it’s OK to fetch input values from them long after a modal
dialog has been dismissed, as shown in
Example 8-21
.
Example 8-21. PP4E\Gui\Tour\entry3-modal.py
# can fetch values after destroy with stringvars
from tkinter import *
from entry3 import makeform, fetch, fields
def show(variables, popup):
popup.destroy()                 # order doesn't matter here
fetch(variables)                # variables live on after window destroyed
def ask():
popup = Toplevel()              # show form in modal dialog window
vars = makeform(popup, fields)
Button(popup, text='OK', command=(lambda: show(vars, popup))).pack()
popup.grab_set()
popup.focus_set()
popup.wait_window()             # wait for destroy here
root = Tk()
Button(root, text='Dialog', command=ask).pack()
root.mainloop()
This version is the same as the original (shown in
Example 8-19
and
Figure 8-25
), butshownow destroys the pop up before inputs are
fetched throughStringVars in the
list created bymakeform. In other
words, variables are a bit more robust in some contexts because they are
not part of a real display tree. For example, they are also commonly
associated with check buttons, radio boxes, and scales in order to
provide access to current settings and link multiple widgets together.
Almost coincidentally, that’s the topic of the next
section.
We laid out input forms two ways in this section: by
row
frames with fixed-width labels (entry2), and by
column
frames (entry3). In
Chapter 9
we’ll see a third form
technique: layouts using thegridgeometry manager. Of these, gridding, and the rows with fixed-width
labels ofentry2tend to work best
across all platforms.
Laying out by column frames as inentry3works only on platforms where the
height of each label exactly matches the height of each entry field.
Because the two are not associated directly, they might not line up
properly on some platforms. When I tried running some forms that
looked fine on Windows XP on a Linux machine, labels and their
corresponding entries did not line up horizontally.
Even the simple window produced byentry3looks slightly askew on closer
inspection. It only appears the same asentry2on some platforms because of the
small number of inputs and size defaults. On my Windows 7 netbook, the
labels and entries start to become horizontally mismatched if you add
3 or 4 additional inputs toentry3’sfieldstuple.
If you care about portability, lay out your forms either with
the packed row frames and fixed/maximum-width labels ofentry2, or by gridding widgets by row and
column numbers instead of packing them. We’ll see more on such forms
in the next chapter. And in
Chapter 12
,
we’ll write a form-
construction
tool that hides the layout details from its clients altogether
(including its use case client in
Chapter 13
).
[
32
]
Historic anecdote: In a now-defunct tkinter release shipped
with Python 1.3, you could also set and fetch variable values by
calling them like functions, with and without an argument (e.g.,var(value)andvar()). Today, you call variablesetandgetmethods instead. For unknown reasons,
the function call form stopped working years ago, but you may still
see it in older Python code (and in first editions of at least one
O’Reilly Python book). If a fix made in the name of aesthetics
breaks working code, is it really a fix?
This section introduces three widget types: theCheckbutton(a multiple-choice input widget),
theRadiobutton(a single-choice
device), and theScale(sometimes known
as a “slider”). All are variations on a theme and are somewhat related to
simple buttons, so we’ll explore them as a group here. To make these
widgets more fun to play with, we’ll reuse thedialogTablemodule shown in
Example 8-8
to provide callbacks
for widget selections (callbacks pop up dialog boxes). Along the way,
we’ll also use the tkinter variables we just met to communicate with these
widgets’ state settings.
TheCheckbuttonandRadiobuttonwidgets
are designed to be associated with tkinter variables:
clicking the button changes the value of the variable, and setting the
variable changes the state of the button to which it is linked. In fact,
tkinter variables are central to the operation of these widgets:
A collection of
Checkbuttons implements a multiple-choice
interface by assigning each button a variable of its own.A collection of
Radiobuttons imposes a mutually exclusive
single-choice model by giving each button a unique value and the
same tkinter variable.
Both kinds of buttons provide bothcommandandvariableoptions. Thecommandoption lets
you register a callback to be run immediately on button-press events,
much like normalButtonwidgets. But by associating a tkinter variable with thevariableoption, you can also fetch
or change widget state at any time by fetching or changing the value of
the widget’s associated variable.
Since it’s a bit simpler, let’s start with the tkinterCheckbutton.
Example 8-22
creates the set of
five captured in
Figure 8-26
. To make this
more useful, it also adds a button that dumps the current state of allCheckbuttons and attaches an instance
of the verifying Quitter button we built earlier in the tour.
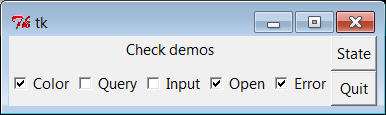
Figure 8-26. demoCheck in action
Example 8-22. PP4E\Gui\Tour\demoCheck.py
"create a bar of check buttons that run dialog demos"
from tkinter import *             # get base widget set
from dialogTable import demos     # get canned dialogs
from quitter import Quitter       # attach a quitter object to "me"
class Demo(Frame):
def __init__(self, parent=None, **options):
Frame.__init__(self, parent, **options)
self.pack()
self.tools()
Label(self, text="Check demos").pack()
self.vars = []
for key in demos:
var = IntVar()
Checkbutton(self,
text=key,
variable=var,
command=demos[key]).pack(side=LEFT)
self.vars.append(var)
def report(self):
for var in self.vars:
print(var.get(), end=' ')   # current toggle settings: 1 or 0
print()
def tools(self):
frm = Frame(self)
frm.pack(side=RIGHT)
Button(frm, text='State', command=self.report).pack(fill=X)
Quitter(frm).pack(fill=X)
if __name__ == '__main__': Demo().mainloop()
In terms of program code, check buttons resemble normal buttons;
they are even packed within a container widget. Operationally, though,
they are a bit different. As you can probably tell from this figure (and
can better tell by running this live), a check button works as a
toggle—pressing one changes its state from off to on (from deselected to
selected); or from on to off again. When a check button is selected, it
has a checked display, and its associatedIntVarvariable has a value of1; when deselected, its display is empty and
itsIntVarhas a value of0.
To simulate an enclosing application, the State button in this
display triggers the script’sreportmethod to display the current values of all five toggles on thestdoutstream. Here is the output after a few
clicks:
C:\...\PP4E\Gui\Tour>python demoCheck.py0 0 0 0 0
1 0 0 0 0
1 0 1 0 0
1 0 1 1 0
1 0 0 1 0
1 0 0 1 1
Really, these are the values of the five tkinter variables
associated with theCheckbuttons withvariableoptions, but they give the buttons’
values when queried. This script associatesIntVarvariables with eachCheckbuttonin this display, since they are 0
or 1 binary indicators.StringVarswill work here, too, although theirgetmethods would return strings'0'or'1'(not integers) and their initial state would be an empty string (not the
integer 0).
This widget’scommandoption
lets you register a callback to be run each time the button is pressed.
To illustrate, this script registers a standard dialog demo call as a
handler for each of theCheckbuttons—pressing a button changes the
toggle’s state but also pops up one of the dialog windows we visited
earlier in this tour (regardless of its new state).
Interestingly, you can sometimes run thereportmethod interactively, too—when working
as follows in a shell window, widgets pop up as lines are typed and are
fully active, even without callingmainloop(though this may not work in some
interfaces like IDLE if you must callmainloopto display your GUI):
C:\...\PP4E\Gui\Tour>python>>>from demoCheck import Demo>>>d = Demo()>>>d.report()0 0 0 0 0
>>>d.report()1 0 0 0 0
>>>d.report()1 0 0 1 1
When I first studied
check buttons, my initial reaction was: why do we need
tkinter variables here at all when we can register button-press
callbacks? Linked variables may seem superfluous at first glance, but
they simplify some GUI chores. Instead of asking you to accept this
blindly, though, let me explain why.
Keep in mind that aCheckbutton’scommandcallback will be run on
every press, whether the press toggles the check button to a selected
or a deselected state. Because of that, if you want to run an action
immediately when a check button is pressed, you will generally want to
check the button’s current value in the callback handler. Because
there is no check button “get” method for fetching values, you usually
need to interrogate an associated variable to see if the button is on
or off.
Moreover, some GUIs simply let users set check buttons without
runningcommandcallbacks at all
and fetch button settings at some later point in the program. In such
a scenario, variables serve to automatically keep track of button
settings. ThedemoCheckscript’sreportmethod represents this
latter approach.
Of course, you could manually keep track of each button’s state
in press callback
handlers
, too.
Example 8-23
keeps its own
list of state toggles and updates it manually oncommandpress callbacks.
Example 8-23. PP4E\Gui\Tour\demo-check-manual.py
# check buttons, the hard way (without variables)
from tkinter import *
states = []                            # change object not name
def onPress(i):                        # keep track of states
states[i] = not states[i]          # changes False->True, True->False
root = Tk()
for i in range(10):
chk = Checkbutton(root, text=str(i), command=(lambda i=i: onPress(i)) )
chk.pack(side=LEFT)
states.append(False)
root.mainloop()
print(states)                          # show all states on exit
The lambda here passes along the pressed button’s index in thestateslist. Otherwise, we would
need a separate callback function for each button. Here again, we need
to use a
default argument
to pass the loop
variable into the lambda, or the loop variable will be its value on
the last loop iteration for all 10 of the generated functions (each
press would update the tenth item in the list; see
Chapter 7
for background details on
this). When run, this script makes the 10–check button display in
Figure 8-27
.

Figure 8-27. Manual check button state window
Manually maintained state toggles are updated on every button
press and are printed when the GUI exits (technically, when themainloopcall returns); it’s a list
of Boolean state values, which could also be integers 1 or 0 if we
cared to exactly imitate the original:
C:\...\PP4E\Gui\Tour>python demo-check-manual.py[False, False, True, False, True, False, False, False, True, False]
This works, and it isn’t too horribly difficult to manage
manually. But linked tkinter variables make this task noticeably
easier, especially if you don’t need to process check button states
until some time in the future. This is illustrated in
Example 8-24
.
Example 8-24. PP4E\Gui\Tour\demo-check-auto.py
# check buttons, the easy way
from tkinter import *
root = Tk()
states = []
for i in range(10):
var = IntVar()
chk = Checkbutton(root, text=str(i), variable=var)
chk.pack(side=LEFT)
states.append(var)
root.mainloop()                               # let tkinter keep track
print([var.get() for var in states])          # show all states on exit (or map/lambda)
This looks and works the same way, but there is nocommandbutton-press callback handler at
all, because toggle state is tracked by tkinter automatically:
C:\...\PP4E\Gui\Tour>python demo-check-auto.py[0, 0, 1, 1, 0, 0, 1, 0, 0, 1]
The point here is that you don’t necessarily have to link
variables with check buttons, but your GUI life will be simpler if you
do. The list comprehension at the very end of this script, by the way,
is equivalent to the following unbound method and lambda/bound-methodmapcall forms:
print(list(map(IntVar.get, states)))
print(list(map(lambda var: var.get(), states)))
Though comprehensions are common in Python today, the form that
seems clearest to you may very well depend upon your shoe
size…
Radio buttons are toggles too,
but they are generally used in groups: just like the
mechanical station selector pushbuttons on radios of times gone by,
pressing oneRadiobuttonwidget in a
group automatically deselects the one pressed last. In other words, at
most, only one can be selected at one time. In tkinter, associating all
radio buttons in a group with unique values and the same variable
guarantees that, at most, only one can ever be selected at a given
time.
Like check buttons and normal buttons, radio buttons support
acommandoption for
registering a callback to handle presses immediately. Like check
buttons, radio buttons also have avariableattribute for associating
single-selection buttons in a group and fetching the current selection
at arbitrary times.
In addition, radio buttons have avalueattribute that lets you tell tkinter
what value the button’s associated variable should have when the button
is selected. Because more than one radio button is associated with the
same variable, you need to be explicit about each button’s value (it’s
not just a 1 or 0 toggle scenario).
Example 8-25
demonstrates radio
button basics.
Example 8-25. PP4E\Gui\Tour\demoRadio.py
"create a group of radio buttons that launch dialog demos"
from tkinter import *                # get base widget set
from dialogTable import demos        # button callback handlers
from quitter import Quitter          # attach a quit object to "me"
class Demo(Frame):
def __init__(self, parent=None, **options):
Frame.__init__(self, parent, **options)
self.pack()
Label(self, text="Radio demos").pack(side=TOP)
self.var = StringVar()
for key in demos:
Radiobutton(self, text=key,
command=self.onPress,
variable=self.var,
value=key).pack(anchor=NW)
self.var.set(key) # select last to start
Button(self, text='State', command=self.report).pack(fill=X)
Quitter(self).pack(fill=X)
def onPress(self):
pick = self.var.get()
print('you pressed', pick)
print('result:', demos[pick]())
def report(self):
print(self.var.get())
if __name__ == '__main__': Demo().mainloop()
Figure 8-28
shows what this script
generates when run. Pressing any of this window’s radio buttons triggers
itscommandhandler, pops up one of
the standard dialog boxes we met earlier, and automatically deselects
the button previously pressed. Like check buttons, radio buttons are
packed; this script packs them to the top to arrange them vertically,
and then anchors each on the northwest corner of its allocated space so
that they align well.
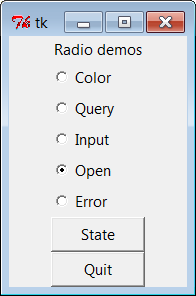
Figure 8-28. demoRadio in action
Like the check button demo script, this one also puts up a State
button to run the class’sreportmethod and to show the current radio state (the button selected). Unlike
the check button demo, this script also prints the return values of
dialog demo calls that are run as its buttons are pressed. Here is what
thestdoutstream looks like after a
few presses and state dumps; states are shown in bold:
C:\...\PP4E\Gui\Tour>python demoRadio.pyyou pressed Input
result: 3.14
Input
you pressed Open
result: C:/PP4thEd/Examples/PP4E/Gui/Tour/demoRadio.py
Open
you pressed Query
result: yes
Query
So, why variables here? For
one thing, radio buttons also have no “get” widget
method to fetch the selection in the future. More importantly, in
radio button groups, thevalueandvariablesettings turn out to be
the whole basis of single-choice behavior. In fact, to make radio
buttons work normally at all, it’s crucial that they are all
associated with the same tkinter variable and have distinct value
settings. To truly understand why, though, you need to know a bit more
about how radio buttons and variables do their stuff.
We’ve already seen that changing a widget changes its associated
tkinter variable, and vice versa. But it’s also true that changing a
variable in any way automatically changes every widget it is
associated with. In the world of radio buttons, pressing a button sets
a shared variable, which in turn impacts other buttons associated with
that variable. Assuming that all radio buttons have distinct values,
this works as you expect it to work. When a button press changes the
shared variable to the pressed button’s value, all other buttons are
deselected, simply because the variable has been changed to a value
not their own.
This is true both when the user selects a button and changes the
shared variable’s value implicitly, but also when the variable’s value
is set manually by a script. For instance, when
Example 8-25
sets the shared
variable to the last of the demo’s names initially (withself.var.set), it selects that demo’s button
and deselects all the others in the process; this way, only one is
selected at first. If the variable was instead set to a string that is
not any demo’s name (e.g.,' '),
all
buttons would be deselected at
startup.
This ripple effect is a bit subtle, but it might help to know
that within a group of radio buttons sharing the same variable, if you
assign a set of buttons the same value, the entire set will be
selected if any one of them is pressed. Consider
Example 8-26
, which creates
Figure 8-29
, for instance. All
buttons start out deselected this time (by initializing the shared
variable to none of their values), but because radio buttons 0, 3, 6,
and 9 have value 0 (the remainder of division by 3), all are selected
if any are selected.

Figure 8-29. Radio buttons gone bad?
Example 8-26. PP4E\Gui\Tour\demo-radio-multi.py
# see what happens when some buttons have same value
from tkinter import *
root = Tk()
var = StringVar()
for i in range(10):
rad = Radiobutton(root, text=str(i), variable=var, value=str(i % 3))
rad.pack(side=LEFT)
var.set(' ') # deselect all initially
root.mainloop()
If you press 1, 4, or 7 now, all three of these are selected,
and any existing selections are cleared (they don’t have the value
“1”). That’s not normally what you want—radio buttons are usually a
single-choice group (check buttons handle multiple-choice inputs). If
you want them to work as expected, be sure to give each radio button
the same variable but a unique value across the entire group. In thedemoRadioscript, for instance, the
name of the demo provides a naturally unique value for each
button.
Strictly speaking, we could get by without tkinter variables
here, too.
Example 8-27
,
for instance, implements a single-selection model without variables,
by manually selecting and deselecting widgets in the group, in a
callback handler of its own. On each press event, it issuesdeselectcalls for every widget object in
the group andselectfor the one
pressed.
Example 8-27. PP4E\Gui\Tour\demo-radio-manual.py
"""
radio buttons, the hard way (without variables)
note that deselect for radio buttons simply sets the button's
associated value to a null string, so we either need to still
give buttons unique values, or use checkbuttons here instead;
"""
from tkinter import *
state = ''
buttons = []
def onPress(i):
global state
state = i
for btn in buttons:
btn.deselect()
buttons[i].select()
root = Tk()
for i in range(10):
rad = Radiobutton(root, text=str(i),
value=str(i), command=(lambda i=i: onPress(i)) )
rad.pack(side=LEFT)
buttons.append(rad)
onPress(0)                   # select first initially
root.mainloop()
print(state)                 # show state on exit
This works. It creates a 10-radio button window that looks just
like the one in
Figure 8-29
but
implements a single-choice radio-style interface, with current state
available in a global Python variable printed on script exit. By
associating tkinter variables and unique values, though, you can let
tkinter do all this work for you, as shown in
Example 8-28
.
Example 8-28. PP4E\Gui\Tour\demo-radio-auto.py
# radio buttons, the easy way
from tkinter import *
root = Tk()                     # IntVars work too
var  = IntVar(0)                # select 0 to start
for i in range(10):
rad = Radiobutton(root, text=str(i), value=i, variable=var)
rad.pack(side=LEFT)
root.mainloop()
print(var.get())                # show state on exit
This works the same way, but it is a lot less to type and debug.
Notice that this script associates the buttons with anIntVar, the integer type sibling ofStringVar, and initializes it to zero (which
is also its default); as long as button values are unique, integers
work fine for radio buttons too.
One minor word of
caution: you should generally hold onto the tkinter
variable object used to link radio buttons for as long as the radio
buttons are displayed. Assign it to a module global variable, store it
in a long-lived data structure, or save it as an attribute of a
long-lived class instance object as done bydemoRadio. Just make sure you retain a
reference to it somehow. You normally will in order to fetch its state
anyhow, so it’s unlikely that you’ll ever care about what I’m about to
tell you.
But in the current tkinter, variable classes have a__del__destructor that automatically unsets
a generatedTkvariable when the
Python object is reclaimed (i.e., garbage collected). The upshot is
that all of your radio buttons may be deselected if the variable
object is collected, at least until the next press resets theTkvariable to a new value.
Example 8-29
shows one way to
trigger this.
Example 8-29. PP4E\Gui\Tour\demo-radio-clear.py
# hold on to your radio variables (an obscure thing, indeed)
from tkinter import *
root = Tk()
def radio1():                   # local vars are temporary
#global tmp                 # making it global fixes the problem
tmp = IntVar()
for i in range(10):
rad = Radiobutton(root, text=str(i), value=i, variable=tmp)
rad.pack(side=LEFT)
tmp.set(5)  # select 6th button
radio1()
root.mainloop()
This should come up with button “5” selected initially, but it
doesn’t. The variable referenced by localtmpis reclaimed on function exit, theTkvariable is unset, and the 5
setting is lost (all buttons come up unselected). These radio buttons
work fine, though, once you start pressing them, because that resets
the internalTkvariable.
Uncommenting theglobalstatement
here makes 5 start out set, as expected.
This phenomenon seems to have grown even worse in Python 3.X:
not only is “5” not selected initially, but moving the mouse cursor
over the unselected buttons seems to select many at random until one
is pressed. (In 3.X we also need to initialize aStringVarshared by radio buttons as we did
in this section’s earlier examples, or else its empty string default
selects all of them!)
Of course, this is an atypical example—as coded, there is no way
to know which button is pressed, because the variable isn’t saved (andcommandisn’t set). It makes little
sense to use a group of radio buttons at all if you cannot query its
value later. In fact, this is so obscure that I’ll just refer you to
demo-radio-clear2.py
in the book’s examples
distribution for an example that works hard to trigger this oddity in
other ways. You probably won’t care, but you can’t say that I didn’t
warn you if you
ever do.