Programming Python (62 page)

Scales
(sometimes called “sliders”) are used to select among a
range of numeric values. Moving the scale’s position with mouse drags or
clicks moves the widget’s value among a range of integers and triggers
Python callbacks if registered.
Like check buttons and radio buttons, scales have both acommandoption for
registering an event-driven callback handler to be run right away when
the scale is moved, and avariableoption for associating a tkinter variable that allows the scale’s
position to be fetched and set at arbitrary times. You can process scale
settings when they are made, or let the user pick a setting for later
use.
In addition, scales have a third processing option
—getandsetmethods that scripts may call to access
scale values directly without associating variables. Because scalecommandmovement callbacks also get
the current scale setting value as an argument, it’s often enough just
to provide a callback for this widget, without resorting to either
linked variables orget/setmethod calls.
To illustrate the basics,
Example 8-30
makes two scales—one
horizontal and one vertical—and links them with an associated variable
to keep them in sync.
Example 8-30. PP4E\Gui\Tour\demoScale.py
"create two linked scales used to launch dialog demos"
from tkinter import *                # get base widget set
from dialogTable import demos        # button callback handlers
from quitter import Quitter          # attach a quit frame to me
class Demo(Frame):
def __init__(self, parent=None, **options):
Frame.__init__(self, parent, **options)
self.pack()
Label(self, text="Scale demos").pack()
self.var = IntVar()
Scale(self, label='Pick demo number',
command=self.onMove,                   # catch moves
variable=self.var,                     # reflects position
from_=0, to=len(demos)-1).pack()
Scale(self, label='Pick demo number',
command=self.onMove,                   # catch moves
variable=self.var,                     # reflects position
from_=0, to=len(demos)-1,
length=200, tickinterval=1,
showvalue=YES, orient='horizontal').pack()
Quitter(self).pack(side=RIGHT)
Button(self, text="Run demo", command=self.onRun).pack(side=LEFT)
Button(self, text="State",    command=self.report).pack(side=RIGHT)
def onMove(self, value):
print('in onMove', value)
def onRun(self):
pos = self.var.get()
print('You picked', pos)
demo = list(demos.values())[pos]    # map from position to value (3.X view)
print(demo())                       # or demos[ list(demos.keys())[pos] ]()
def report(self):
print(self.var.get())
if __name__ == '__main__':
print(list(demos.keys()))
Demo().mainloop()
Besides value access and callback registration, scales have
options tailored to the notion of a range of selectable values, most of
which are demonstrated in this example’s code:
The
labeloption
provides text that appears along with the scale,lengthspecifies an initial size
in pixels, andorientspecifies
an axis.The
from_andtooptions
set the scale range’s minimum and maximum values (note
thatfromis a Python reserved
word, butfrom_is not).The
tickintervaloption
sets the number of units between marks drawn at
regular intervals next to the scale (the default means no marks are
drawn).The
resolutionoption
provides the number of units that the scale’s value
jumps on each drag or left mouse click event (defaults to 1).The
showvalueoption
can be used to show or hide the scale’s current value
next to its slider bar (the defaultshowvalue=YESmeans it is drawn).
Note that scales are also packed in their container, just like
other tkinter widgets. Let’s see how these ideas translate in practice;
Figure 8-30
shows the window you get if you
run this script live on Windows 7 (you get a similar one on Unix and Mac
machines).
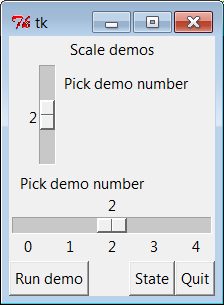
Figure 8-30. demoScale in action
For illustration purposes, this window’s State button shows the
scales’ current values, and “Run demo” runs a standard dialog call as
before, using the integer value of the scales to index the demos table.
The script also registers acommandhandler that fires every time either of the scales is moved and prints
their new positions. Here is a set of messages sent tostdoutafter a few moves, demo runs (italic),
and state requests (bold):
C:\...\PP4E\Gui\Tour>python demoScale.py['Color', 'Query', 'Input', 'Open', 'Error']
in onMove 0
in onMove 0
in onMove 1
1
in onMove 2
You picked 2
123.0
in onMove 3
3
You picked 3
C:/Users/mark/Stuff/Books/4E/PP4E/dev/Examples/PP4E/Launcher.py
As you can probably tell,
scales offer a variety of ways to process their
selections: immediately in move callbacks, or later by fetching
current positions with variables or scale method calls. In fact,
tkinter variables aren’t needed to program scales at all—simply
register movement callbacks or call the scalegetmethod to fetch scale values on demand,
as in the simpler scale example in
Example 8-31
.
Example 8-31. PP4E\Gui\Tour\demo-scale-simple.py
from tkinter import *
root = Tk()
scl = Scale(root, from_=-100, to=100, tickinterval=50, resolution=10)
scl.pack(expand=YES, fill=Y)
def report():
print(scl.get())
Button(root, text='state', command=report).pack(side=RIGHT)
root.mainloop()
Figure 8-31
shows two
instances of this program running on Windows—one stretched and one not
(the scales are packed to grow vertically on resizes). Its scale
displays a range from −100 to 100, uses theresolutionoption to adjust the current
position up or down by 10 on every move, and sets thetickintervaloption to show values next to
the scale in increments of 50. When you press the State button in this
script’s window, it calls the scale’sgetmethod to display the current setting,
without variables or callbacks of any kind:
C:\...\PP4E\Gui\Tour>python demo-scale-simple.py0
60
-70
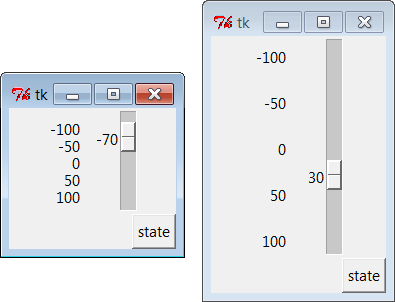
Figure 8-31. A simple scale without variables
Frankly, the only reason tkinter variables are used in thedemoScalescript at all is to
synchronize scales. To make the demo interesting, this script
associates the same tkinter variable object with both scales. As we
learned in the last section, changing a widget changes its variable,
but changing a variable also changes all the widgets it is associated
with. In the world of sliders, moving the slide updates that variable,
which in turn might update other widgets associated with the same
variable. Because this script links one variable with two scales, it
keeps them automatically in sync: moving one scale moves the other,
too, because the shared variable is changed in the process and so
updates the other scale as a side effect.
Linking scales like this may or may not be typical of your
applications (and borders on deep magic), but it’s a powerful tool
once you get your mind around it. By linking multiple widgets on a
display with tkinter variables, you can keep them automatically in
sync, without making manual adjustments in callback handlers. On the
other hand, the synchronization could be implemented without a shared
variable at all by calling one scale’ssetmethod from a move callback handler of
the other. I’ll leave such a manual mutation as a suggested exercise,
though. One person’s deep magic might be another’s
useful hack.
Now that we’ve built a handful of similar demo launcher programs,
let’s write a few top-level scripts to combine them. Because the demos
were coded as both reusable classes and scripts, they can be deployed as
attached frame components, run in their own top-level windows, and
launched as standalone programs. All three options illustrate code reuse
in action.
To illustrate
hierarchical GUI composition on a grander scale than we’ve
seen so far,
Example 8-32
arranges to show all four of the dialog launcher bar scripts of this
chapter in a single container. It reuses Examples
8-9
,
8-22
,
8-25
, and
8-30
.
Example 8-32. PP4E\Gui\Tour\demoAll-frm.py
"""
4 demo class components (subframes) on one window;
there are 5 Quitter buttons on this one window too, and each kills entire gui;
GUIs can be reused as frames in container, independent windows, or processes;
"""
from tkinter import *
from quitter import Quitter
demoModules = ['demoDlg', 'demoCheck', 'demoRadio', 'demoScale']
parts = []
def addComponents(root):
for demo in demoModules:
module = __import__(demo)                       # import by name string
part = module.Demo(root)                        # attach an instance
part.config(bd=2, relief=GROOVE)                # or pass configs to Demo()
part.pack(side=LEFT, expand=YES, fill=BOTH)     # grow, stretch with window
parts.append(part)                              # change list in-place
def dumpState():
for part in parts:                                  # run demo report if any
print(part.__module__ + ':', end=' ')
if hasattr(part, 'report'):
part.report()
else:
print('none')
root = Tk()                                             # make explicit root first
root.title('Frames')
Label(root, text='Multiple Frame demo', bg='white').pack()
Button(root, text='States', command=dumpState).pack(fill=X)
Quitter(root).pack(fill=X)
addComponents(root)
root.mainloop()
Because all four demo launcher bars are coded as frames which
attach themselves to parent container widgets, this is easier than you
might think: simply pass the same parent widget (here, therootwindow) to all four demo constructor
calls, and repack and configure the demo objects as desired.
Figure 8-32
shows this
script’s graphical result—a single window embedding instances of all
four of the dialog demo launcher demos we saw earlier. As coded, all
four embedded demos grow and stretch with the window when resized (try
taking out theexpand=YESto keep
their sizes more constant).
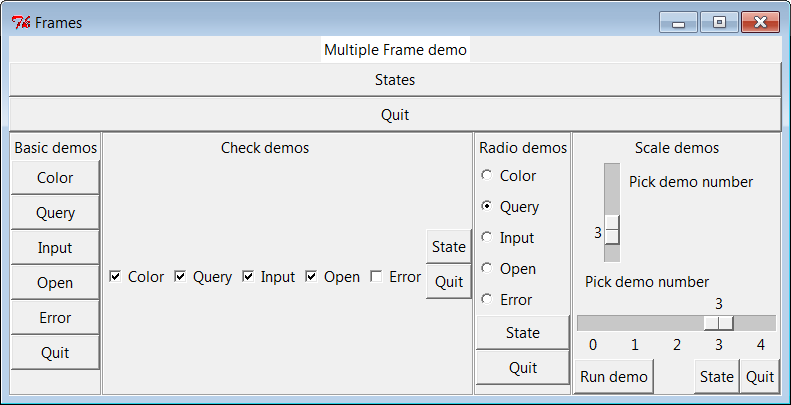
Figure 8-32. demoAll_frm: nested subframes
Naturally, this example is artificial, but it illustrates the
power of composition when applied to building larger GUI displays. If
you pretend that each of the four attached demo objects was something
more useful, like a text editor, calculator, or clock, you’ll better
appreciate the point of this example.
Besides demo object frames, this composite window also contains no
fewer than five instances of the Quitter button we wrote earlier (all of
which verify the request and any one of which can end the GUI) and a
States button to dump the current values of all the embedded demo
objects at once (it calls each object’sreportmethod, if it has one). Here is a
sample of the sort of output that shows up in thestdoutstream after interacting with widgets
on this display; States output is in bold:
C:\...\PP4E\Gui\Tour>python demoAll_frm.pyin onMove 0
in onMove 0
demoDlg: none
demoCheck: 0 0 0 0 0
demoRadio: Error
demoScale: 0
you pressed Input
result: 1.234
in onMove 1
demoDlg: none
demoCheck: 1 0 1 1 0
demoRadio: Input
demoScale: 1
you pressed Query
result: yes
in onMove 2
You picked 2
None
in onMove 3
You picked 3
C:/Users/mark/Stuff/Books/4E/PP4E/dev/Examples/PP4E/Launcher.py
3
Query
1 1 1 1 0
demoDlg: none
demoCheck: 1 1 1 1 0
demoRadio: Query
demoScale: 3
The only substantially
tricky part of this script is its use of Python’s
built-in__import__function to
import a module by a name string. Look at the following two lines from
the script’saddComponentsfunction:
module = __import__(demo)             # import module by name string
part = module.Demo(root)              # attach an instance of its Demo
This is equivalent to saying something like this:
import 'demoDlg'
part = 'demoDlg'.Demo(root)
However, the preceding code is not legal Python syntax—the
module name in import statements and dot expressions must be a Python
variable, not a string; moreover, in an import the name is taken
literally (not evaluated), and in dot syntax must evaluate to the
object (not its string name). To be generic,addComponentssteps through a list of name
strings and relies on__import__to
import and return the module identified by each string. In fact, theforloop containing these
statements works as though all of these statements were run:
import demoDlg, demoRadio, demoCheck, demoScale
part = demoDlg.Demo(root)
part = demoRadio.Demo(root)
part = demoCheck.Demo(root)
part = demoScale.Demo(root)
But because the script uses a list of name strings, it’s easier
to change the set of demos embedded—simply change the list, not the
lines of executable code. Further, such data-driven code tends to be
more compact, less redundant, and easier to debug and maintain.
Incidentally, modules can also be imported from name strings by
dynamically constructing and running import statements, like
this:
for demo in demoModules:
exec('from %s import Demo' % demo)       # make and run a from
part = eval('Demo')(root)                # fetch known import name by string
Theexecstatement compiles
and runs a Python statement string (here, afromto load a module’sDemoclass); it works here as if the
statement string were pasted into the source code where theexecstatement appears. The following
achieves the same effect by running animportstatement instead:
for demo in demoModules:
exec('import %s' % demo)                 # make and run an import
part = eval(demo).Demo(root)             # fetch module variable by name too
Because it supports any sort of Python statement, theseexec/evaltechniques are more general than the__import__call, but can also be slower,
since they must parse code strings before running them.
[
33
]
However, that slowness may not matter in a GUI; users
tend to be significantly slower than parsers.
One other alternative worth mentioning: notice how
Example 8-32
configures and
repacks each attached demo frame for its role in this GUI:
def addComponents(root):
for demo in demoModules:
module = __import__(demo)                       # import by name string
part = module.Demo(root)                        # attach an instance
part.config(bd=2, relief=GROOVE)                # or pass configs to Demo()
part.pack(side=LEFT, expand=YES, fill=BOTH)     # grow, stretch with window
Because the demo classes use their**optionsarguments to support constructor
arguments, though, we could configure at creation time, too. For
example, if we change this code as follows, it produces the slightly
different composite window captured in
Figure 8-33
(stretched a bit
horizontally for illustration, too; you can run this as
demoAll-frm-ridge.py
in the examples package):
def addComponents(root):
for demo in demoModules:
module = __import__(demo)                       # import by name string
part = module.Demo(root, bd=6, relief=RIDGE)    # attach, config instance
part.pack(side=LEFT, expand=YES, fill=BOTH)     # grow, stretch with window
Because the demo classes both subclassFrameand support the usual construction
argument
protocols, they become
true widgets—specialized tkinter frames that implement an attachable
package of widgets and support flexible configuration
techniques.
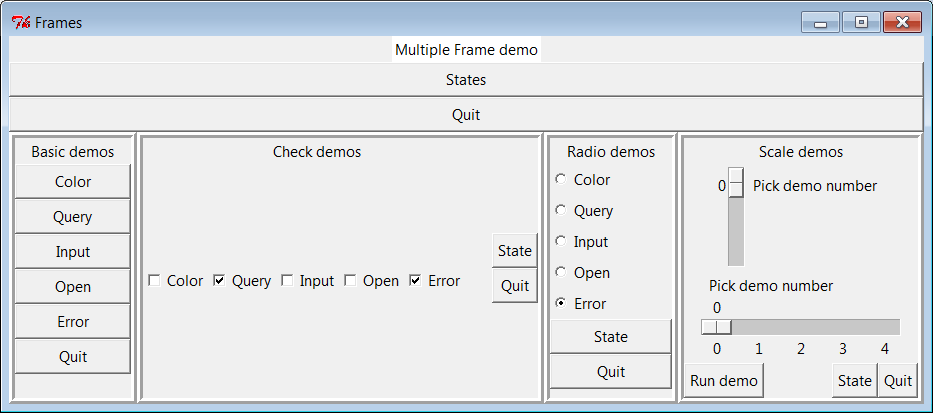
Figure 8-33. demoAll_frm: configure when constructed
As we saw in
Chapter 7
,
attaching
nested frames like this is really just
one way to reuse GUI code structured as classes. It’s just as easy to
customize such interfaces by
subclassing
rather than embedding.
Here, though, we’re more interested in deploying an existing widget
package than changing it, so attachment is the pattern we want. The
next two sections show two other ways to present such precoded widget
packages to users—in pop-up windows and as autonomous
programs.
Once you have a
set of component classes coded as frames, any parent will
work—both other frames and brand-new, top-level windows.
Example 8-33
attaches instances of
all four demo bar objects to their own independentToplevelwindows, instead of the same container.
Example 8-33. PP4E\Gui\Tour\demoAll-win.py
"""
4 demo classes in independent top-level windows;
not processes: when one is quit all others go away, because all windows run in
the same process here; make Tk() first here, else we get blank default window
"""
from tkinter import *
demoModules = ['demoDlg', 'demoRadio', 'demoCheck', 'demoScale']
def makePopups(modnames):
demoObjects = []
for modname in modnames:
module = __import__(modname)          # import by name string
window = Toplevel()                   # make a new window
demo   = module.Demo(window)          # parent is the new window
window.title(module.__name__)
demoObjects.append(demo)
return demoObjects
def allstates(demoObjects):
for obj in demoObjects:
if hasattr(obj, 'report'):
print(obj.__module__, end=' ')
obj.report()
root = Tk()                                   # make explicit root first
root.title('Popups')
demos = makePopups(demoModules)
Label(root, text='Multiple Toplevel window demo', bg='white').pack()
Button(root, text='States', command=lambda: allstates(demos)).pack(fill=X)
root.mainloop()
We met theToplevelclass
earlier; every instance generates a new window on your screen. The net
result is captured in
Figure 8-34
. Each demo runs in
an independent window of its own instead of being packed together in a
single display.
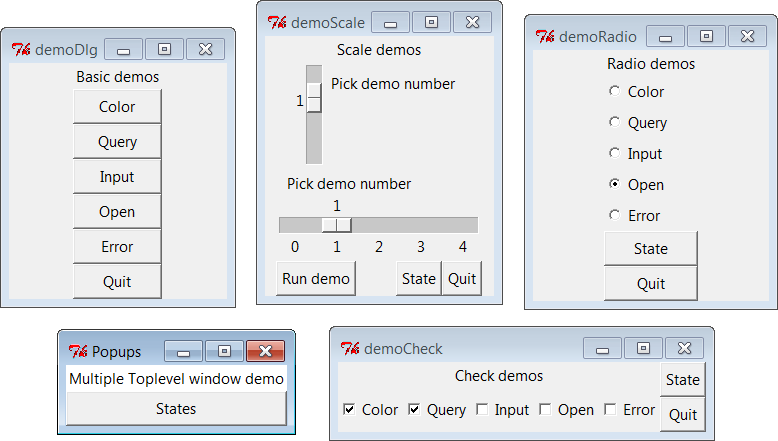
Figure 8-34. demoAll_win: new Toplevel windows
The main root window of this program appears in the lower left of
this screenshot; it provides a States button that runs thereportmethod of each demo object, producing
this sort ofstdouttext:
C:\...\PP4E\Gui\Tour>python demoAll_win.pyin onMove 0
in onMove 0
in onMove 1
you pressed Open
result: C:/Users/mark/Stuff/Books/4E/PP4E/dev/Examples/PP4E/Launcher.py
demoRadio Open
demoCheck 1 1 0 0 0
demoScale 1
As we learned earlier in this chapter,Toplevelwindows function independently, but
they are not really independent programs. Destroying just one of the
demo windows in
Figure 8-34
by clicking theXbutton in its upper right corner
closes just that window. But quitting any of the windows shown in
Figure 8-34
—by a demo window’s
Quit buttons or the main window’sX—quits them
all
and ends
the application, because all run in the same program process. That’s OK
in some applications, but not all. To go truly rogue we need to spawn
processes, as the next section
shows.