Programming Python (65 page)

[
34
]
This particular image is not my creation; it appeared as a
banner ad on developer-related websites such as Slashdot when the
book
Learning Python
was first published in
1999. It generated enough of a backlash from Perl zealots that
O’Reilly eventually pulled the ad altogether. Which may be why, of
course, it later appeared in this book.
As mentioned earlier, Python
tkinter scripts show images by associating independently
created image objects with real widget objects. At this writing, tkinter
GUIs can display photo image files in GIF, PPM, and PGM formats by
creating aPhotoImageobject, as well
as X11-style bitmap files (usually suffixed with an
.xbm
extension) by creating aBitmapImageobject.
This set of supported file formats is limited by the underlying Tk
library, not by tkinter itself, and may expand in the future (it has not
in many years). But if you want to display files in other formats today
(e.g., the popular JPEG format), you can either convert your files to one
of the supported formats with an image-processing program or install the
PIL Python extension package mentioned at the start of
Chapter 7
.
PIL, the Python Imaging Library, is an open source system that
supports nearly 30 graphics file formats (including GIF, JPEG, TIFF, PNG,
and BMP). In addition to allowing your scripts to display a much wider
variety of image types than standard tkinter, PIL also provides tools for
image processing, including geometric transforms, thumbnail creation,
format conversions, and much more.
To use its tools,
you must first fetch and install the PIL package: see
http://www.pythonware.com
(or
search for “PIL” on the web). Then, simply use specialPhotoImageandBitmapImageobjects imported from the PILImageTkmodule to open files in other
graphic formats. These are compatible replacements for the standard
tkinter classes of the same name, and they may be used anywhere tkinter
expects aPhotoImageorBitmapImageobject (i.e., in label, button,
canvas, text, and menu object configurations).
That is, replace standard tkinter code such as this:
from tkinter import *
imgobj = PhotoImage(file=imgdir + "spam.gif")
Button(image=imgobj).pack()
with code of this form:
from tkinter import *
from PIL import ImageTk
photoimg = ImageTk.PhotoImage(file=imgdir + "spam.jpg")
Button(image=photoimg).pack()
or with the more verbose equivalent, which comes in handy if you
will perform image processing in addition to image display:
from tkinter import *
from PIL import Image, ImageTk
imageobj = Image.open(imgdir + "spam.jpeg")
photoimg = ImageTk.PhotoImage(imageobj)
Button(image=photoimg).pack()
In fact, to use PIL for image display, all you really need to do
is install it and add a singlefromstatement to your code to get its replacementPhotoImageobject after loading the original
from tkinter. The rest of your code remains unchanged but will be able
to display JPEG, PNG, and other image types:
from tkinter import *
from PIL.ImageTk import PhotoImage                 # <== add this line
imgobj = PhotoImage(file=imgdir + "spam.png")
Button(image=imgobj).pack()
PIL installation details vary per platform; on Windows, it is just
a matter of downloading and running a self-installer. PIL code winds up
in the Python install directory’s
Lib\site-packages
; because this is
automatically added to the module import search path, no path
configuration is required to use PIL. Simply run the installer and
import the PIL package’s modules. On other platforms, you might untar or
unZIP a fetched source code archive and add PIL directories to the front
of yourPYTHONPATHsetting; see the
PIL system’s website for more details. (In fact, I am using a
pre-release version of PIL for Python 3.1 in this edition; it should be
officially released by the time you read these words.)
There is much more to PIL than we have space to cover here. For
instance, it also provides image conversion, resizing, and
transformation tools, some of which can be run as command-line programs
that have nothing to do with GUIs directly. Especially for tkinter-based
programs that display or process images, PIL will likely become a
standard component in your software tool set.
See
http://www.pythonware.com
for more
information, as well as online PIL and tkinter documentation sets. To
help get you started, though, we’ll close out this chapter with a
handful of real scripts that use PIL for image display and
processing.
In our earlier image
examples, we attached widgets to buttons and canvases, but
the standard tkinter toolkit allows images to be added to a variety of
widget types, including simple labels, text, and menu entries.
Example 8-42
, for instance, uses
unadorned tkinter to display a single image by attaching it to a
label
, in the main application window. The example
assumes that images are stored in an
images
subdirectory, and it allows the image filename to be passed in as a
command-line argument (it defaults to
spam.gif
if
no argument is passed). It also joins file and directory names more
portably withos.path.join, and it
prints the image’s height and width in pixels to the standard output
stream, just to give extra information.
Example 8-42. PP4E\Gui\PIL\viewer-tk.py
"""
show one image with standard tkinter photo object;
as is this handles GIF files, but not JPEG images; image filename listed in
command line, or default; use a Canvas instead of Label for scrolling, etc.
"""
import os, sys
from tkinter import *                    # use standard tkinter photo object
# GIF works, but JPEG requires PIL
imgdir  = 'images'
imgfile = 'london-2010.gif'
if len(sys.argv) > 1:                    # cmdline argument given?
imgfile = sys.argv[1]
imgpath = os.path.join(imgdir, imgfile)
win = Tk()
win.title(imgfile)
imgobj = PhotoImage(file=imgpath)        # display photo on a Label
Label(win, image=imgobj).pack()
print(imgobj.width(), imgobj.height())   # show size in pixels before destroyed
win.mainloop()
Figure 8-43
captures this script’s
display on Windows 7, showing the default GIF image file. Run this from
the system console with a filename as a command-line argument to view
other files in the images subdirectory (e.g.,
python
viewer_tk.py filename.gif
).
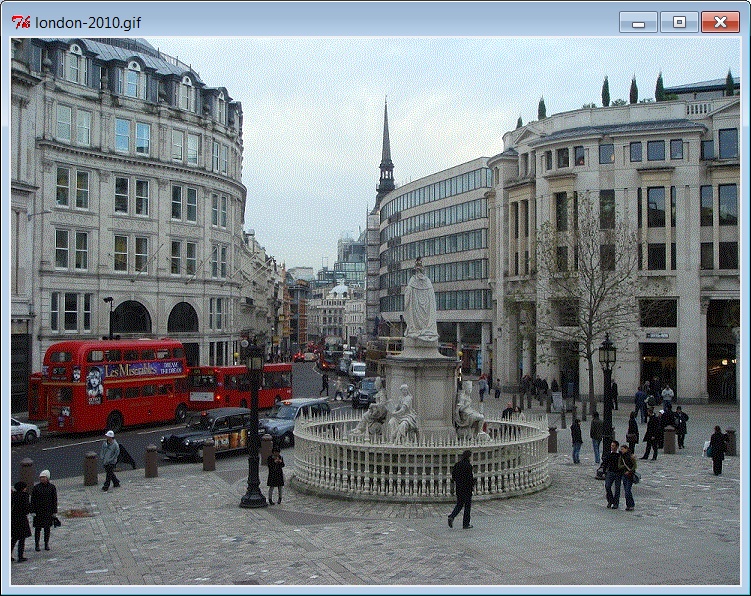
Figure 8-43. tkinter GIF display
Example 8-42
works,
but only for image types supported by the base tkinter toolkit. To
display other image formats, such as JPEG, we need to install PIL and
use its replacementPhotoImageobject. In terms of code, it’s simply a matter of adding one import
statement, as illustrated in
Example 8-43
.
Example 8-43. PP4E\Gui\PIL\viewer-pil.py
"""
show one image with PIL photo replacement object
handles many more image types; install PIL first: placed in Lib\site-packages
"""
import os, sys
from tkinter import *
from PIL.ImageTk import PhotoImage       # <== use PIL replacement class
# rest of code unchanged
imgdir  = 'images'
imgfile = 'florida-2009-1.jpg'           # does gif, jpg, png, tiff, etc.
if len(sys.argv) > 1:
imgfile = sys.argv[1]
imgpath = os.path.join(imgdir, imgfile)
win = Tk()
win.title(imgfile)
imgobj = PhotoImage(file=imgpath)        # now JPEGs work!
Label(win, image=imgobj).pack()
win.mainloop()
print(imgobj.width(), imgobj.height())   # show size in pixels on exit
With PIL, our script is now able to display many image types,
including the default JPEG image defined in the script and captured in
Figure 8-44
. Again, run with a
command
-line argument to view
other photos.
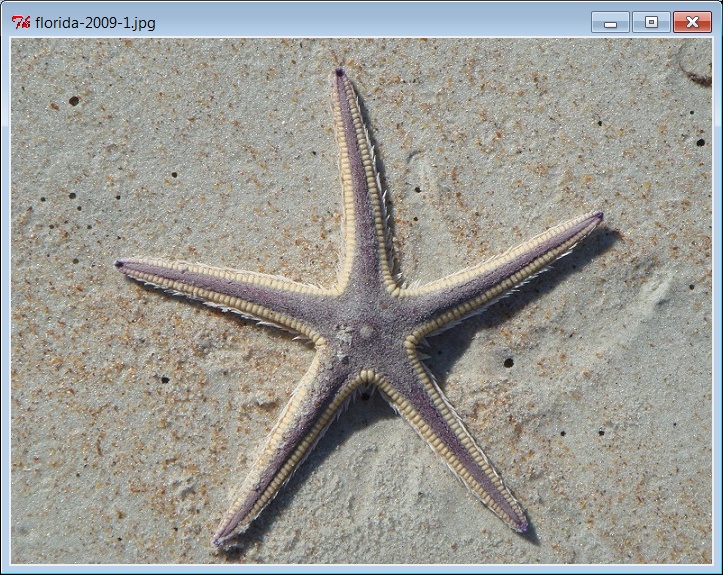
Figure 8-44. tkinter+PIL JPEG display
While we’re at it,
it’s not much extra work to allow viewing all images in
a directory, using some of the directory path tools we met in the
first part of this book.
Example 8-44
, for
instance, simply opens a newToplevelpop-up window for each image in a
directory (given as a command-line argument or a default), taking care
to skip nonimage files by catching exceptions—error messages are both
printed and displayed in the bad file’s pop-up window.
Example 8-44. PP4E\Gui\PIL\viewer-dir.py
"""
display all images in a directory in pop-up windows
GIFs work in basic tkinter, but JPEGs will be skipped without PIL
"""
import os, sys
from tkinter import *
from PIL.ImageTk import PhotoImage          # <== required for JPEGs and others
imgdir = 'images'
if len(sys.argv) > 1: imgdir = sys.argv[1]
imgfiles = os.listdir(imgdir)               # does not include directory prefix
main = Tk()
main.title('Viewer')
quit = Button(main, text='Quit all', command=main.quit, font=('courier', 25))
quit.pack()
savephotos = []
for imgfile in imgfiles:
imgpath = os.path.join(imgdir, imgfile)
win = Toplevel()
win.title(imgfile)
try:
imgobj = PhotoImage(file=imgpath)
Label(win, image=imgobj).pack()
print(imgpath, imgobj.width(), imgobj.height())      # size in pixels
savephotos.append(imgobj)                            # keep a reference
except:
errmsg = 'skipping %s\n%s' % (imgfile, sys.exc_info()[1])
Label(win, text=errmsg).pack()
main.mainloop()
Run this code on your own to see the windows it generates. If
you do, you’ll get one main window with a Quit button to kill all the
windows at once, plus as many pop-up image view windows as there are
images in the directory. This is convenient for a quick look, but not
exactly the epitome of user friendliness for large directories! The
sample images directory used for testing, for instance, has 59 images,
yielding 60 pop-up windows; those created by your digital camera may
have many more. To do better, let’s move on to the next
section.
As mentioned, PIL
does more than display images in a GUI; it also comes with
tools for resizing, converting, and more. One of the many useful tools
it provides is the ability to generate small, “thumbnail” images from
originals. Such thumbnails may be displayed in a web page or selection
GUI to allow the user to open full-size images on demand.
Example 8-45
is a
concrete implementation of this idea—it generates thumbnail images using
PIL and displays them on buttons which open the corresponding original
image when clicked. The net effect is much like the file explorer GUIs
that are now standard on modern operating systems, but by coding this in
Python, we’re able to control its behavior and to reuse and customize
its code in our own applications. In fact, we’ll reuse themakeThumbsfunction here repeatedly in other
examples. As usual, these are some of the primary benefits inherent in
open source software in general.
Example 8-45. PP4E\Gui\PIL\viewer_thumbs.py
"""
display all images in a directory as thumbnail image buttons that display
the full image when clicked; requires PIL for JPEGs and thumbnail image
creation;  to do: add scrolling if too many thumbs for window!
"""
import os, sys, math
from tkinter import *
from PIL import Image                   # <== required for thumbs
from PIL.ImageTk import PhotoImage      # <== required for JPEG display
def makeThumbs(imgdir, size=(100, 100), subdir='thumbs'):
"""
get thumbnail images for all images in a directory; for each image, create
and save a new thumb, or load and return an existing thumb;  makes thumb
dir if needed;  returns a list of (image filename, thumb image object);
caller can also run listdir on thumb dir to load;  on bad file types may
raise IOError, or other;  caveat: could also check file timestamps;
"""
thumbdir = os.path.join(imgdir, subdir)
if not os.path.exists(thumbdir):
os.mkdir(thumbdir)
thumbs = []
for imgfile in os.listdir(imgdir):
thumbpath = os.path.join(thumbdir, imgfile)
if os.path.exists(thumbpath):
thumbobj = Image.open(thumbpath)            # use already created
thumbs.append((imgfile, thumbobj))
else:
print('making', thumbpath)
imgpath = os.path.join(imgdir, imgfile)
try:
imgobj = Image.open(imgpath)            # make new thumb
imgobj.thumbnail(size, Image.ANTIALIAS) # best downsize filter
imgobj.save(thumbpath)                  # type via ext or passed
thumbs.append((imgfile, imgobj))
except:                                     # not always IOError
print("Skipping: ", imgpath)
return thumbs
class ViewOne(Toplevel):
"""
open a single image in a pop-up window when created;  photoimage
object must be saved: images are erased if object is reclaimed;
"""
def __init__(self, imgdir, imgfile):
Toplevel.__init__(self)
self.title(imgfile)
imgpath = os.path.join(imgdir, imgfile)
imgobj  = PhotoImage(file=imgpath)
Label(self, image=imgobj).pack()
print(imgpath, imgobj.width(), imgobj.height())   # size in pixels
self.savephoto = imgobj                           # keep reference on me
def viewer(imgdir, kind=Toplevel, cols=None):
"""
make thumb links window for an image directory: one thumb button per image;
use kind=Tk to show in main  app window, or Frame container (pack);  imgfile
differs per loop: must save with a default;  photoimage objs must be saved:
erased if reclaimed; packed row frames (versus grids, fixed-sizes, canvas);
"""
win = kind()
win.title('Viewer: ' + imgdir)
quit = Button(win, text='Quit', command=win.quit, bg='beige')   # pack first
quit.pack(fill=X, side=BOTTOM)                                  # so clip last
thumbs = makeThumbs(imgdir)
if not cols:
cols = int(math.ceil(math.sqrt(len(thumbs))))     # fixed or N x N
savephotos = []
while thumbs:
thumbsrow, thumbs = thumbs[:cols], thumbs[cols:]
row = Frame(win)
row.pack(fill=BOTH)
for (imgfile, imgobj) in thumbsrow:
photo   = PhotoImage(imgobj)
link    = Button(row, image=photo)
handler = lambda savefile=imgfile: ViewOne(imgdir, savefile)
link.config(command=handler)
link.pack(side=LEFT, expand=YES)
savephotos.append(photo)
return win, savephotos
if __name__ == '__main__':
imgdir = (len(sys.argv) > 1 and sys.argv[1]) or 'images'
main, save = viewer(imgdir, kind=Tk)
main.mainloop()
Notice how this code’sviewermust pass in theimgfileto the
generated callback handler with a
default argument
;
becauseimgfileis a loop variable,
all callbacks will have its final loop iteration value if its current
value is not saved this way (all buttons would open the same image!).
Also notice we keep a list of references to the photo image objects;
photos are
erased
when their object is garbage
collected, even if they are currently being displayed. To avoid this, we
generate references in a long-lived list.
Figure 8-45
shows
the main thumbnail selection window generated by
Example 8-45
when viewing the
default
images
subdirectory in the examples source
tree (resized here for display). As in the previous examples, you can
pass in an optional directory name to run the viewer on a directory of
your own (for instance, one copied from your digital camera). Clicking a
thumbnail button in the main window opens a corresponding image in a
pop-up window;
Figure 8-46
captures one.
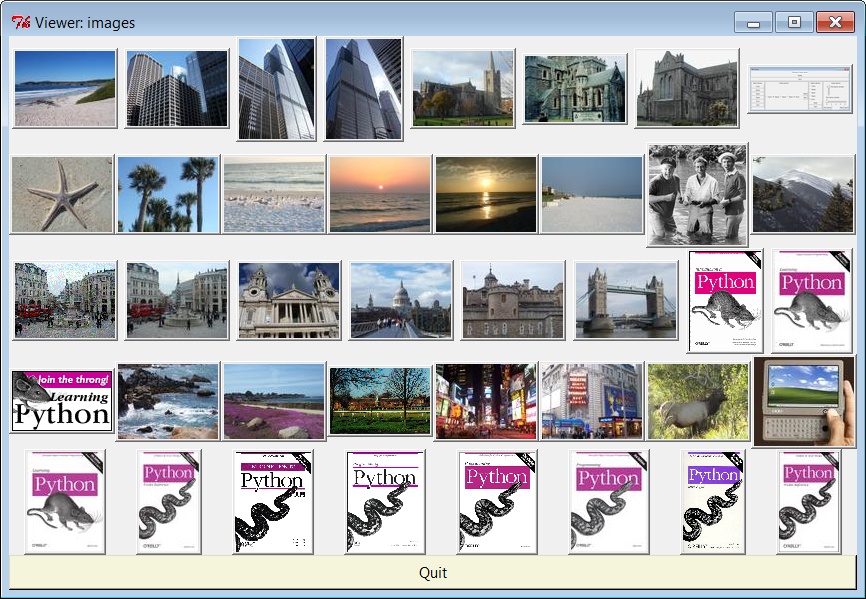
Figure 8-45. Simple thumbnail selection GUI, simple row frames

Figure 8-46. Thumbnail viewer pop-up image window
Much of
Example 8-45
’s
code should be straightforward by now. It lays out thumbnail buttons in
row frames
, much like prior examples (see the input
forms layout alternatives earlier in this chapter). Most of the
PIL-specific code in this example is in themakeThumbsfunction. It opens, creates, and
saves the thumbnail image, unless one has already been saved (i.e.,
cached) to a local file. As coded, thumbnail images are saved in the
same image format as the original full-size photo.
We also use the PILANTIALIASfilter—the best quality for down-sampling (shrinking); this does a
better job on low-resolution GIFs. Thumbnail generation is essentially
just an in-place resize that preserves the original aspect ratio.
Because there is more to this story than we can cover here, though, I’ll
defer to PIL and its documentation for more details on that package’s
API.
We’ll revisit thumbnail creation again briefly in the next chapter
to create toolbar buttons. Before we move on, though, three variations
on the thumbnail viewer are worth quick consideration—the first
underscores performance concepts and the others have to do with
improving on the arguably odd layout of
Figure 8-45
.
As is, the viewer
saves the generated thumbnail image in a file, so it can
be loaded quickly the next time the script is run. This isn’t strictly
required—
Example 8-46
, for
instance, customizes the thumbnail generation function to generate the
thumbnail images in memory, but never save them.
There is no noticeable speed difference for very small image
collections. If you run these alternatives on larger image
collections, though, you’ll notice that the original version in
Example 8-45
gains a big
performance advantage by saving and loading the thumbnails to files.
On one test with many large image files on my machine (some 320 images
from a digital camera memory stick and an admittedly underpowered
laptop), the original version opens the GUI in roughly just 5 seconds
after its initial run to cache thumbnails, compared to as much as 1
minute and 20 seconds for
Example 8-46
: a factor of 16
slower. For thumbnails, loading from files is much quicker than
recalculation
.
Example 8-46. PP4E\Gui\PIL\viewer-thumbs-nosave.py
"""
same, but make thumb images in memory without saving to or loading from files:
seems just as fast for small directories, but saving to files makes startup much
quicker for large image collections; saving may be needed in some apps (web pages)
"""
import os, sys
from PIL import Image
from tkinter import Tk
import viewer_thumbs
def makeThumbs(imgdir, size=(100, 100), subdir='thumbs'):
"""
create thumbs in memory but don't cache to files
"""
thumbs = []
for imgfile in os.listdir(imgdir):
imgpath = os.path.join(imgdir, imgfile)
try:
imgobj = Image.open(imgpath)          # make new thumb
imgobj.thumbnail(size)
thumbs.append((imgfile, imgobj))
except:
print("Skipping: ", imgpath)
return thumbs
if __name__ == '__main__':
imgdir = (len(sys.argv) > 1 and sys.argv[1]) or 'images'
viewer_thumbs.makeThumbs = makeThumbs
main, save = viewer_thumbs.viewer(imgdir, kind=Tk)
main.mainloop()
The next variations on
our viewer are purely cosmetic, but they illustrate
tkinter layout concepts. If you look at
Figure 8-45
long enough,
you’ll notice that its layout of thumbnails is not as uniform as it
could be. Individual rows are fairly coherent because the GUI is laid
out by row frames, but columns can be misaligned badly due to
differences in image shape. Different packing options don’t seem to
help (and can make matters even more askew—try it), and arranging by
column frames would just shift the problem to another dimension. For
larger collections, it could become difficult to locate and open
specific images.
With just a little extra work, we can achieve a more uniform
layout by either laying out the thumbnails in a grid, or using uniform
fixed-size buttons.
Example 8-47
positions buttons
in a row/column grid by using the tkintergridgeometry manager—a topic we will
explore in more detail in the next chapter, so like the canvas, you
should consider some of this code to be a preview and segue, too. In
short,gridarranges its contents
by row and column; we’ll learn all about the stickiness of the Quit
button here in
Chapter 9
.
Example 8-47. PP4E\Gui\PIL\viewer-thumbs-grid.py
"""
same as viewer_thumbs, but uses the grid geometry manager to try to achieve
a more uniform layout; can generally achieve the same with frames and pack
if buttons are all fixed and uniform in size;
"""
import sys, math
from tkinter import *
from PIL.ImageTk import PhotoImage
from viewer_thumbs import makeThumbs, ViewOne
def viewer(imgdir, kind=Toplevel, cols=None):
"""
custom version that uses gridding
"""
win = kind()
win.title('Viewer: ' + imgdir)
thumbs = makeThumbs(imgdir)
if not cols:
cols = int(math.ceil(math.sqrt(len(thumbs))))     # fixed or N x N
rownum = 0
savephotos = []
while thumbs:
thumbsrow, thumbs = thumbs[:cols], thumbs[cols:]
colnum = 0
for (imgfile, imgobj) in thumbsrow:
photo   = PhotoImage(imgobj)
link    = Button(win, image=photo)
handler = lambda savefile=imgfile: ViewOne(imgdir, savefile)
link.config(command=handler)
link.grid(row=rownum, column=colnum)
savephotos.append(photo)
colnum += 1
rownum += 1
Button(win, text='Quit', command=win.quit).grid(columnspan=cols, stick=EW)
return win, savephotos
if __name__ == '__main__':
imgdir = (len(sys.argv) > 1 and sys.argv[1]) or 'images'
main, save = viewer(imgdir, kind=Tk)
main.mainloop()
Figure 8-47
displays the
effect of gridding—our buttons line up in rows and columns in a more
uniform fashion than in
Figure 8-45
, because they
are positioned by
both
row and column, not just
by rows. As we’ll see in the next chapter, gridding can help any time
our displays are two-dimensional by nature.
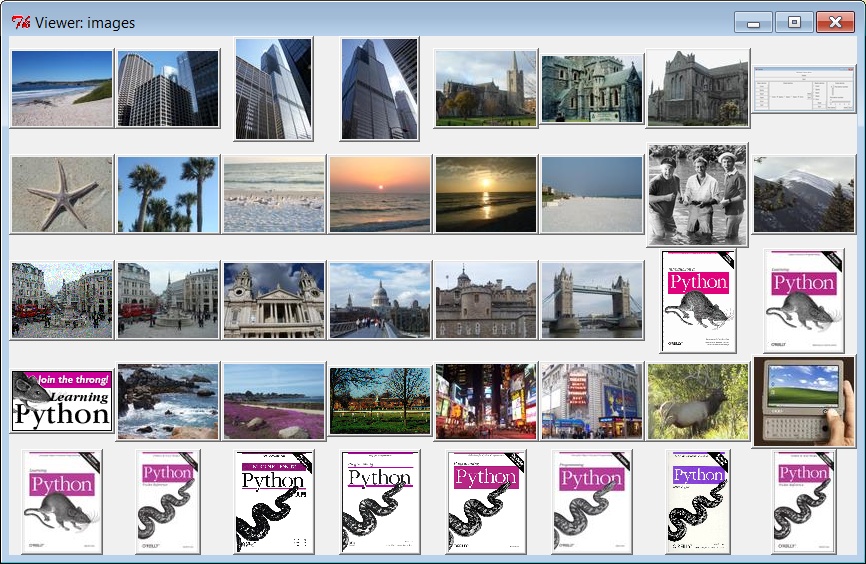
Figure 8-47. Gridded thumbnail selection GUI