Programming Python (63 page)

To be more
independent,
Example 8-34
spawns each of the
four demo launchers as independent programs (processes), using
thelaunchmodesmodule we
wrote at the end of
Chapter 5
. This works
only because the demos were written as both importable classes and
runnable scripts. Launching them here makes all their names__main__when run, because they are separate,
stand-alone programs; this in turn kicks off themainloopcall at the bottom of each of their
files.
Example 8-34. PP4E\Gui\Tour\demoAll-prg.py
"""
4 demo classes run as independent program processes: command lines;
if one window is quit now, the others will live on; there is no simple way to
run all report calls here (though sockets and pipes could be used for IPC), and
some launch schemes may drop child program stdout and disconnect parent/child;
"""
from tkinter import *
from PP4E.launchmodes import PortableLauncher
demoModules = ['demoDlg', 'demoRadio', 'demoCheck', 'demoScale']
for demo in demoModules:                        # see Parallel System Tools
PortableLauncher(demo, demo + '.py')()      # start as top-level programs
root = Tk()
root.title('Processes')
Label(root, text='Multiple program demo: command lines', bg='white').pack()
root.mainloop()
Make sure thePP4Edirectory’s
container is on your module search path (e.g.,
PYTHONPATH
) to run this; it imports an
example module from a different directory. As
Figure 8-35
shows, the display
generated by this script is similar to the prior one; all four demos
come up in windows of their own.
This time, though, these are truly independent programs: if any
one of the five windows here is quit, the others live on. The demos even
outlive their parent, if the main window is closed. On Windows, in fact,
the shell window where this script is started becomes active again when
the main window is closed, even though the spawned demos continue
running. We’re reusing the demo code as program, not module.
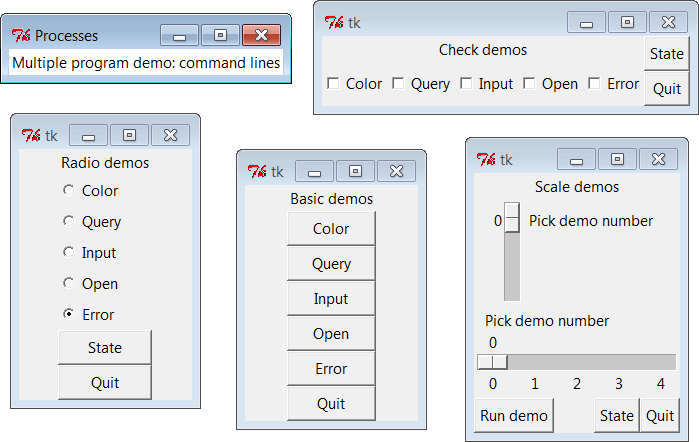
Figure 8-35. demoAll_prg: independent programs
If you backtrack to
Chapter 5
to
study the portable launcher module used by
Example 8-34
to start programs,
you’ll see that it works by usingos.spawnvon Windows andos.fork/execon
others. The net effect is that the GUI processes are
effectively started by launching
command lines
.
These techniques work well, but as we learned in
Chapter 5
, they are members of a larger set
of program launching tools that also includesos.popen,os.system,os.startfile, and thesubprocessandmultiprocessingmodules; these tools can
vary subtly in how they handle shell window connections, parent
process
exits, and more.
For example, themultiprocessingmodule we studied in
Chapter 5
provides a similarly portable way
to run our GUIs as independent processes, as demonstrated in
Example 8-35
. When run, it
produces the exact same windows shown in
Figure 8-35
, except that the
label in the main window is different.
Example 8-35. PP4E\Gui\Tour\demoAll-prg-multi.py
"""
4 demo classes run as independent program processes: multiprocessing;
multiprocessing allows us to launch named functions with arguments,
but not lambdas, because they are not pickleable on Windows (Chapter 5);
multiprocessing also has its own IPC tools like pipes for communication;
"""
from tkinter import *
from multiprocessing import Process
demoModules = ['demoDlg', 'demoRadio', 'demoCheck', 'demoScale']
def runDemo(modname):                     # run in a new process
module = __import__(modname)          # build gui from scratch
module.Demo().mainloop()
if __name__ == '__main__':
for modname in demoModules:                               # in __main__ only!
Process(target=runDemo, args=(modname,)).start()
root = Tk()                                               # parent process GUI
root.title('Processes')
Label(root, text='Multiple program demo: multiprocessing', bg='white').pack()
root.mainloop()
Operationally, this version differs on Windows only in
that:
The child processes’ standard output shows up in the window
where the script was launched, including the outputs of both
dialog demos themselves and all demo windows’ State
buttons.The script doesn’t truly exit if any children are still
running: the shell where it is launched is blocked if the main
process’s window is closed while children are still running,
unless we set the child processes’daemonflag toTruebefore they start as we saw in
Chapter 5
—in which case all child
programs are automatically shut down when their parent is (but
parents may still outlive their children).
Also observe how we start a simple named function in the newProcess. As we learned in
Chapter 5
, the target must be pickleable on
Windows (which essentially means importable), so we cannot use lambdas
to pass extra data in the way we typically could in tkinter callbacks.
The following coding alternatives both fail with errors on
Windows
:
Process(target=(lambda: runDemo(modname))).start()            # these both fail!
Process(target=(lambda: __import__(modname).Demo().mainloop())).start()
We won’t recode our GUI program launcher script with any of the
other techniques available, but feel free to experiment on your own
using
Chapter 5
as a resource. Although
not universally applicable, the whole point of tools like thePortableLauncherclass is to hide such
details so we can largely forget
them.
Spawning GUIs as programs
is the ultimate in code independence, but it makes the
lines of communication between components more complex. For instance,
because the demos run as programs here, there is no easy way to run
all theirreportmethods from the
launching script’s window pictured in the upper right of
Figure 8-35
. In fact, the
States button is gone this time, and we only getPortableLaunchermessages instdoutas the demos start up in
Example 8-34
:
C:\...\PP4E\Gui\Tour>python demoAll_prg.pydemoDlg
demoRadio
demoCheck
demoScale
On some platforms, messages printed by the demo programs
(including their own State buttons) may show up in the original
console window where this script is launched; on Windows, theos.spawnvcall used to start programs bylaunchmodesin
Example 8-34
completely
disconnects the child program’sstdoutstream from its parent, but themultiprocessingscheme of
Example 8-35
does not.
Regardless, there is no direct way to call all demos’reportmethods at once—they are spawned
programs in distinct address spaces, not imported modules.
Of course, we could trigger report methods in the spawned
programs with some of the Inter-Process Communication (IPC) mechanisms
we met in
Chapter 5
. For
instance:
The demos could be instrumented to catch a user
signal
, and could run theirreportin response.The demos could also watch for request strings sent by the
launching program to show up in
pipes
orfifos; thedemoAlllaunching program would
essentially act as a client, and the demo GUIs as servers that
respond to client requests.Independent programs can also converse this same way over
sockets
, the general IPC tool introduced in
Chapter 5
, which we’ll study in
depth in
Part IV
. The main window
might send a report request and receive its result on the same
socket (and might even contact demos running remotely).If used, the
multiprocessingmodule has IPC tools all
its own, such as the object pipes and queues we studied in
Chapter 5
, that could also be leveraged:
demos might listen on this type of pipe, too.
Given their event-driven nature, GUI-based programs like our
demos also need to avoid becoming stuck in
wait
states
—they cannot be blocked while waiting for requests on
IPC devices like those above, or they won’t be responsive to users
(and might not even redraw themselves). Because of that, they may also
have be augmented with threads, timer-event callbacks, nonblocking
input calls, or some combination of such techniques to periodically
check for incoming messages on pipes, fifos, or sockets. As we’ll see,
the tkinteraftermethod call
described near the end of the next chapter is ideal for this: it
allows us to register a callback to run periodically to check for
incoming requests on such IPC tools.
We’ll explore some of these options near the end of
Chapter 10
, after we’ve looked at GUI
threading topics. But since this is well beyond the scope of the
current chapter’s simple demo programs, I’ll leave such cross-program
extensions up to more parallel-minded readers for now.
A postscript: I
coded the demo launcher bars deployed by the last four
examples to demonstrate all the different ways that their widgets can
be used. They were not developed with general-purpose reusability in
mind; in fact, they’re not really useful outside the context of
introducing widgets in this book.
That was by design; most tkinter widgets are easy to use once
you learn their interfaces, and tkinter already provides lots of
configuration flexibility by itself. But if I had it in mind to codecheckbuttonandradiobuttonclasses to be reused as general
library components, they would have to be structured
differently:
- Extra widgets
They would not display anything but radio buttons and
check buttons. As is, the demos each embed State and Quit
buttons for illustration, but there really should be just one
Quit per top-level window.- Geometry management
They would allow for different button arrangements and
would not pack (or grid) themselves at all. In a true
general-purpose reuse scenario, it’s often better to leave a
component’s geometry management up to its caller.- Usage mode limitations
They would either have to export complex interfaces to
support all possible tkinter configuration options and modes, or
make some limiting decisions that support one common use only.
For instance, these buttons can either run callbacks at press
time or provide their state later in the application.
Example 8-36
shows
one way to code check button and radio button bars as library
components. It encapsulates the notion of associating tkinter
variables and imposes a common usage mode on callers—state fetches
rather than press callbacks—to keep the interface simple.
Example 8-36. PP4E\Gui\Tour\buttonbars.py
"""
check and radio button bar classes for apps that fetch state later;
pass a list of options, call state(), variable details automated
"""
from tkinter import *
class Checkbar(Frame):
def __init__(self, parent=None, picks=[], side=LEFT, anchor=W):
Frame.__init__(self, parent)
self.vars = []
for pick in picks:
var = IntVar()
chk = Checkbutton(self, text=pick, variable=var)
chk.pack(side=side, anchor=anchor, expand=YES)
self.vars.append(var)
def state(self):
return [var.get() for var in self.vars]
class Radiobar(Frame):
def __init__(self, parent=None, picks=[], side=LEFT, anchor=W):
Frame.__init__(self, parent)
self.var = StringVar()
self.var.set(picks[0])
for pick in picks:
rad = Radiobutton(self, text=pick, value=pick, variable=self.var)
rad.pack(side=side, anchor=anchor, expand=YES)
def state(self):
return self.var.get()
if __name__ == '__main__':
root = Tk()
lng = Checkbar(root, ['Python', 'C#', 'Java', 'C++'])
gui = Radiobar(root, ['win', 'x11', 'mac'], side=TOP, anchor=NW)
tgl = Checkbar(root, ['All'])
gui.pack(side=LEFT, fill=Y)
lng.pack(side=TOP,  fill=X)
tgl.pack(side=LEFT)
lng.config(relief=GROOVE, bd=2)
gui.config(relief=RIDGE,  bd=2)
def allstates():
print(gui.state(), lng.state(), tgl.state())
from quitter import Quitter
Quitter(root).pack(side=RIGHT)
Button(root, text='Peek', command=allstates).pack(side=RIGHT)
root.mainloop()
To reuse these classes in your scripts, import and call them
with a list of the options that you want to appear in a bar of check
buttons or radio buttons. This module’s self-test code at the bottom
of the file gives further usage details. It generates
Figure 8-36
—
a top-level window
that embeds twoCheckbars, oneRadiobar, aQuitterbutton to exit, and a Peek button to
show bar states—when this file is run as a program instead of being
imported.
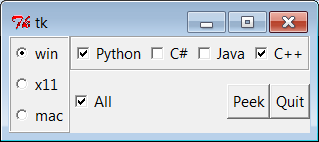
Figure 8-36. buttonbars self-test window
Here’s thestdouttext you
get after pressing Peek—the results of these classes’statemethods:
x11 [1, 0, 1, 1] [0]
win [1, 0, 0, 1] [1]
The two classes in this module demonstrate how easy it is to
wrap tkinter interfaces to make them easier to use; they completely
abstract away many of the tricky parts of radio button and check
button bars. For instance, you can forget about linked variable
details completely if you use such higher-level classes instead—simply
make objects with option lists and call theirstatemethods later. If you follow this path
to its logical conclusion, you might just wind up with a higher-level
widget library on the order of the Pmw package mentioned in
Chapter 7
.
On the other hand, these classes are still not universally
applicable; if you need to run actions when these buttons are pressed,
for instance, you’ll need to use other high-level interfaces. Luckily,
Python/tkinter already provides plenty. Later in this book, we’ll
again use the widget combination and reuse techniques introduced in
this section to construct larger GUIs like text editors, email clients
and calculators. For now, this first chapter in the widget tour is
about to make one last stop—the photo
shop.