Mac Hacks (22 page)

. Lock Down that Mac
One supposes that a Mac connected only to a power source, in a secure
location, and without network access would be perfectly safe. But it would
also be practically useless. The way the world works demands that your Mac
be online, and the way you
watch
the world demands it,
too. There’s no reason that this has to be an inherently unsafe proposition.
This chapter explains how to lock your Mac down and safely go about your
daily business with some peace of mind.
. Achieve Network Anonymity
While
you’re bouncing around on the Internet, the Internet is
keeping an eye on you. This hack explains how to jump around the Web
without giving away information about yourself or your computer using free
tools and services.
You know that when you visit a website, you’re giving up information
about yourself. This might be something you can live with or it might be
something you can’t abide. There’s no way to know unless you’re aware of
how much information you’re giving up when you visit a site or connect to
another computer. Turns
out you can find out what info you’re giving out by
visiting
Panopticlick
and clicking the site’s Test Me button.
Figure 7-1
shows the type of
results you’ll see.

it too much?
The
nifty tool you just used is brought to you by the
Electronic Freedom Foundation. The results might worry you a bit, but you
probably don’t need to fret too much. While you’ll likely be told your
browser fingerprint is unique, it’s a big jump from that to someone
actually being able to identify your computer as the source.
That noted, websites can use the information you broadcast and learn
quite a bit about you and your habits with
cookies
.
Cookies are little packets of information stored by your browser that can
let a website know that you’ve been there previously and how you want
things configured. That seems innocuous, but there are also
tracking
cookies that track every site you visit. As
you can imagine, that level of information could reveal information you’d
rather keep to yourself. Don’t worry—taking care of cookies is
easy.
If
you’re worried about cookies, head to
Safari→Preferences→Privacy. You’ll see a Remove All Website Data button,
which wipes out
all
your cookies. However, this is
probably a bit extreme for most folks, so instead, try inspecting all
the cookies in Safari manually by clicking the Details button. This will
bring up a list of all the cookies and other information stored by your
browser. You can delete the information on a case-by-case basis, as
shown in
Figure 7-2
.

will be more to your liking.
After
you’ve finished deleting the little bundles of tracking
that you no longer want, click Done. Back on the Privacy tab, in the
“Block cookies” section, you have a decision to make about the future:
do you want to only accept cookies from sites you navigate to (the
default setting, “From third parties and advertiser”), stop accepting
cookies altogether (Always), or make like a famished moppet and accept
every cookie sent your way (Never)? It’s your choice, but the default
option works well for most users. For the security minded, Always is the
preferred setting.
If
you’re not satisfied with that level of control, you can
go completely incognito by using an
anonymizer
.
These online sites route your network traffic through their servers,
leaving the impression that their associated IP address was the point of
origin. Several sites provide this service, such
as
Anonymouse
, shown in
Figure 7-3
. A Google search
for “anonymizer” will get you a bevy of other options.
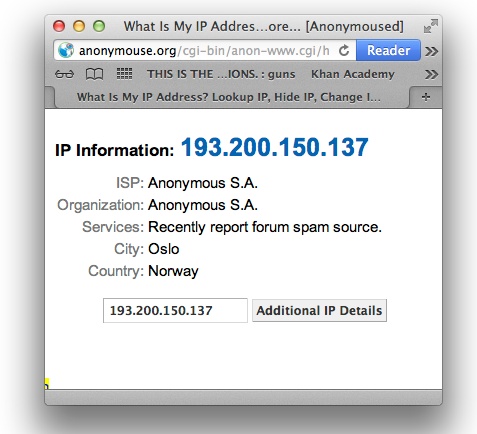
exhibit at Epcot, but that’s where the IP address it’s currently using
points to!
While using Anonymouse or a similar web service seems like an
ideal solution, there are some drawbacks. Since these sites anonymize
people, shady types sometimes exploit them for spam and such. Many
websites are wise to this, so you’ll likely run into a ton of captchas
you wouldn’t usually have to deal with.
The second problem is that most of these anonymizers handle HTTP
requests only. That’s fine when you want to browse the Web, but not so
great when you want to transfer a large file, because such files are
generally handled by a different protocol (FTP). So if you want to
transfer a big file—like a song, for example—you won’t be helped by an
anonymizer.
If
the little inconveniences and the (unlikely) possibility
of ne’er-do-wells compromising your information when using a web-based
anonymous proxy are too much to bear, it is time to think about
Tor.
Unlike a web-based anonymizer, which makes it look as if all your
traffic is emanating from its server, Tor works by routing your traffic
through
numerous
other computers. It aims to keep
you anonymous by making your path very hard to follow. Imagine the
connection from your computer to a particular site as a piece of string.
It’s trivially easy to follow that string from a data-harvesting site
back to your computer. But with Tor, the string doesn’t point back to
your computer; it points back to
another
computer,
which points back to yet another computer, etc. Put differently, Tor
transforms your connection from a single string to a ball of twine with
20 ends hanging out in every direction.
Anonymous
This hack focuses on using Tor with Firefox because that’s the
easiest way to use Tor. But Firefox isn’t the only thing on your Mac
that accesses the Internet. What about Safari and iChat (to cite two
easy examples)—do you want to keep your comings and goings with those
applications anonymous as well? If you have a yearning for more robust
anonymity for a variety of apps, point your browser to
“Running Tor
on Mac OS X”
and discover how to set up your Mac for maximum
anonymity.
Tip: Some sites block requests from known anonymous servers.
Because Tor routes your Internet traffic through any number of
different servers, you’re much less likely to be blocked when using
Tor than when using an anonymizer.
To
start using Tor, simply head to
the download page
and
grab the browser bundle. This will get you browsing anonymously in no
time (you’ll need to have Firefox on your Mac). Once the download is
finished, double-click it and you’ll be informed of your success (
Figure 7-4
).
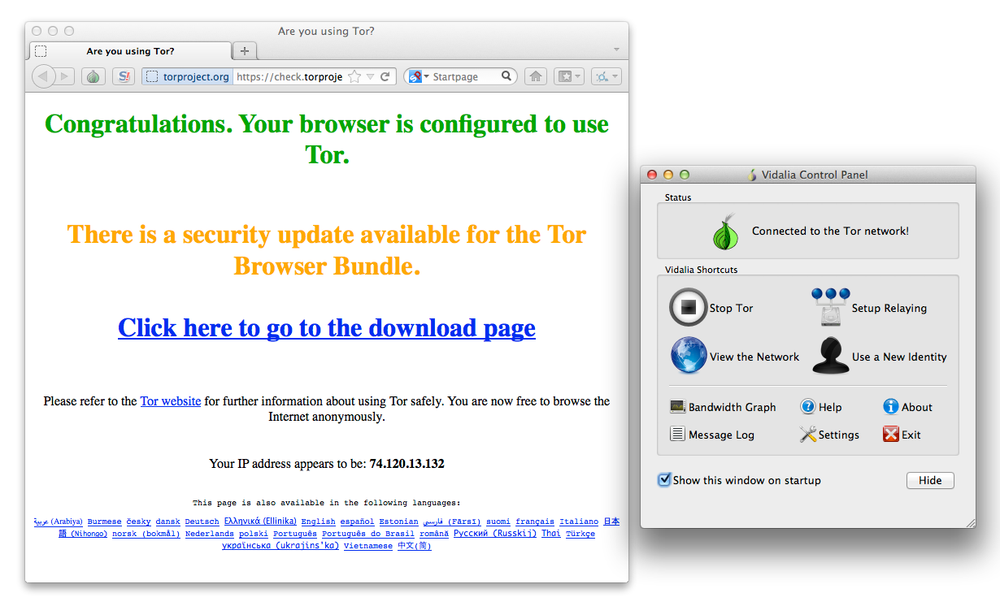
panel when you launch Vidalia. You’re browsing anonymously in
seconds.
You can now safely browse the Internet using Tor (Tor does the
legwork of anonymizing your data; Vidalia provides the graphical
interface to control Tor). But before you start, read the “Want Tor to
really work?” section at the bottom of the download page. It includes
five really good suggestions for protecting yourself while browsing with
Tor.
Warning: Tor offers an easy path to anonymity, but it doesn’t do
anything at all for
privacy
. Using Tor is a
little like going to a foreign country and streaking: no one knows who
you are, so you’re anonymous, but anyone who cares to look can see you
running about in the nude. In other words, all your data sent over the
network is easily peered at and analyzed by the person running the Tor
server (specifically, the exit node) that the information passes
through. So while Tor is great for helping you be reasonably
anonymous, it’s not a good idea to use Tor to send out any critical
unencrypted data.
Now that you can safely browse the Net, you might wonder about
other ways you connect to the Net and how to anonymize those
connections. For example, if you use Messages (formerly known as iChat),
you might want to make those communications untraceable. You can do that
with Tor, but it takes a little configuring. You can find information on
how to Tor-ify individual applications and protocols
at
the wiki
page
.
. Monitor Your Network Traffic
Everyone
worries about someone secretly accessing their machine over
the network, but not as many people worry about just what their Mac is
sending out over the network. Learn how to keep an eye on the data going
into
and
coming out of your Mac.
When
you load a program on your Mac, you usually do so for a
specific reason. For example, if you’re into photo management, you
install a piece of software to manage your photos. What most people
don’t
knowingly do is load software on to their
computer knowing that the software will use your always-on Internet
connection to phone home and report that status of the program to the
company that produced the software.
Usually the check-in with the corporation’s servers is completely
innocuous—the software is just checking for updates or getting help
topics. But other times, the call back to home isn’t as benign. The
program could be checking to see if your copy of the software is valid,
or it might be relaying information you’d rather not broadcast. Of
course, not all software does this. Some programs are completely upfront
about when and why they check in with home base. But other programs
check with more stealth.
While it’s easy to sympathize with a software company’s desire not
to have its titles pirated, it’s a headache when legitimate use of a
program is blocked by the company’s antipiracy efforts. To put a face on
this problem: User CKS has multiple Macs and rarely bothers quitting a
program. On more than one occasion, he has been prevented from using a
particular program on one machine because another instance of the
program is running on another machine (Microsoft Office is one example
of a program that does this). So even though User CKS is only attempting
to actively use one copy of the software, he’s prevented from doing so
because the program has been phoning
home.
Denying users use of legitimately obtained software isn’t just
annoying, it also means that the software is communicating to another
computer somewhere without the user’s knowledge. In some cases, it’s
just another computer on your network, as when the running copies of a
program compare license keys. But in some cases, this communication is
with a server somewhere else—and that’s a little disconcerting. If a
program is calling home without your knowledge, you don’t really have
any idea what information the program is actually sending. This is
something you’d probably like to put a stop to.
If you want more control over the data entering and leaving your
Mac, what you’re really after is a
firewall
. A
firewall separates the Internet from your computer and, depending on
which firewall you use, it can be customized to meet your needs. As you
can probably imagine, customizing a firewall can either be so
superficial as to be worthless or so arcane as to be indecipherable.
What most users would like is just a little more control with a minimal
amount of effort.
OS X comes with a built-in firewall that is turned off by default.
Why is that the default setting? Because chances are that your Mac is
behind the firewall that’s part of your router, so having the OS X
firewall off makes for easy connections with all your other Apple
devices.
But that doesn’t mean you have to
leave
the
OS X firewall turned off. If you use a laptop and hop onto a lot of
different networks, you’ll likely want to turn the firewall on. It’s
easy to do: just head to System Preferences→Security &
Privacy→Firewall. Once there, click the lock icon, authenticate, and
then (on the Firewall tab) click the Turn On Firewall button (
Figure 7-5
).

Mac will listen to and chat with anyone (or anything).
Just turning on your Mac’s firewall doesn’t seem to do much except
light up the green circle next to Firewall: On. There’s more going on,
you just won’t see it until you click Firewall Options. On the pane that
appears (
Figure 7-6
),
you can set access on a per-app basis or even block
all
incoming connections. You can go as crazy as
you want configuring everything, and once you’re done you can rest
safely knowing your Mac is better protected.

list anytime, ensuring that only the connections you want to allow are
made.
This
hack is about limiting the information leaving your
Mac, but since you’re adjusting the firewall settings anyway, you
might want to consider enabling stealth mode. This won’t stop your Mac
from sending information out, but any other computer that tries to
contact your machine will receive no response—essentially telling the
other machine that nothing at all resides at your IP address. To turn
stealth mode on, head to the Security & Privacy preference pane,
click the Advanced button in the Firewall tab, and then turn on the
“Enable stealth mode” checkbox. Why would you want to do this? Well,
if someone is looking for a receptive host computer and yours doesn’t
respond, they’ll look
elsewhere.
You
can secure your Mac as tightly as you’d like with the
built-in firewall, but that only gives you control over what apps can
connect to outside connections, not what they can connect
to
. What an app is connecting to is easily as
interesting whether or not it’s making connections, so a tool to see
what an app is up to on the Net would be ideal.
Fortunately such a tool exists and (happy day) it’s free. It’s
called Private Eye and you can download it
here
. Once it’s
installed, launch Private Eye and look at what the gumshoe can do for
you (
Figure 7-7
).

outbound, which app is using it, and where the data is headed. Here,
usbmuxd is sending info to an iPhone through a WiFi network (the IP
associated with the only iPhone on the WiFi network is
192.168.125.5).
Private Eye reveals a lot of info that you can filter by using the
sidebar on the left side of the window. If you’re worried that Private
Eye is going to constantly scan your data’s comings and goings, worry
not—Private Eye only works when its program window is open. If you see
that a program is sending out data and you don’t think it needs to be
doing that, note what program it is and find a replacement.
So now you know how to stop network traffic with the firewall
that’s built in to OS X, you know how to monitor the traffic and where
it’s going with Private Eye, and you’re probably wondering about the
next logical step: how to tell what data your computer is sending and/or
receiving?
Turns
out that when your computer communicates over a
network, it uses a technique called
packet
switching
. It’s an old concept in the computer world, but a
very useful one. What it means is that, instead of sending a movie
(for example) as one giant file to your Mac, the file is chopped up
into packets of a suitably small size. These packets are then sent to
your Mac where they’re decoded and stitched back together all so you
can watch that Oscar-nominated film without dragging yourself to the
local art-house theater.
It
isn’t much of a trick to see the exact data your computer
is sending out: all you need is a packet analyzer and a little time.
There are plenty of packet analyzers for OS X, but one of the easiest to
use is Cocoa Packet Analyzer. While this tool lacks some bells and
whistles that other packet analyzers offer, it’s easy to get up and
running and will introduce you to the world of packet analysis.
To
get the app, head to
the TastyCocoaBytes download
page
. (The app is also in the Mac App Store, but that version
won’t capture packets, so be sure to get it directly from
TastyCocoaBytes
.)
Once Cocoa Packet Analyzer is installed, fire up the app and click
the Capturing button. When you do, you’ll see a pane where you choose
which interface you want to capture the packets from. The Interface
field will give you a variety of interfaces to choose from; you’ll
usually want to select en0 (Ethernet) or en1 (WiFi) depending on whether
your Mac uses a wired or wireless Internet connection. Once you’ve made
your selection, click the Start button, authenticate, and watch Cocoa
Packet Analyzer grab those packets (
Figure 7-8
)!

intercepting the packets, it’s just copying them, so feel free to use
your Mac as you usually would while CPA is running.
Once Cocoa Packet Analyzer has run for what you feel is a
reasonable amount of time (meaning you’ve collected enough packets to
play with), click Stop. You’ll be in captured-packet nirvana! (See
Figure 7-9
.)
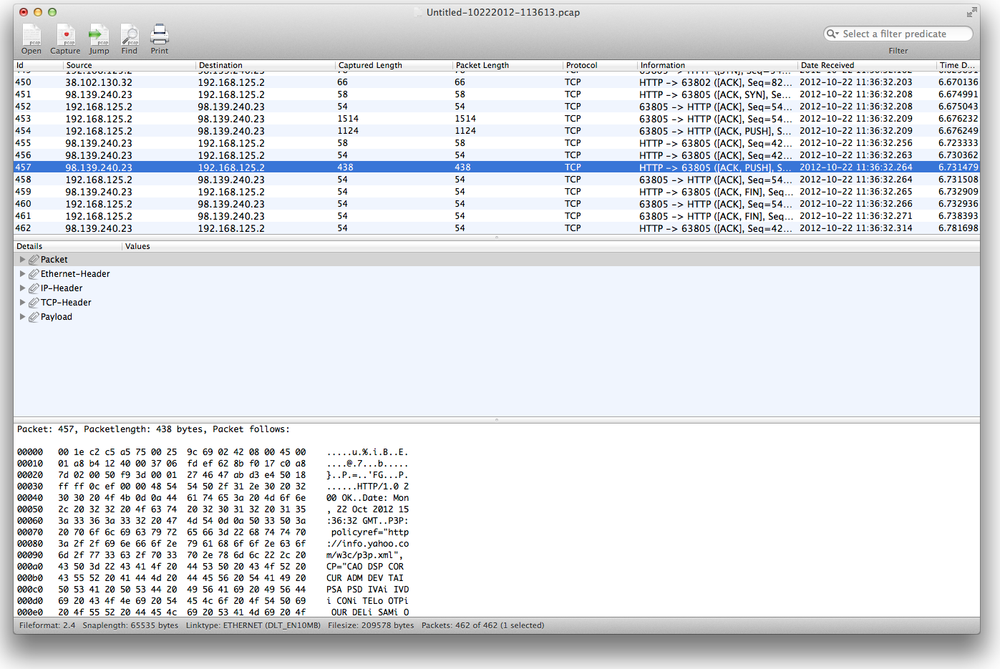
and receiving.
The question now is what to do with all this information. You can
actually do quite advanced packet analysis, but that’s a full book’s
worth of information. For now, be happy that your network holds no
secrets from
you.