Mac Hacks (23 page)

. Protect Sensitive Files
There
are plenty of ways to secure files in OS X, but good
security takes planning, something you might not have done when you ran
across that must-save file. Even without planning and without being a
system administrator, there are methods you can use to hide the files you
don’t want others to see.
There are probably files on your computer that you don’t want people
to see. It might be financial information, embarrassing poems, or the
world’s greatest invention. It really doesn’t matter what it is—if it’s
something you don’t want others to see, you need to know the tricks to
keep other eyeballs off your work while keeping the data accessible to
you.
The most obvious solution to this problem is simply taking proper
security procedures: use strong passwords, multiple accounts, encrypt
everything with FileVault, etc. Taking those steps will provide a great
deal of security for your files, but most people don’t bother to—or
can’t—take all those steps. For example, if you work on a shared Mac in an
office with lax security procedures, the system administrator might have
everyone working off the same account. Or, if you use your computer around
the house, you likely have it set to auto login and family members just
come and use the Mac as they wish without separate, secured user
accounts.
Many (probably most) users get by using their Macs in this fashion,
and it usually isn’t that big a deal. If your computer mates at work
aren’t interested in delving into the Mac and your family members are
using your home machine mainly for web surfing, everything will probably
be okay. That isn’t to say that one account for everyone can’t lead to
serious problems—it surely can, particularly if it’s an administrator
account. It’s just that most people don’t run into insurmountable
problems.
A problem people
do
run into when using a
shared Mac is one of keeping their really private stuff
truly
private. Say you’ve found a video you want to
share with your friend, just to see their reaction. If you save it to your
desktop as a file called
reallyfunnyvideo.m4v
or
supergross.mp4
, there’s a good chance someone
else won’t be able to resist the temptation to take a look. But some
things just don’t go over well at work or at home. You need to hide that
file.
Probably
the easiest way to hide files is simply to put them
somewhere no one (not even Spotlight) is likely to look. If you’re
logged in as an administrator, you can make this place just about
anywhere you want: in the system library, deep in an application
package, or in a fake account you set up. These are all great places,
but ones that require authentication to use. For nonadmin users, their
user library comes to the rescue. The user library is a pretty boring
place, and shoving a file somewhere inconspicuous inside it is likely to
keep your plans secret (see
Figure 7-10
).

Note: In Lion and Mountain Lion, the user Library folder is
hidden (even better!). To see it in the Finder, click the Go menu and
then press the Option key.
When
OS X first came out, one of the common reactions among
computer critics in the know was that OS X hid its Unix roots very well.
What they meant was that, while OS X is based on a system that had been
around forever (in computer years, anyway), not much of the text-based
Unix came through. The thing is, all that Unixy stuff is still there;
you just can’t see it. OS X manages to hide the files from view, so the
end user is presented with a clean GUI to play with. One of the ways OS
X achieves this is by making a lot of files invisible. Visibility of a
file or folder is controlled by a bit that is set to either visible or
invisible. You can edit the bit by hand, rendering formerly invisible
files visible or vice versa. Fire
up the Terminal and type:
setfile -a Vtestfile.txt
Wheretestfile.txtis any file you want
hidden. To make the file visible again, in the Terminal, type:
setfile -a vtestfile.txt
That’s right: the only difference is whether the v is capitalized
or lowercase V, but it makes
all
the
difference.
You
can still open an invisible file, but you’ll need to use
Terminal to do so because it’s mighty hard to click something
represented by zero pixels. Try:
opentestfile.txt
This command doesn’t just work for individual files, it works for
folders (directories) as well—with one important difference: with
individual files, you have to toggle their visibility, but use this
trick on a folder and you can store visible items inside the invisible
folder and those files remain invisible to everyone else. To get at the
files in an invisible folder, in the finder, select
Go→“Go to Folder.”
Alas,
Spotlight will still index the contents of the invisible
folder and that, obviously, won’t do. Exclude the hidden folder from
Spotlight by opening Spotlight’s preferences (System
Preferences→Spotlight). Click the Privacy tab and then add the folder
you want hidden to the list of places you don’t want Spotlight to search
(
Figure 7-11
). Simply
click the + sign below the list and then navigate to the directory you
want to keep under the radar.

necessary step when hiding files.
Since it’s a directory, you can toss any files you want into the
hidden folder without switching the files’ visibility with Terminal. The
files won’t be visible because they’re in an invisible folder, but
they’re
technically
still visible because you
haven’t changed their visibility setting. Confusing? Yes. If it helps,
you can think of it as sort of like Harry Potter’s cloak: Harry isn’t
actually invisible, so if you’re with him under the cloak you can see
him, but no one
outside
the cloak can see him. (The
Invisible Woman, on the other hand, she’s just plain invisible.) To
access the files in the Finder, press Shift-Command-G or choose Go→“Go
to Folder.” Type in the path to your folder (such as~/worlddomplan1
and you’ll be able to browse the files in your favorite GUI
manner.
How hard will these files be to find? Using either method (hiding
individual files or a whole folder) will defeat a Spotlight search, but
things could get dicey if the folder or files get too large. You don’t
have to put the files or folder in a particular spot, but wherever you
put them, their size will be the giveaway and people may notice that if
they sort the disk by file size. No one is ever going to notice a few
kilobytes being taken up by a small directory, but if you’re slapping
Blu-ray rips of
Honey Boo Boo
into a hidden folder,
that will likely be discovered if someone is trying to save some drive
space.
Perhaps
a more elegant way to hide files on the fly is with an
encrypted disk image. This hack works on two levels. The first level is
social engineering: we’ll name the disk image something so boring that
no one will want to look at it. Second, we’ll password-protect the data
so if someone does try to take a peek, they’ll need a password. Will it
be safer if you bury the disk image? Probably, but you can let it sit
right on the desktop if you play your cards right.
To get started, launch Disk Utility (Applications→Utilities→Disk
Utility) and then click New Image. Now here’s the crucial naming part.
You’ll want a name so impossibly boring that no one would ever want to
look at the disk image. How about
Principia_Latin_Version
? That should keep the files
from being looked at anywhere outside a university physics building. If
you happen to be trying to pull this hack off in a physics building
(like I once did), a better choice is probably
PORNO
or
interpretive_dance_reviews
. The important thing is
to know the types of people likely to be using the computer and to
adjust the name accordingly (see
Figure 7-12
). Type the appropriate name in
the Save As box.
After that, pick an appropriate size. The default size is 100 MB,
but obviously you’ll want something big enough to hold all the files, so
change the size to suit your needs. Finally,
choose your encryption method and pick a good password.
Type the password twice and ensure the “Add to Keychain” box is
unchecked
because, unless you’ve changed the
defaults, Keychain will automatically type the password in for you,
which is obviously self-defeating in this case.
After
the image is created, the disk will auto-mount. Drag any
files you wish to the disk and then eject the disk. The
.dmg
you created will remain, but the files
inside won’t be visible with a Spotlight search, and anyone trying to
open the
.dmg
will be required to
enter the password you created.

.dmg
.
Thanks
to an easy-to-use feature of OS X called FileVault 2, you
can encrypt your Home
folder.
Note: In Mountain Lion, FileVault 2 is just called FileVault. In
Lion, it was a big deal so Apple made sure you knew it was FileVault
2
. It’s still a great feature, and still
technically FileVault 2, but OS X Mountain Lion simply refers to it as
FileVault.
Once encrypted, it can’t be accessed, even if the firmware
password is removed or your hard drive is stolen. In fact, your Mac’s
disk is ciphered with
XTS-AES 128 (Advanced Encryption Standard with 128-bit
key), and files can’t be read if the correct password isn’t provided.
(You enable FileVault 2 on a user-by-user basis; each person’s password
will allow them to access their own disk.)
Tip: This
is a good time to point out that having very different
passwords is a
really
good idea. Say you’ve set
your firmware password to “Letmein” and your administrator password to
“kn030213zO0#4.fgh.” Even if someone compromises your firmware
password, they still have to figure out the other password. Far too
many people will use the same password with minor variations over and
over and this is definitely not the time you want to do that.
To enable FileVault 2, go to System Preferences→Security &
Privacy and click the FileVault tab. Click the bottom-left lock icon to
authenticate and change settings. Then click “Turn on FileVault.”
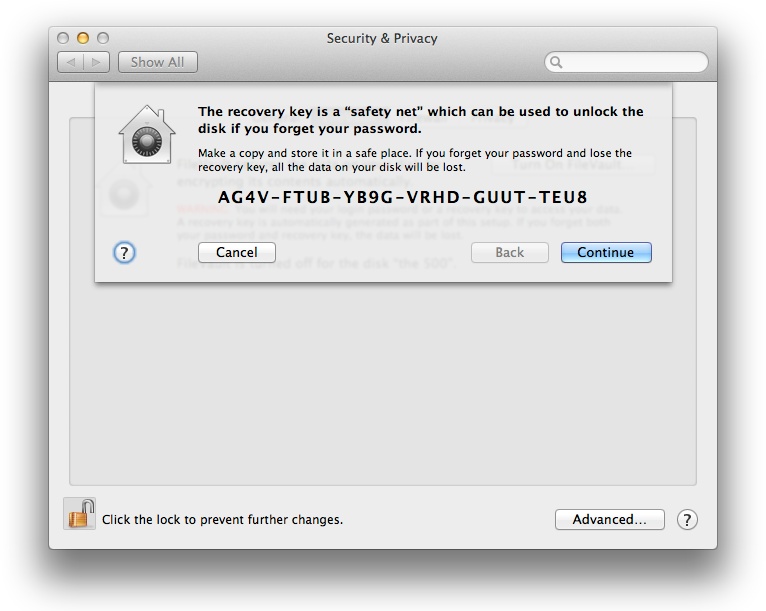
At
this point, you’ll get a long recovery key (OS X calls it
a “safety net”) that you can use if you forget the password (see
Figure 7-13
). Write down this key
and keep it in a safe place. When you click Continue, you’ll get the
option to store the recovery key with Apple by filling out a form. It’s
a good idea to take Apple up on this offer (remember, if you store the
key on your Mac and forget the administrator password, you won’t be able
to retrieve the key).
Once you enable FileVault 2, things change a bit. All the files in
your Home directory will be encrypted and will be automatically
deciphered after you login. Sounds processor intensive, right? Actually, it
isn’t—this feature is almost transparent to the user (so you shouldn’t
notice your computer running any slower) and provides great protection
against people accessing your
files.