Mac Hacks (20 page)

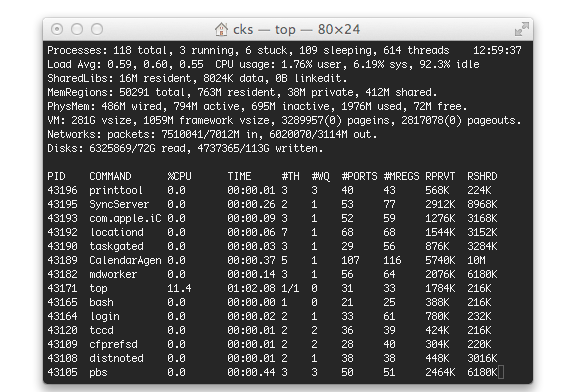
running and associated stats!
Now that you’re armed with thekillcommand and a way to watch things in the
Terminal, you can track down those pesky performance drainers and banish
them to the digital
ether!
Tip: What’s
that you say? You love the idea and functionality oftopbut loathe the very notion of
firing up the Terminal? Today is your lucky day: every Mac ships with a
cool GUI version oftopcalled
Activity Monitor. Just dig into Applications→Utilities and fire it up.
All the goodness oftopwith pretty
icons everywhere. (Here’s a fun experiment: fire uptopand Activity Monitor at the same time and
see which one requires more from the CPU. On my machine, Activity
Monitor requires roughly four times the resources oftop.)
. Install Homebrew
The
Mac App Store is full to bursting with apps made
specifically for OS X, but there are even
more
great
apps your Mac can run with just a little bit of help.
When OS X was first released way back in 2001, one reviewer remarked
that Apple had “hidden UNIX really well.” The thought was that UNIX was a
powerful computing system for the hardcore folks out there and not suited
for home computers. That made some folks wonder, “Hey, can I still get the
power of UNIX on my Mac?” The answer is yes—and if you give it a chance,
you’ll really like it.
Alas, most people don’t give it a chance. They take one look at what
is takes to install a program like The Gimp on OS X and think “Well, the
price is nice but installing all that? No way.” Even if they do go to the
trouble of installing an app that doesn’t require OS X, then they have to
worry about keeping it updated and other app-management tasks. It all
seems like too much. Why isn’t there some easy way to install new programs
and look for updates? Also, if all this software that doesn’t run natively
on your Mac is so great, why hasn’t someone made it easier to use?
Turns out people
have
noticed that problem and
have been working on solutions. While there’s more than one program that
aims to make nonnative apps run on the Mac more easily, Homebrew is a
great one to start with.
One of the neat things about Homebrew is that it takes care of
dependencies for you. For example, program X might rely on program Y and
program Z, so to install program X, you have to realize that they rely
on the other two programs and install those, too. It can be a bit of a
headache, and that’s a great reason to use Homebrew. In this example
we’ll be using ImageMagick, which has dozens of dependencies. You
could
chase all of them down by hand if you wanted
to, but Homebrew will do all that for you.
Neat!
Another
great reason to install Homebrew? It has minimal
dependencies. All you need is a copy of Xcode (free from the Mac App
Store) and the Command Line Tools extension. Download Xcode (a 3.5+ GB
download) from the Mac App Store for free. Once you’ve done that, launch
the application, agree to its terms, and then choose Xcode→Preferences.
In the Preferences window, click the Downloads tab, and then click the
Install button next to Command Line Tools (where the status bar is in
Figure 6-6
). You’ll be
asked to authenticate, and once you do, the download will begin.
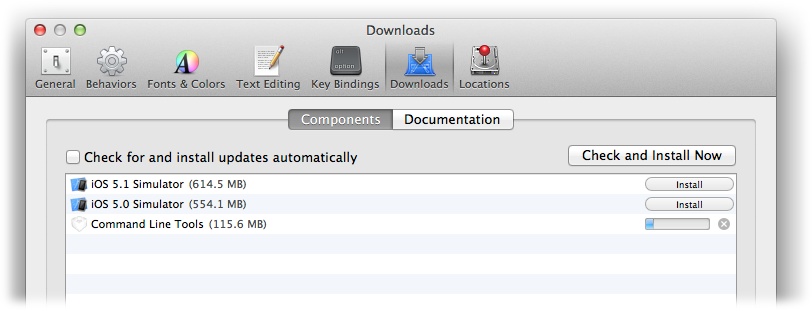
too. These used to be a standard part of the Xcode download, but now
you get to jump through an extra hoop to get them.
After
you’ve installed Xcode and the Command Line Tools, you’ll
want to install or update your XQuartz installation. (XQuartz is the
windowing environment used by a ton of applications that aren’t OS X
native.) It came preinstalled on older versions of OS X, but in Mountain
Lion, it isn’t installed. If you already have XQuartz, launch it and
install the latest updates for it. If you don’t, head to
Applications→Utilities→X11 and follow Apple’s instructions for
installing XQuartz.
Installing
Homebrew is simply a matter of typing a single line into
Terminal:
ruby -e "$(curl -fsSkL raw.github.com/mxcl/homebrew/go)"
Before
we run this command, let’s take a look at what it will
do:
rubyis a programming
language built into your Mac. This command starts Ruby, and the-etells Ruby a command is
coming.curlstands
for cURL, a command that fetches data from a
server.-fsSkLis a set of flags
that tell cURL when (and when
not
) to report
errors, use progress bars, and so forth.raw.github.com/mxcl/homebrew/gotells cURL
where to get Homebrew from.
Note: It turns out that the line of code you use to install
Homebrew is the same line you use to
uninstall
it. So if you have Homebrew installed and need to get rid of it, type
that command in and Homebrew will say it’s already installed and give
you a command to uninstall it.
Once you type that in and hit Return, you’ll see information about
what Homebrew is going to do. Once you’ve digested all of the changes
Homebrew is going to make, press Return, and then type in your
administrator password and hit Return yet again. It will take a few
moments, but Homebrew will complete the installation process on its
own.
When
the process is complete, Terminal displays two
instructions: it says to run the commandbrewbefore you install anything, and to type
doctorbrew helpnow. Typingbrew helpand then pressing Return displays
some quick examples and troubleshooting tips that you should take a look
at. Thebrew doctorcommand tells you
about the installation. When you run this command, if Homebrew sees
anything it doesn’t like, it will let you know (
Figure 6-7
).
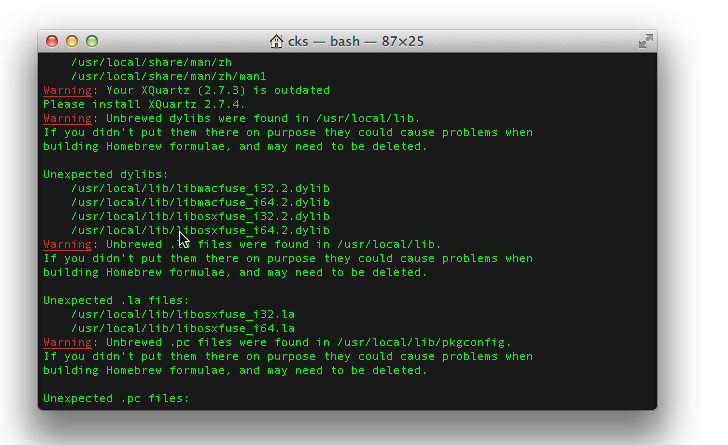
world know something isn’t right. It specifies the location of the
offending files (in this case, /usr/local) so you can find and delete
them.
In my case, Homebrew wasn’t pleased about an old installation of
the now deprecated MacFuse, so I manually deleted the files Homebrew
listed. Once you delete any offending files, you can runbrew doctoragain and you’ll see the message
“Your system is raring to brew.” So let’s get
brewing!
Tip: If you’re loathe to navigate to the offending files using
Terminal and don’t want to turn on invisibles (by default, the
usr
folder—whose name is short for “Unix system
resources”—is invisible in OS X), use the Finder instead. Choose
Go→“Go to Folder” and you can see whatever folder you wish. In this
case, typing in/usr/localgave me
access to the folder holding the suspect files so I could manually
delete them.
There
are a ton of apps you can install with Homebrew. One
useful app is ImageMagick, which lets you do all sorts of nifty image
manipulation so you can impress your friends, and Homebrew is a great
way to install and manage it. Simply
open a Terminal window and type:
brew install imagemagick
Homebrew takes care of the rest (
Figure 6-8
).

you installed it with one line in Terminal instead of chasing various
apps all day long.
Once the installation is over you’ve got ImageMagick. Well, maybe
not. Look for any errors. My
particular install said ghostscript was missing.
ImageMagick needs ghostscript? But how can a person easily install
ghostscript? Oh, yeah! Here’s how:
brew install ghostscript
Now ImageMagick is ready to roll! See
[Hack #30]
to learn how to
use it.
. Get Things Done Safely with the Command Line
Once you’re relatively comfortable with the command-line interface,
you’ll want to do more with it. This hack takes you down the path to
command-line proficiency.
Killing
processes with the command line is great fun and
empowering (
[Hack #27]
), but that example
doesn’t even
begin
to hint at all the command
line’s abilities. The first order of business is deciding how to move
around using the command line. It isn’t as intuitive as the GUI of OS X,
but the process is straightforward. Try
launching Terminal and typing this (remember,$represents the command prompt; you don’t
actually need to type it in):
$ cd Documents
That command changes the
working directory
to
the Documents folder of your home folder (cdis short for “change directory”). Your
working directory is the one you’re “in” at the moment; you can think of
it as analogous to the active Finder window. You
can see the results of moving to this directory by
typing:
$ pwd
This command (short for “print working directory”) makes Terminal
display the path to the current destination:
/Users/username/Documents
.
(In Unix and many programming languages,
print
doesn’t refer to printing text on a page; it just makes something appear
onscreen—in this example, the current working directory.)
To get back to the home directory, type:
$ cd
This command is a lot like Dorothy’s red slippers—it takes you
back to your home directory no matter
where
you are
in Unix space. You can, naturally, string things together. If you wanted
to get to your iPhoto library, just keep extending the pathname of where
you want to end up. To wit:
$ cd Pictures/iPhoto\ Library
There are a couple of things to note here. If you want Unix to
understand where you want to go, you can’t skip ahead and type onlyiPhoto\ Library; you’ll have to
follow the path from the directory where you currently sit (in this
example, your home directory). Secondly, if the name of your destination
contains a space, you have to replace the space with “\” (a forward slash and then a space). (It’s
enough to make you want to use underscores!)
Navigating
backwards a single level is easy enough: two dots tell
Unix to move up to the parent directory:
$ cd ..
If you’re not a big fan of moving about using the command line,
you can always use a nifty OS X feature that automatically completes the
path. Simply typecdat the command
prompt, followed by a space, and then drag a folder from a nearby Finder
window over to your Terminal window. Your Mac will automatically fill in
the path to that folder. For example, typingcd, then a space, and then dragging the iPhoto
Library folder onto the Terminal window results in (on my Mac, anyhow)
the following:
ElChupacabra:everything cks2$ cd /Users/cks2/Pictures/iPhoto\ Library
Hitting Return takes me to the desired directory:
ElChupacabra:iPhoto Library cks2$
Quick refresher: The stuff before the$is useful because it tells you where you
are. It lists your computer’s name (ElChupacabra, in this example), the
directory you’re currently in (iPhoto Library), and your
username (cks2).
Now
that you know the fundamentals of traveling about using
the command line, we can move on to creating
directories
(the Unix term for “folders”). The
command to create a directory ismkdir. On its own,mkdirdoesn’t do anything; it needs the name
of the new directory, too. Type:
$ mkdir machacks
Whatever directory you were in before now has a new folder in it
called machacks. Does this mean you can only create directories in
whatever directory you’re in at the moment? Of course not. You can use
the navigation method we used earlier to choose any directory you want.
Simply replacecdwithmkdir, and the new directory can be created in
the place of your choosing. This command, for example:
$ mkdir ~/Documents/machacks
Results in a folder called
machacks
in the
Documents folder.
But
what good is a directory without files in it? None at all,
so now it’s time to learn how to move files around. In Unix, you do that
with themvcommand. Here’s what to
do if you wish to move a file named
monk.tif
from your working directory into the
newly created
machacks
folder:
$ mv monk.tif machacks/
The command moves the specified file into the
machacks
folder. You can also usemvto rename a file:
$ mv monk.tif machacks/monknew.tif
That changes the name of
monk.tif
to
monknew.tif
and also moves the file to the
machacks
folder. But you could just as well have
kept it in the same location and changed the name by typing:
$ mv monk.tif monknew.tif
Of
course, you don’t always want to move a file; sometimes
you just want to
copy
it. In Unix, the command for
copying a file iscp. You have to
specify the name of the file and the name of the copy:
$ cp monk.tif monkcopy.tif
This results in the original file
monk.tif
and an identical file called
monkcopy.tif
residing in the
working directory. That’s great and all, but most of the time you want
the file copied to some other location. No problem. Just type:
$ cp monk.tif machacks/monkcopy.tif
That creates a copy of
monk.tif
called
monkcopy.tif
and deposits it in the
machacks
folder.
Tip: It’s easy to forget that names don’t always translate from
the Finder to Unix. In Unix, the file extension is visible even if you
saved a file with the Hide Extension option turned on. It’s
technically possible, though rare, to find files without extensions.
That probably won’t happen to you, but if it does, you’ve been warned.
If you find yourself wondering why you can’t copy a file that’s
clearly present in the Finder, use thelscommand to see if the name you’re typing
matches the name the command line is looking for.
You’ve
generated a directory and created some superfluous files.
But who wants a bunch of worthless files lying around? Time to get rid
of them!
Warning: We are about to invoke thermcommand. This is the time to remember
that in Unix spelling, spacing, and capitalization all count. If you
forget that, you might accidentally delete the wrong file.
Before using thermcommand
(short for “remove”), it is a good idea to make sure you know where you
are and what you’re about to remove. To
see a list of all the files in the working directory,
typels(short for “list”) and then
hit Return. Until you feel very confident in your command-line skills,
run thelscommand before thermcommand so you can see what files
are in the working directory before you banish them for eternity.
Time to get rid of that useless
monkcopy.tif
file. Type:
$ rm monkcopy.tif
Bam,
monkcopy.tif
is gone!
And I mean
gone
—don’t look for it in the Trash,
because it’s not there. It’s been obliterated from your machine. So
don’t usermunless you want to
completely
get rid of a file.
You can extend thermcommand
by specifying multiple files you want to delete. Simply put a space
between the filenames. For example, this command deletes both
monk.tif
and
monkcopy.tif
:
$ rm monk.tif monkcopy.tif
You can include as many files as you wish, and they’ll all be gone
as soon as you hit Return.
Thecp,mv, andrmare commands that give people new to
Terminal pause. They’re only two-letter commands, but they can be
incredibly destructive. For instance,cpandmvwill overwrite any files with the same names in the target directory
without warning. This can be a real problem when you’re moving files
to a backup location; your old backups will be overwritten without a
peep from Terminal. Thermcommand
can be even more worrisome because those two letters are the Unix
equivalent of saying goodbye
forever.
The good news is that all three commands support the-ioption, which will prompt you (in the
case ofcpandmv) if any files are going to be overwritten
and (in the case ofrm) which file
is about to be deleted. In Terminal, typerm -i filenameto use this feature. For
example, if you’re about to usermto remove
monkcopy.tif
and typerm -i monkcopy.tif, Terminal
will warn before it erases
monkcopy.tif
. This isn’t a
set-it-and-forget-it deal: you’ll need to add the-ieach time you use one of the commands if
you want Terminal to warn you. (The-ibit is called a
flag
, and when used in conjunction with therm,cp, andmvcommands, it causes Terminal to warn you
before it deletes data.)
Moving files and creating directories is useful, but it’s time to
step things up a notch. It turns out that there’s more power in these
commands than is apparent from the way you’ve been using them.
In
general, commands have
arguments
and
options
(a.k.a.
flags
).
Arguments are usually the file you want the command to act upon (inrm monkcopy.tif, for instance, the
argument is
monkcopy.tif
), and
options are ways to specify how the command should work. Options vary
from command to command. You
can find a list of the options for any particular command
by typingman(short for “manual”)
followed by the command you’re interested in. For
example, typingmanreturns a list of the various options you can invoke when
ls
using thelscommand. (When you’re
done looking at the manual page, hit Q and you’ll be back to a shell you
can type in.)
It’s one thing to read the list of the options; it’s another to
actually
use
them. Let’s try stringing together a
command, an option, and an argument. Pick a folder and type:
$ ls -F /usr/libexec/
You’ve specified a command (ls), an option (-F), and a folder to inspect
(
/usr/libexc/
). Thanks to the option you supplied,lswon’t just return a list of all
the files; instead, it’ll return a list in which directories are
identified with a trailing/and
executable files are identified with an*. Here’s the partial output of that
command:
|
|
|
|
|
|
|
|
|
|
|
|
As you can see, the-Foption
modifies the behavior of thelscommand. But there’s more to adding options and arguments. You can
string them together like so:
$ ls -F -a ~/Desktop/Chapter_4 ~/Desktop/bboah_bu
In my case, that command roots through a folder called
Chapter_4
and a folder called
bboah_bu
on my desktop and returns the results
according to thelscommand’s-F -aflags (-atelllsto list files that start with a ., which are usually invisible).
Finally, it
turns out that there are a lot of hidden programs on your
Mac. The Finder won’t reveal them, but you can run them from the command
line. One program included on the Mac is Diff, which can compare
documents and show you the differences between them (particularly useful
when you are updating an old file and a trick I wish I had remembered
when writing
OS X Mountain
Lion Pocket Guide
!).
The syntax for Diff is:difffirstfile secondfile. To make the differences
easier to spot, we can make Diff display the output in two columns by
adding the-yflag after thediffcommand. The actual command looks like
this:
diff -ypathtofile1 pathtofile2
That will generate two columns showing you the difference between
the two text files you’re comparing. The thing about Diff isn’t that
it’s so interesting; it’s that it’s such a good example of a
command-line program. There are a lot of them, and they generally work
the same way: command, flags, file(s). For a list of all the commands
that are available to you, visit
this
page
. You’ll be
amazed.