Mac Hacks (32 page)

. Hack Some Hardware
Hardware hacking is the scariest and, for some, the most interesting
type of hacking. You’ve got a Dremel (the high-speed cutting and polishing
tool all hackers love), a Mac, and a few spare hours—what could possibly go
wrong? The truth is that a lot can go wrong, but when things go right the
result is often fantastic. So why not try to beef up that aging laptop? Not
enough of a challenge? Then turn it into a tablet computer. And as long as
it’s in pieces, why not dye it fluorescent green or give it a one-of-a-kind
paint job? Hardware hacking is where it is at!
. Have Your Mac Automagically
Recognize You
What
if your Mac knew when you were in the room? It can sense
when you’re near with the help of some clever scripts and Bluetooth
exploits!
In the movies, smart homes automatically greet you when you return
after a hard day at work. And while that does sound like a neat trick,
until recently it hasn’t been very easy to actually accomplish.
Fortunately, technology and clever programmers are catching up with the
fantasy. With the Mac you already have, your cellphone, and a little
scripting, you can be living in a house that automatically does things for
you when you arrive; no buttons required.
What’s the ingredient that makes this possible? Bluetooth. Although
it wasn’t designed for this use, it turns out that Bluetooth provides a
way for your computer to know when you’re home by inferring your presence
from the cellphone or other Bluetooth-equipped device you have on your
person. And that’s good enough to start putting the “smart” in smart
homes.
You need a Mac with Bluetooth (which any modern Mac already has)
and at least one Bluetooth device, such as an iPhone or iPod Touch
(virtually any portable Bluetooth-equipped device will work). No special
Bluetooth support is necessary to have your Mac and iPhone talk, since
your Mac doesn’t have to actually exchange any information with the
device; it only has to be able to detect that the device is within
range. I’ve used the technique described here with an old Nokia phone, a
Motorola Bluetooth Headset, and an Apple iPhone. You only need one
Bluetooth device, but it needs to be one that you’re going to carry
around, so the Apple Magic Trackpad is only a good choice if you carry
it around in your purse or briefcase.
Bluetooth is an often-overlooked feature on OS X. Bluetooth just
sits there talking to your wireless keyboard and mouse, never doing
much to attract your notice except displaying the flashing battery
sign to let you know disconnection is imminent. Or maybe you’re having
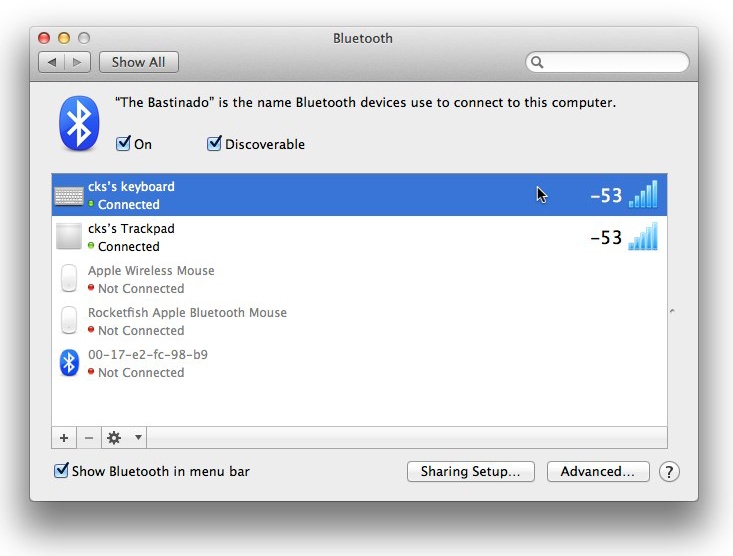
Bluetooth connectivity problems. Check
your Bluetooth signal strength by heading to System
Preferences and choosing Bluetooth. You’ll see a list of devices, but
all you’ll learn is that they’re connected. Your Mac knows how strong
the signal is but needs to be persuaded to tell you. Option-click the
device you’re interested in to discover how strong its signal is
(
Figure 11-1
). As with
WiFi, numbers closer to zero are better (−10 is much better than
−50).
You
need an app that lets you run scripts when it detects the
presence of a Bluetooth device. There are a few different apps that can
do this, but I use
the Bluetooth
Proximity Tasker
, which is available in the App Store. It’s a
little clunky to set up, but it does what we need and it’s inexpensive
($2 as of this writing).
The
first step is to formally introduce your Mac and your
Bluetooth device (let’s assume it’s an iPhone) to each other, a process
called “pairing.” To do this, make sure your device’s Bluetooth support
is switched on and that it is set to “discoverable” mode. On an iPhone,
for example, go to Settings→Bluetooth and turn on Bluetooth.
Don’t
close the Settings pane when you’re done—it
has to be open for your iPhone to be discoverable.
Next, head over to your Mac and follow these steps:
Choose System Preferences from the Apple menu, and then click
Bluetooth.Make sure that the On and Discoverable checkboxes are turned
on. This allows your phone to see that your Mac is available via
Bluetooth.Click the + button at the bottom of the Devices list (
Figure 11-2
); or, if you
don’t have any devices connected, click the Set Up New Device
button. Either way, the Bluetooth Setup Assistant opens.Use the setup assistant to pair the iPhone with your Mac.
(Depending on the device, this might involve entering a series of
numbers to authorize the connection.)

see the + button—the Set Up New Device button. Once your Mac sees your
device, follow the onscreen instructions to pair the device.
When you’ve finished the Setup Assistant, your iPhone will be
added to the list of devices in the Bluetooth preference pane.
Note: It’s OK if the status message you see on your phone reads
“Not Connected,” and if you see a similar status on your Mac. That
just means your Mac and iPhone have been formally introduced but
aren’t exchanging any data. For this hack, no data is sent back and
forth—the Mac and phone just need to see each other.
Next,
open the Bluetooth Proximity Tasker app on your Mac. (If
you see a dialog box about AppleScript not executing, don’t be
concerned. This is just Bluetooth Proximity Tasker telling you that it’s
not going to run any scripts while you’re configuring it. This is a good
thing, despite the confusing alert.) If you don’t automatically see the
app’s preferences window, then click the gear icon on the right side of
your menu bar and choose Preferences. Next, click the Bluetooth Device
button and select your iPhone from the list of devices and then click
Select. This tells the app that this is the device you want it to watch
for.
Next, tell the app to run an AppleScript when your iPhone is
within range of your Mac. To do this, copy and paste a debugged script
from AppleScript Editor into Bluetooth Proximity Tasker’s In Range
AppleScript field. (The next section includes suggestions of the type of
scripts to use.)
Bluetooth Proximity Tasker can also execute a script when it
stops
detecting your device, which you configure
with the “Out of Range AppleScript” field, but I haven’t found this
useful for home automation. The reason is that Bluetooth’s range is
rather limited, so you can’t reliably infer that you’ve left home simply
because your device has moved out of range; you might have only gone to
the kitchen for another cup of coffee. But if you’re simply using the
script to trigger the screensaver or something simple like that, the
option can be quite useful.
One very nice feature of Bluetooth Proximity Tasker is the Select
slider, which lets you set the detection sensitivity. For example, if
you want to run the script only when your iPhone is
very
close to your Mac, set the slider towards the
right. Or, to run a script when there’s no sign of your iPhone at all,
set the slider all the way to the left. You’ll have to experiment to
find the setting that works best for you.
The Delay field defines how often the app checks for the presence
of your iPhone. The value you enter here (in seconds) should be
appropriate for the actions you’ve programmed in your AppleScript. For
example, if you want your Mac to turn on the room lights as soon as it
detects your presence, you’ll want to have Bluetooth Proximity Tasker
look for your iPhone every minute or so. But if you simply want to
announce how many mails you have waiting, then a longer scan interval
might be sufficient.
Bluetooth Proximity Tasker is smart enough to only run your script
when it notices that your iPhone proximity has changed. That is, it will
run the In Range AppleScript code when your iPhone is newly nearby,
after having not been detected the last time it checked. Here again is
where you’ll want to fine-tune the Select slider.
The AppleScripts that you use with Bluetooth Proximity Tasker is
where all the magic happens, and this is your opportunity to really get
creative. You can make your Mac automatically perform anything you can
accomplish with AppleScript when you, carrying your iPhone, get within
sensing range of your Mac.
If
the things you’re interested in automating only happen on
your Mac, such as automatically checking your personal email account
when you come home from work, you don’t need anything except the script
you want to run. But if you want to control the lights in your home or
otherwise reach out beyond your computer, you’ll need home-automation equipment and software.
Two
good software options are
Indigo
or
XTension
. In this example I’ll use
XTension.
My In Range script tells XTension to perform several actions in
sequence, some of which use conditions that are tracked for me by
XTension. The first thing that happens is that, if the current time is
after sunset, a lamp in the entryway turns on. Not only is this
welcoming, it provides a visual cue that my Mac has recognized me and
has started the script.
Next, the Mac uses text-to-speech to tell me how many phone calls
I missed while I was gone. This
information is tracked by XTension using
CIDTracker
.
Finally, the Mac announces how many unread email messages I have
waiting. It determines this by asking Mail for the contents of a mailbox
that only contains messages sent to me by people that I’ve assigned to a
group in Contacts. This is accomplished by a rule that I’ve defined in
Mail.
These are all standard techniques but, as with much of home
automation, it’s the ability to connect existing pieces in new and
convenient ways that creates value and adds convenience.
Now that you know how to trigger actions automatically, the hard
part is deciding on the most useful things to have happen. Perhaps you
want to have Safari load your favorite websites, or have your
appointments read from Calendar. The limit is your imagination,
AppleScript ability, and the fun you find in experimenting with
different
approaches.
—
Gordon Meyer
. Squeeze Some Speed out of an Aging MacBook Pro
It’s
an age-old question: upgrade that MacBook or spend the
dough on a new one? How are your interests best served? This hack helps
you decide, and shows you how to install a new hard drive, battery, and
RAM modules to give your old machine more zip.
One day you’ll pick up your MacBook and wonder what happened to its
speed. You’ll think, “It’s as if an occult hand has reached inside my
laptop and slowed my once-speedy MacBook to a crawl.” The reason for the
perceived slowdown could be many things. You
could have too many login items; switch these off in the
Users & Groups preference pane. While
you’re in System Preferences, you should also delete any
preference panes you added but no longer use: right-click the obsolete
preference pane and select Remove. You might also consider cleaning up
your desktop (see
[Hack #22]
). If none of that
helps—and it might not—create a new user account and see if that restores
some of your lost zip.
If none of those tips work, it could be that your Mac
hasn’t
slowed down—you could just be comparing it to
the latest and greatest MacBook. If that’s the case, then it isn’t a
surprise your MacBook seems slower—it is compared to zippy new machines.
The only question left is do you attempt to upgrade it or put that money
towards a new machine?
It’s a tough decision. First, some caveats: if you’re after raw
processor speed and power, you’ll want to get a new machine, because you
can’t upgrade the processor on MacBooks. Secondly, if you’re jealous of
the Retina displays on new MacBook Pros, no amount of upgrading will get
you where you want to be, so you should plunk down cash for a new
computer.
On
the other hand, if you’re interested in noticeably
improving the performance of your current MacBook, that’s something that
you might be able to accomplish. In this example we’ll be upgrading a
13-inch, mid-2009 MacBook Pro with 2 GBs of RAM and a 160 GB hard drive.
The
RAM is upgradeable to a maximum of 8 GB. You’ll want to
check your particular model and your current memory configuration against
the maximum RAM at a site like
Everymac.com
. The larger the difference
between your current setup and the maximum allowable configuration, the
bigger the performance boost you can get.
Another
thing to consider is replacing the hard drive. Traditional
hard drives rely on spinning plates and magnets to store data.
These
are slowly being replaced by faster, less error-prone Solid
State Drives (SSDs). Currently, hard drives offer superior storage for the
money, but SSD drives use less power and are faster. In this project we’ll
be replacing the hard drive with an SSD.
That’s
about all we can really do hardware-wise to improve the
performance of the MacBook Pro, but we should also consider replacing the
battery. Why? Starting in 2008, Apple shifted from user-replaceable
batteries to internal batteries that are supposedly only serviceable by
Apple. Since we’re going to be opening up the MacBook Pro to make the
other changes, why not replace the battery while we are at it? The battery
cycle count of the machine I’m using for this hack (that is, the number of
times the battery has been charged and discharged) is in the high 700s, so
we’ll replace it.
Tip: If you wondering whether you should replace your battery,
don’t just guess—find out for sure! Apple warranties batteries by the
number of cycles they’ve been through and how much charge they hold.
For
a list of maximum cycles to expect out of your battery
(and how to check its cycle count), visit
this support page
. If
your battery is nearing the end of its useful life, go ahead and replace
it; if not, don’t waste your money. If your battery hasn’t reached the
listed cycle count but is failing, call Apple Support or take your
MacBook to an Apple store. [You
can find a complete list of technical support numbers for
Apple at
this
support page
. In the U.S., the number is 1-800-275-2273.] They
might just replace the battery for free!
Before you get started, you’ll need to gather the components you
plan on installing. I ordered these items from Amazon, but you could
probably find them cheaper elsewhere:
8 GB memory (two 4 GB chips), $37.99
Apple OEM (Original Equipment Manufacturer) battery,
$76.40Crucial 128 GB SSD Drive, $111.59
In addition to those items, you’ll also need tools: a screwdriver
that includes tiny Phillips-head bits, as well as an (optional) Torx
screwdriver.
Once your parts are on hand or in the mail, it’s time to prepare
your data for this hack. Preparing your data means backing up. Usually
you’d just back up your data, but this time you’ll be replacing the
entire
drive, so you might want to consider
creating a bootable copy of your hard drive. Time Machine won’t do that
for you, so look to an app like
Carbon Copy Cloner
, which costs
about $40 and is worth the investment. Once your have a copy of Carbon
Copy Cloner (or a similar app), clone your drive to suitable media or to
its final destination.
In this hack, you’ll transfer data from your current drive to
some intermediary destination (such as a flash drive), and then from
that destination to the drive you’ll install later in the hack. That’s
a lot of data swapping!
You can skip one of the swaps by transferring your data
directly
to the new drive you’ll be installing.
You can pull that trick off by using a
drive
enclosure
. A drive enclosure is everything you need to have
an external drive except the drive itself: ports, power, and
electronics—the only thing you provide is the actual drive. I used a
Rosewill Drive Enclosure ($21.99), but pick a drive enclosure that
fits your particular needs. For example, if you’re using 3.5-inch SATA
drives that you want to connect using FireWire, it’s best to get a
FireWire drive enclosure for 3.5-inch SATA disks.
Warning: Before you try this on your MacBook, find a take-apart
guide for your specific model on a site like
iFixit.com
. Some models (like the one
featured in this hack) are relatively easy to work on, while others
(like the new MacBook Retina) are very difficult to modify.
With
your data backed up and the new parts on hand, it’s time
to dive into the warranty-voiding, performance-enhancing part of this
hack! It’s a good idea to fully drain the battery before you start—you
know, use the Mac until it automatically shuts down. (This isn’t
something we did at Mac Hacks Labs because we didn’t realize it would be
a good idea until later...) Why bother? Because it’s that much less
energy you’ll have to deal with when messing with your Mac’s internals.
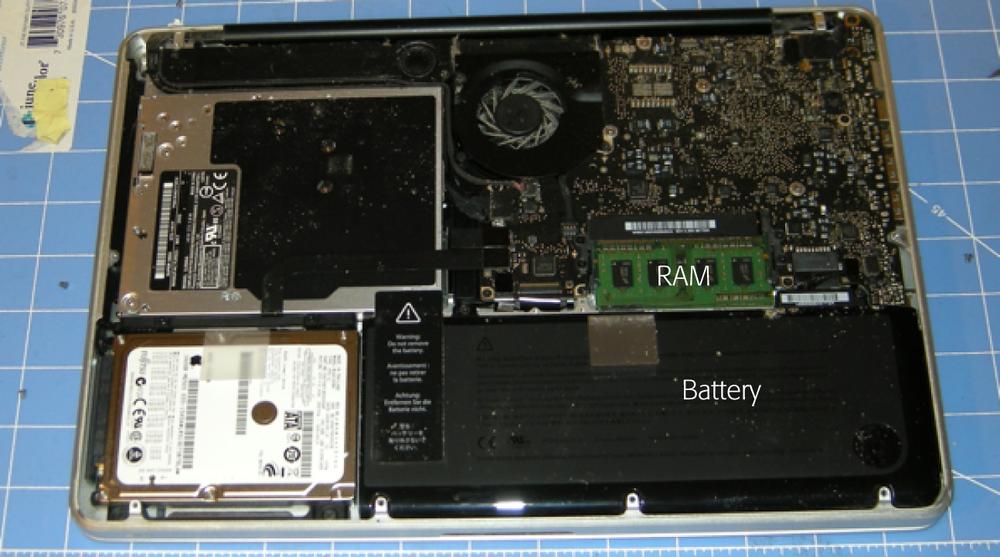
So either run the battery down or at least shut off your MacBook, and
then flip it over. On the bottom, you’ll find tiny screws around the
edges. Get the appropriate-sized bit (a Phillips-head 00) and remove the
screws. You’ll note that the screws are different lengths, so devise a
scheme so you’ll know where the screws belong when you need to put them
back in. Once you get the screws out, you’ll see something like
Figure 11-3
.
some canned air to blow the dust out of your Mac.
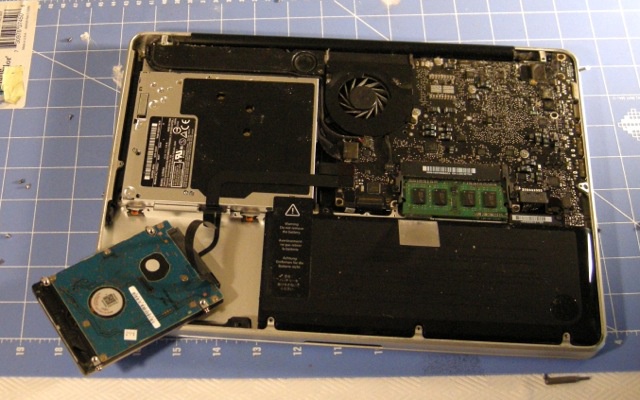
So where should you start? The hard drive is your best bet. By
removing the screws at the top of the drive (these screws are black so
you can tell they don’t go on the case), a black retention bar was
removed and the hard drive popped right out (
Figure 11-4
).
ribbons connecting it to the Mac are thin and likely fragile. Use
caution and pay attention to how the ribbon cables are connected;
you’ll want to replicate that setup when you put in the new
drive.
Gently disconnect the ribbon cables, and then grab a Torx driver
to remove the screws from the sides of the hard drive. These screws hold
the drive in your Mac. The replacement drive has holes for these screws
but no screws, so put the screws in the new drive, attach the cables,
and then install the new
drive.
In
the particular model I worked on, it’s much easier to
access the RAM with the battery removed, which makes the next step
obvious: remove that battery. The battery is held in place by two
proprietary Tri Wing screws, but I was able to remove them with a tiny
Phillips-head screwdriver. (If you prefer, you can order the proper Tri
Wing screwdriver from
iFixit.com
or some other source.) Once the screws are out, carefully remove the
battery connector from the main board (be gentle). Then simply lift the
battery out of the enclosure (
Figure 11-5
).

new battery will provide longer run time. Even if it doesn’t, it will
certainly extend the time until the case needs to be opened
again!
With
the battery out of the way, you’ve got much better access
to the RAM. Remove the top RAM module first by applying slight upward
pressure on it. This causes the module to pop up at about a 45-degree
angle; then simply pull it out of the machine. The same method was used
to remove the RAM from the second slot. Then put the new RAM into the
bottom slot first by inserting it at the same angle at which you removed
the old RAM, and then push it flat (
Figure 11-6
).

I could tell when the angle was correct by the feel of it. Be gentle
and don’t try to force the modules into place.
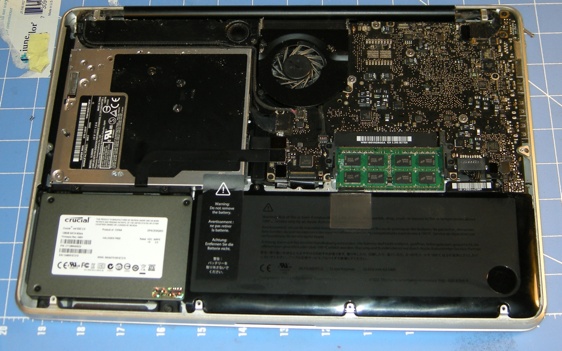
Once the RAM modules are installed, it’s just a matter of
installing the new battery and putting all the screws back where they
belong (
Figure 11-7
). You might notice
that there’s blue thread-locking material on some of the screws. You
could replace this stuff, but you’re a hacker—you’ll want to get in the
case again someday—so ignore it.
was it worth it?
Once the MacBook Pro is reassembled, the moment of truth comes:
was the roughly $220 investment worth it? If you’re not a hacker, you
might object that time and effort should be factored into the cost
equation but, as the true tinkerer knows, messing with stuff is part of
the payoff! Philosophical discussions aside, did the hack pay off? Here
are a couple of ways to judge:
Battery Life
. Before I
cracked open the case, this MacBook Pro would run for about three
hours on a full charge depending on what I used it for. After
replacing the battery, the MacBook would run for over four hours
before shutting down. Not the up-to-seven hours promised when the
MacBook was new, but still a good chunk of time. Is the extra hour
worth the $75 cost? Well, the battery would need to be replaced at
some point, but there’s a good chance that by the time the battery
had reached the end of its useful life, I’d have bought a newer Mac.
So, for me, if I was only replacing the battery, it probably
wouldn’t be worth it.RAM Performance/Disk
Performance
. There
are a ton of apps out there for quantifying
performance. For the upgraded MacBook, I used
Geekbench
to
generate before and after scores. Before the surgery, the MacBook
Pro scored about 2700; after the upgrades, its score bumped up to
about 3300. (How informative those numbers are to the average person
is a little suspect. Sure, we can compare those numbers and say that
the MacBook Pro is 22% faster, but what does that really
mean
?)
With the objective measurements taken and noted, the more
important subjective measurements have to be considered. Even if the
upgrades technically made the MacBook Pro faster than Deep Blue, that
wouldn’t matter if the MacBook Pro still
felt
sluggish because everyone would still hate using it.
I decided to try to get a subjective assessment from someone who
didn’t
spend half an hour installing the upgrades.
Test Subject One—who was unaware that the upgrades had been ordered
until the credit card bill arrived—began using the MacBook Pro and asked
whether the distinctive O’Reilly sticker had been moved to a new MacBook
Pro. When informed that the sticker had not been moved, Subject One
asked why the MacBook Pro seemed so much faster. Subject Two just fired
up Minecraft and started playing without commenting on either the speed
of the computer or his father’s kindness (as evidenced by letting him
use a MacBook Pro for Minecraft). He was soon grounded.