Mac Hacks (29 page)

With
the lightweight security measures out of the way, we can
turn our attention to methods that don’t simply obfuscate the network
but actually encrypt its traffic. To put a finer point on the
difference: if you use one of the previous methods, your network may be
difficult to find, but all its traffic will be sent in plain text, so
anyone who bothers to intercept your traffic can follow exactly what is
going on with very little work. Adding WPA2 to your network makes it
much more difficult to see what’s actually being transmitted over your
network.
Your router likely has several security protocols built in,
leaving you to wonder which one is best for your particular needs.
Unfortunately, most of the security protocols with your router have been
compromised by nefarious types, leaving WPA2 (short for WiFi Protected
Access II) as the only sensible option. Once you’ve decided to go with
WPA2, you have to decide which version of it is right for you. Most
routers come with two versions: WPA2 Personal and WPA2 Enterprise. The
difference isn’t trivial: WPA2 Personal relies on a pre-shared key (you
can get on the network if you know the password) (
Figure 9-10
), while WPA 2
Enterprise relies on network clients logging in with a username and
password. WPA2 Personal is your best bet for a home network.

it provides both ease of use and security.
Now
that you’ve made your choice, the good news is that the
work is almost done. The bad news is that the process isn’t as
straightforward as you would expect. With most routers, you can type any
password you wish into the WPA2 shared key field. For example, if I set
a password to “qwerty,” the router will happily accept that key. But
trying to enter that key to gain access to the router via WiFi won’t
work—OS X won’t let you enter any password that’s less than eight
characters. Why? It turns out that OS X is smarter than your router. The
WPA2 specification demands a key length of between 8 and 63 characters.
Your router wasn’t smart enough to tell you that, but OS X is. Now that
you know that, all you have to do is choose an 8-character (or longer)
password and enter it in your router’s settings. If you’re successful, a
small lock icon should be displayed next to the name of your network
when you’re browsing nearby wireless networks.
At
this point you’re feeling pretty good. You’ve locked your
WiFi down so freeloaders can’t surf for free. But there’s one more thing
to consider—the security of your password. A password like 123GOVOLS is
memorable, but it’s also very vulnerable. WPA2 networks aren’t
susceptible to the tricks that WEP networks are, but they
can
be compromised by
dictionary
attacks
(where passwords are tried from a table of common
passwords and words). How devoted are people to trying a zillion network
passwords to see if any of them work? Visit
www.renderlab.net
where you can find a rainbow of tables (useful for cracking) that range
up to 33 GB in size.
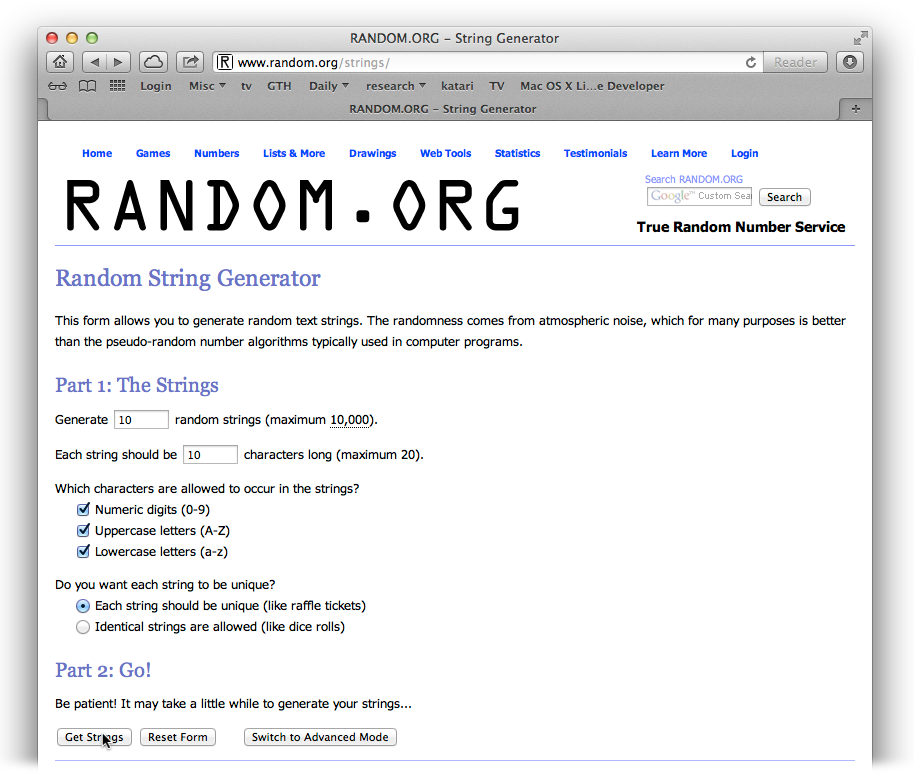
So why not make a really good password? You won’t be entering it
often, your Mac will remember it for you, and you’ll be secure in the
knowledge that it will take a really long time to crack your network. A
quick trip to
this
page
gives you access to a tool that generates random sequences
of letters, numbers, or a mix of the two (
Figure 9-11
). Length is
crucial: a randomly generated passphrase of 14 letters is considered
very secure, so set the page to output just such a string.
can’t find any of them in a dictionary.
You’ll have to really reach to find some obvious phrase or pattern
in any of the generated strings. This means they’re hard to crack but
also very difficult to memorize. Fortunately, ease of memorization isn’t
a big deal when you’re setting a WiFi password, since you’ll only have
to enter it once on each Mac you use.
Once you’ve generated and chosen a string, write it down. Store it
in OS X’s Keychain app or somewhere else safe. Paste the new pre-shared
password into the appropriate spot on your router’s configuration page
and then save the new setting. The router will restart, safe from prying
eyes and bandwidth leeches.
To get your Mac back on the network, select the network you’ve
secured and enter the password into the required
field.
You’ve changed your network’s name and password, hidden its SSID,
crammed a completely random 14-letter phrase in as a WPA2 password—and
then forgotten or lost every scrap of information you used for the
settings. If you try to unplug your router hoping the defaults will be
restored, you’re going to be stymied. So how can you get your router
back when you’ve been blocked by your own security?
Don’t worry: your router hasn’t become a brick of plastic,
circuitry, and electronics. Most
routers have a recessed reset button that you can press
with a pencil tip or paperclip to return your router to its factory
defaults. Hit the reset button and you can start the process all over
again.
. Use Your Mac as an Access Point
In
case you’re feeling generous, this hack shows you how to
share an Ethernet connection with your iPad- and iPhone-using friends via
WiFi.
Your Mac is a sharing machine! Plug in a printer, and it can share
that; toss some files into your Public folder, and users can get to them
over the LAN. Want to run a site from your Mac? No problem. But the
sharing doesn’t end there: you can even go so far as to share your
Internet connection with those around you who can’t connect, or with your
wireless gaming console.
The situation where you might want to share your Internet connection
without access to a router seems a bit suspect at first. Just where are
you going to be that doesn’t have an Internet connection? And if you have
an Internet connection, why would you want to share it; heck your laptop
is already connected!
It seems an unlikely scenario until it happens to you—then it seems
like Apple really knew what it was doing when it added the ability to
share your Internet connection via the Network preference pane. Typically,
the scenario goes something like this: you’re in a hotel room or some
other not-home place where you can get Internet via an Ethernet cable but
not wirelessly. Of course, you’re sharing the room, and the other person
also has a laptop. Naturally, you both want to hop on the Internet at the
same time. Instead of the predictable knife fight over who gets to use the
sole Ethernet hookup, hook up your Mac and use it to
share
the Internet connection.
That’s the most common way to use this hack, but not the only one.
Some ISPs give you a modem but don’t really require that you use it; the
Internet connection will work just as well if you plug the Ethernet cable
straight in to the back of your Mac. The obvious downside of this method
is that you can only connect one device. With this hack, you can use your
Mac as an access point so you can get rid of the router and associated
cables.
The good news is that this is a very easy trick to pull off. The
bad news is that the process includes an ominous warning that may
frighten the uninitiated. So let’s get initiated.
Head to System Preferences→Sharing and configure the preference
pane as required for your particular situation. In this example, an
Ethernet connection will be shared over WiFi (
Figure 9-12
). The specific setup
you’ll want will depend on your particular situation. No matter what
configuration you desire, you have to perform this step before OS X will
let you turn on Internet sharing.
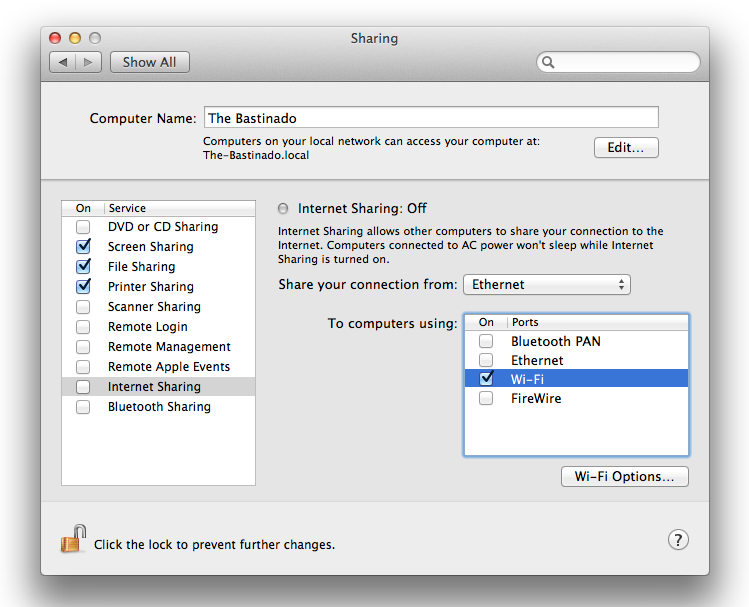
before OS X will let you share it. Sharing options vary by machine—for
example, those with newer Macs will find options for Thunderbolt that
aren’t shown here.
The exact procedure depends on how you want to share the Internet
connection. In the case of sharing it over WiFi (likely the most common
scenario), you get to make a few choices you won’t have to make when
choosing other configurations. To proceed, click the Wi-Fi Options
button. As shown in
Figure 9-13
, you’ll be able to
decide whether or not to rename your network (the default name is the
same name as your computer), what channel you want to use, and whether
your network should require a WPA2 password. Note that you’ll only have
to make these decisions (as mundane as they may be) if you click the
Wi-Fi Options button; otherwise OS X will just go with default
values.
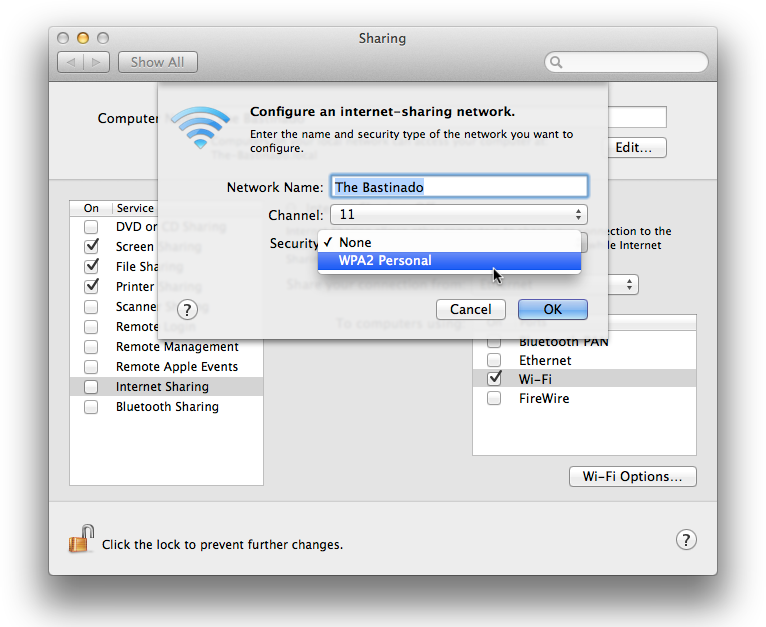
exact options you’re presented depend on the configurations you are
using; you won’t see options exactly like these unless you are sharing
from Ethernet to WiFi.
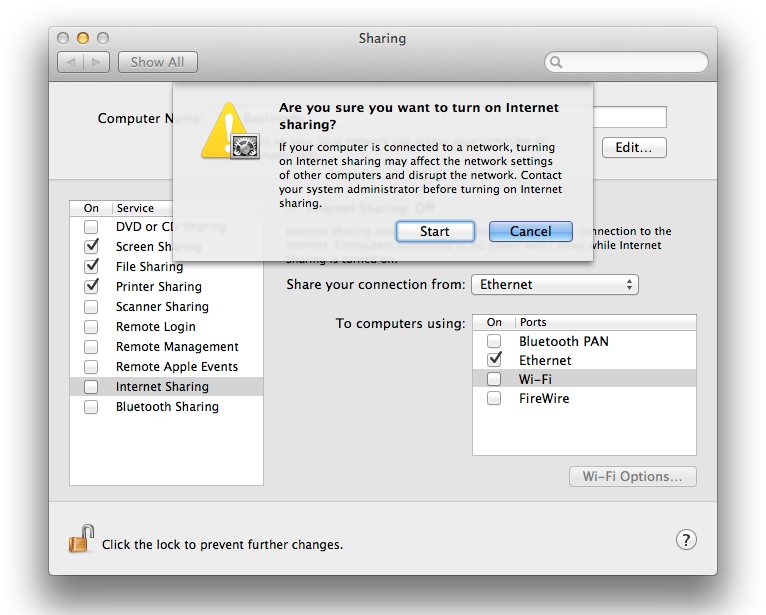
Once you’ve got everything set up the way you want, it’s time to
start sharing that connection. This is where the ominous warnings begin.
Instead of simply checking the box next to Internet Sharing and having
the sharing begin, you get a stern warning that you’re about to mess up
everyone’s Internet settings and instructions to contact the system
administrator (
Figure 9-14
).
The chances of you breaking the Internet are slim to none, so go
ahead and click Start in the warning box to start the sharing process.
You’ll know you’re successful when the AirPort menulet changes from its
usual broadcast icon to a quarter pizza slice with an up arrow (see
Figure 9-15
).
That’s all there is to it. You can now hook up any device you
would
usually
hook up to a router to your Mac
instead and enjoy all the benefits
of connectivity.
work but it’s your home system, so go ahead! Don’t worry—you won’t
break the Internet.

all rejoice that their data plan can remain unscathed while they
consume bandwidth.