The New Drawing on the Right Side of the Brain (47 page)
Read The New Drawing on the Right Side of the Brain Online
Authors: Betty Edwards

BOOK: The New Drawing on the Right Side of the Brain
3.86Mb size Format: txt, pdf, ePub
You can perceive this relationship by measuring it on your reflection in the mirror. Then note where the top of the ear is, and then the bottom. See Figure 10-30.
Ready to draw!Now that we’ve reviewed crosshatching and the general proportions for the frontal and three-quarter views, you are ready for the last drawing exercise, your Self-Portrait in fully articulated lights and shadows.
What you’ll need:• Your drawing paper—three or four sheets (for padding), taped to your drawing board.
• Your pencils, sharpened, and your eraser
• A mirror and tape for attaching the mirror to a wall, or you may want to sit in front of a bathroom mirror or dressing table mirror
• Your felt-tip marker
• Your graphite stick
• A paper tissue or towel for rubbing in a ground
• A dampened tissue for correcting marker-pen marks on plastic
• A floor lamp or a table lamp to illuminate one side of your head (Figure 10-31 shows an inexpensive spot lamp)
• A hat, scarf, or headdress, if that idea appeals to you
1. First, prepare your drawing paper with a ground. You may choose any level of tone. You may want to do a “high-key” (meaning light) drawing by starting with a pale ground, or you may decide to use the drama of a dark ground for a “low-key” (meaning dark) drawing. Or, perhaps you prefer a middle value. Be sure to lightly draw in the crosshairs.
Note that in this drawing, you will not need your plastic Picture Plane. The mirror itself becomes the picture-plane. Try to think that through—I’m sure you will see the logic of it.
2. Once your ground is prepared, set yourself up to draw. Check the setup in Figure 10-32. You will need one chair to sit in and one chair or small table to hold your drawing tools. As you see in the diagram, you will lean your drawing board against the wall. Once you are seated, adjust the mirror on the wall so that you can comfortably see your image. Also, the mirror should be just at arm’s length from where you are sitting. You want to be able to take sightings directly on the mirror as well as directly on your face and skull as you observe the measurements in the mirror.
3. Adjust the lamp and test out various poses by turning your head, raising or lowering your chin, and adjusting your hat or headdress, until you see in the mirror a composition in lights and shadows that you like. Decide whether to draw a full-face view or a three-quarter view, and decide which way you will turn, left or right, if you choose the three-quarter view.
4. Once you have carefully chosen your composition in the mirror and the pose is “set,” try to keep all of your gear in the same places until the drawing is finished. If you stand up to take a break, for example, try not to move your chair or the lamp. Students often find it very frustrating if they can’t recapture exactly the same view when they sit down again.
5. You are now ready to draw. The instructions that follow are really only a suggestion for one procedure among myriad possible procedures. I suggest that you read through all of the remaining instructions and then begin to draw following the suggested procedure. Later on, you’ll find your own way to proceed.
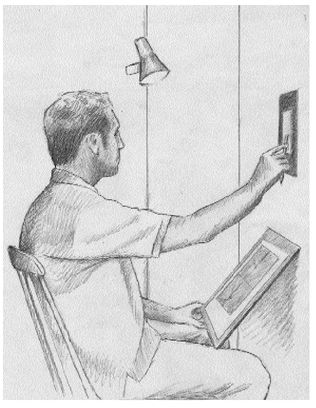
Fig. 10-32.
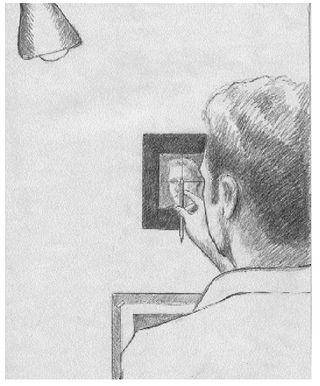
Fig. 10-33.
A self-portrait in pencil1. Gaze at your reflection in the mirror, searching for negative spaces, interesting edges, and the shapes of lights and shadows. Try to suppress language entirely, particularly verbal criticism of your face or features. This is not easy to do, because this is a new use of a mirror—not for checking or correcting, but to reflect an image in an almost impersonal way. Try to regard yourself the way you would regard a still-life setup or a photograph of a stranger.
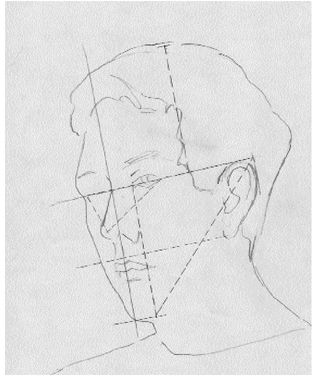
2. Choose a Basic Unit. This is entirely up to you. I generally use eye level to chin, and I often draw in a central axis (a line that vertically bisects the head, running through the center of the bridge of the nose and the center of the mouth). Next, draw in the eye level line.
These two guidelines, the central axis and the eye level line, always cross at right angles, whether in full-face view or three-quarter and whether the person’s head is tilted relative to vertical or is held perfectly upright. I suggest drawing the central axis and eye level line directly on the mirror with your felt-tip pen. (You may prefer to start your drawing another way, perhaps relying only on the crosshairs printed on your mirror. Please feel free to do so.) You must, however, be sure to mark the top and bottom of your Basic Unit directly on the mirror.
3. The next step, of course, is to transfer your Basic Unit to your drawing paper with its crosshairs and toned ground. Just make marks at the top and bottom of your Basic Unit. You may wish to add marks for the top edge and side edges of the image in the mirror. Transfer these marks to your drawing.
4. Next, squint your eye a bit to mask out some of the detail in your mirror image and find the large lighted shapes. Note where they are located relative to your Basic Unit and to the crosshairs on the mirror and in your drawing and to the central axis/eye level lines, if you are using them.
5. Begin your drawing by erasing out the largest lighted shapes, as in Figure 10-34. Try to avoid any small forms or edges. Right now you are trying to see the large lights and shadows.
6. You may wish to erase out the ground around the head, leaving the toned ground as the middle value of the head. You may, on the other hand, want to lower the value (darken) the negative spaces. These are aesthetic choices. Figure 10-34 shows both.
7. You may want to add some graphite to the shadowed side of the face. For this, I recommend your #4B pencil, not the graphite stick, which is somewhat hard to control and becomes rather greasy if pressed hard on the paper.
8. I’m sure you’ve noticed that I have said nothing about eyes, nose, or mouth up to this point. If you can resist the impulse to draw the features first, and allow them to “come out” of the light/shadow pattern, as I describe in the margin, you will be able to exploit the full power of this kind of drawing.
9. Rather than drawing the eyes, for example, I recommend that you rub your #4B pencil point on a scrap of paper, rub your forefinger over the graphite, and, checking back in the mirror for the location of the eyes, rub your graphited finger where the eyes should be. Suddenly you will be able to “see” the eyes, and you need only to reinforce that ghostly perception.
10. Once you have the large shapes of lights and shadows drawn, begin to look for some of the smaller shapes. For example, you may find a shadowed shape under the lower lip or under the chin or under the nose. You may see a shadow-shape on the side of the nose or under the lower lid. You can slightly tone the shadow-shape with your pencil, using crosshatching, or, if you wish, rub the tone in with your finger to smooth it. Be sure that you place and tone the shadow-shapes exactly as you see them. They are the shapes they are because of the bone structure and the particular light that falls on the shape.
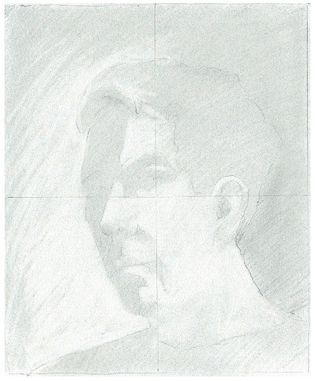
Fig. 10-34.
11. At this point, you are ready to decide whether you want to leave the drawing at this somewhat rough or “unfinished” stage, or whether you want to work the drawing up to a “high finish.” Throughout this book, you will find numerous examples of drawings at various degrees of “finish.”
This lesson leads to one of the two additional basic skills I mentioned in the Introduction: the “dialogue” that goes on in drawing from the imagination. This is drawing at a more advanced level. You check the information “out there” or in your imagination and just barely indicate placement of the first marks. This causes an imagined image in the mind of the artist, who then draws what he or she has already “seen.” Thus drawing becomes a kind of dialogue between the artist’s intent and what develops on the paper. The artist makes a mark. That mark generates a further image. The artist reinforces the imagined addition, which triggers more imaging, and so on.
Fig. 10-35. A diagram of the three-quarter self-portrait shown in Fig. 10-37.
Fig. 10-36. The full-face view diagram.
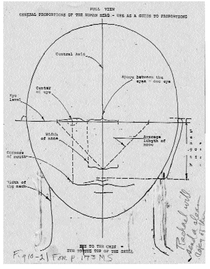
12. I will briefly list again some of the main proportions to watch for. Remember that your brain may not be helping you to see what is really “out there,” and these reminders may encourage you to take sights on everything!
• For a full-face self-portrait: Eye level to chin = eye level to the top of the skull.
• If the hair is thick, the upper part will be greater than half.
• The space between the eyes is approximately one eye-width.
• Determine the length of the nose by imaging an inverted triangle with the outside points at the outside corners of the eyes and the point at the bottom edge of the nose. This is a variable proportion. The inverted triangle is a particular shape for each particular model.
• The outside edges of the nostrils of the nose are usually directly under the inside corners of the eyes. This proportion also varies.
• The outside corners of the mouth fall under the pupils of the eyes. This proportion varies. Note with special care the position and shape of the outer corners of the mouth, where much of the subtle expression of a face is located.
• The tops of the ears fall approximately at or slightly above eye level line.
• The bottoms of the ears are approximately at (or slightly above or below) the upper lip. Note that if the head is tilted up or down, the location of the ears—as seen on the picture plane—relative to the eye level line will change.
• Observe the neck, collar, and shoulders relative to the head. Make sure that the neck is wide enough by checking the width in relation to the width of the face. Use negative space for the collar (draw the spaces under and around the collar). Notice how wide the shoulders are. A frequent student error is making the shoulders too narrow. Sight the width relative to your Basic Unit.
• In drawing the hair, look for the largest lights and shadows of the hair first and then work down to the finer details later. Note the major directions in which the hair grows and the places where it parts to shows a darker tone underneath. Note and draw details of how the hair grows and what its texture is close to the face. Give your viewer enough information about the hair to know what it is like.
Other books
MAMista by Len Deighton
On The Edge by Hill, Jamie
Surrender My Love by Eugene, Lisa
All You'll Ever Need by Sharon C. Cooper
Truth or Dare . . by P.J. Night
A Sensible Arrangement by Tracie Peterson
Immortal Dreams by Chrissy Peebles
Finding Her Fantasy by Trista Ann Michaels
All-Star Pride by Sigmund Brouwer
The House of the Mosque by Kader Abdolah