SM 101: A Realistic Introduction (22 page)
Read SM 101: A Realistic Introduction Online
Authors: Jay Wiseman

It never fails: As soon as your hands are tied behind your back, your nose will start to itch.
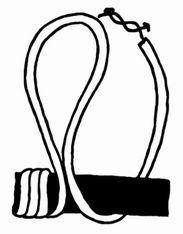
Tying off the end.
To finish tying off a single long length of rope, circle it around the final bound part two or three times, then place your finger against the rope and run the rope back
over
your finger and the rest of the rope until it reaches the opposite side of the bound body part, thus creating two opposing ends. Tie these ends in a surgeon’s knot or similar knot.
end tie-off
This process is well-illustrated in the bandaging video of the first aid class. Some first aid books also show it, but I suggest you see the film.
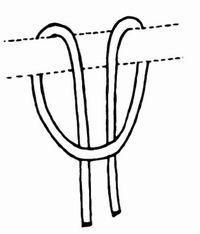
The lark’s head.
You may also have to secure a rope after passing it through an eyebolt or around a post. One way is to pass the two ends through (or over) side-by-side, then separate the ends and pass one on either side back over the parallel ends. Knot the two ends together. You can also use the midpoint to start a tie here, as shown in the illustration on the next page.
The lark’s head is a handy, versatile knot with many bondage applications, some of which I’ll discuss later. It’s well worth your time to learn it well. (This knot is also sometimes called a cow hitch or a lanyard hitch. It’s a simpler version of the cat’s paw knot.)
lark’s head
Obi knot. To my delight, I discovered that the knot I’d learned for tying my
obi,
or martial arts belt, worked beautifully as a comfortable bondage knot for limbs. It enables the dominant to place several loops around the limb for maximum comfort, and unlike most bondage, distributes any pull over all the loops.
obi knot
,
stage 1 & 2
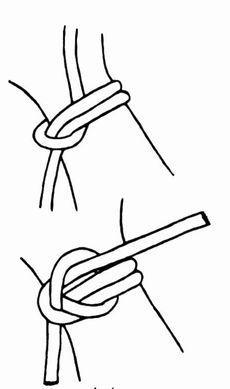
Place two to four loops around the limb. Run one end of the rope under all the other strands of rope. Bring it back over, and finish it with an overhand knot.
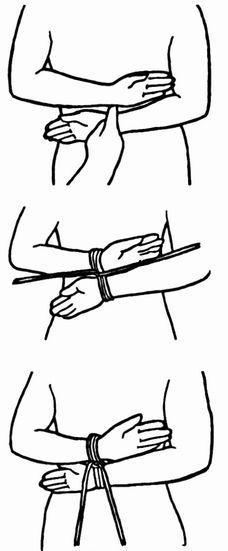
Cinch loops. As a dominant, you must carefully regulate tightness. If you apply bondage too loosely, the submissive may escape. If you apply it too tightly, you may harm them.
Cinch loops offer a wonderful way to make tightness “just right.” These are coils that run between the bound parts, taking up slack.
Imagine that you have two six-foot ropes and that a pair of hands is being offered to you, palms facing each other. Take one rope and, leaving about a finger-width of space between the wrists, wrap it repeatedly around the wrists and tie its ends together. Then take the second rope and wind it between the wrists over the first rope. The second rope provides cinch loops.
He kept bugging me to tie him up, so I did - just to shut him up. Then, while I was tying him, I got this incredible rush, and I thought, “Hey, this is really neat!”
Cinch loops can be used whenever two body parts are bound together, such as ankles, knees, or elbows. They are especially useful when tying wrists. They can also be useful when tying body parts to bedposts, rods, and so forth.
Basic Bondage Techniques
Tying the wrists. A dominant will usually tie the submissive’s wrists behind their back. This is the most restrictive position, and thus usually the position of choice. Wrists tied together in front of a submissive’s body, unless the arms are otherwise restrained, hardly qualify as bondage.
When tying the hands behind the back, consider how to arrange them. The best way to decide this (and many other bondage questions) is to plan what you will do to the submissive after you’ve bound them.
Note: Many people who do keyboard work such as typing or programming suffer from carpal tunnel syndrome and/or related physiological problems in their hands, wrists, and arms. Such people may need to wear wrist braces under their bondage. Some of them may not be able to assume certain wrist bondage positions at all, particularly those that require twisting or bending the wrists. It is important to discuss such issues before playing, and to maintain ongoing communication about any pain, numbness, or tingling in the wrists or hands while playing. If you are a submissive who suffers from such problems, consider having a custom set of restraints made for you that will protect your hands and arms.
One classic position for hands-behind-the-back bondage is crossing the wrists at right angles to each other with the submissive’s palms facing to the rear. A second position is placing the backs of the hands together. These positions are used for simple wrist bondage. They can work well, particularly as part of a hogtie (discussed later), but have a major drawback: a bound submissive usually has difficulty lying on their back if their wrists are bound either of these ways - and it’s common for submissives to be placed on their backs. Their body weight will put their hands to sleep and, as you know, that’s a bad idea.
A third hand position involves placing the palms together and tying the wrists. This often precedes tying the elbows together. This position often makes it even harder for the submissive to lie on their back. (Although some light, flexible submissives have no problem lying on their back while tied in any of these ways).
Note: Binding slender, flexible submissives is both a joy and a challenge. Their bendability makes it possible to put them in positions impossible for heavier submissives, even physically fit ones. On the other hand, these “tubber band people” can arch, bend, twist, and reach in ways the less flexible cannot, and that makes tying them a challenge. For example, I knew one woman who could, even with both her wrists and elbows lashed together behind her back, casually reach around and pluck the clamps off her nipples. She would then stand there and beam at her master with that sweet, mischievous grin somehow unique to the female submissive.
All the hands-behind-the-back positions I have presented so far have another drawback. They also bring the hands down over the upper buttocks. This may interfere with spanking and similar activities. Even masochists and well-trained submissives may instinctively reach back to shield their buttocks with their hands during spankings, canings, and so forth. This might cause serious hand injury. Bondage that holds the hands away from the area therefore increases safety.
The position I like best for general hands-behind-the-back bondage is to place the submissive’s arms so the backs of their hands are against their back, one above the other, just above their waist. This position keeps the hands away from the buttocks, especially if you secure them in place (more about that later). This is usually also a comfortable arm position if you place the submissive on their back.
wrist bondage with cinch loop
Still, a submissive on their back with their wrists tied behind them is at risk of having their hands go to sleep. One excellent way to prevent this is to place a thick pillow, or something similar, under their buttocks. This often solves the problem by creating a space between their lower back and the bed for their hands. (To date, I have heard no reports of pain or back problems from anybody who has used this technique.)
I love seeing you all tied up like this.
The narrow point of the wrist seems a natural place to apply ropes, but is actually somewhat insecure. Nimble submissives can often easily slip a hand free. A more secure alternative is to apply the bondage to the lower forearm instead of the wrist. The forearm bones flare slightly at their ends. You can see this most readily by noting the knob on the back of your forearm at the little-finger side. Wrist bondage will be considerably more secure if you apply it above this knob.
Tying the ankles.
After tying the wrists, it’s natural to turn your attention to the submissive’s ankles. Binding someone’s ankles considerably increases their vulnerability. Unbound feet can run, kick, and generally cause a ruckus.
Remember, for a first bondage session, it’s a good idea to tie only the submissive’s wrists. Don’t tie them to anything such as a bed or chair, and don’t tie their legs or ankles.
Once you decide it’s appropriate to bind the submissive’s ankles, how should you go about it? Well, as with all bondage, you should have some idea of what you want to do with them after they’re tied.
The most basic way to tie the ankles is simply to place the submissive’s feet together, wrap the rope around their ankles, and tie off it in a knot. Cinch loops are good, but not necessary. The spur-like heel usually holds the ropes in place. Note: Some submissives may need a slight amount of padding, such as a small, soft towel, placed between their ankles to prevent the inner ankle bones from pushing painfully against each other.
While missionary position vaginal intercourse is essentially impossible with the ankles tied this way, rear-entry vaginal intercourse, or anal intercourse, is usually possible. (Some submissives are fond of being taken from the rear. For them, it feels more impersonal and/or more like they’re being “used.” That feeling/fantasy arouses them.)
Another advantage of this position is that it’s difficult (not impossible, but difficult) to tie the ankles so tightly that they go to sleep.
In most people, if the ankles are tied side-by-side and then crossed, the bondage will loosen somewhat. Conversely, if the ankles are crossed and tied, and then uncrossed, the bondage will tighten.
Safety tip: Remember that a person standing unsupported with their feet tied together is unstable and at great risk for being injured by falling. This can be remedied somewhat by tying their knees instead of their ankles.
When I first realized that I had you tied up so that you really couldn’t get loose, I got this really big rush down in my cunt.
Another excellent way to bind the ankles is to order the submissive to cross their ankles and spread their knees apart, then circle the ankles in a “vertical” direction (along the same axis as the submissive’s spine) without using cinch loops. A submissive whose ankles are bound this way will find it nearly impossible to stand or bring their knees together. It also allows good access to their genitals.