101 Excel 2013 Tips, Tricks and Timesavers (40 page)
Read 101 Excel 2013 Tips, Tricks and Timesavers Online
Authors: John Walkenbach

Setting up your Quick Access toolbar
The operations described in this tip require commands that aren’t normally available in the Ribbon when a comment is selected. So the first step is to add three commands to your Quick Access toolbar:
1.
Right-click the Quick Access toolbar and choose Customize Quick Access Toolbar.
The Customization section of the Excel Options dialog box appears.
2.
From the Choose Commands From drop-down list, select All Commands.
3.
In the list on the left, select Format Shape and then click the Add button.
4.
In the list on the left, select Change Shape and then click the Add button.
5.
In the list on the left, select Picture Fill and then click the Add button.
6.
Click OK to close the Excel Options dialog box.
After you complete these steps, your Quick Access toolbar has three new icons.
Formatting a comment
To change the formatting of a comment, Ctrl+click the comment (to select it as a shape) and then click the Format Shape icon in your Quick Access toolbar, or you can press Ctrl+1. Either of these actions displays the Format Comment dialog box. This dialog box has eight tabs that enable you to change just about any aspect of the comment.
Figure 99-1 shows a normal cell comment, and the same comment after changing the font, alignment, fill color, text color, and border width and style.
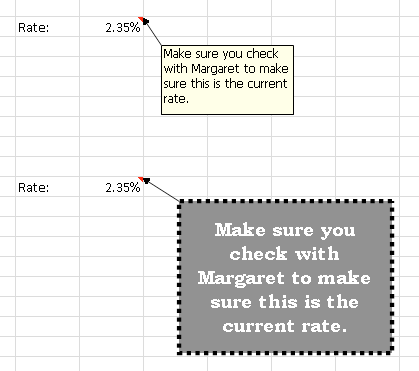
Figure 99-1:
A normal cell comment and a comment with different formatting.
Changing the shape of a comment
Comments don’t have to display as a rectangular box. Figure 99-2 shows a cell comment, after applying a different shape.
To change the shape of a comment, Ctrl+click the comment (to select it as a shape). Click the Change Shape button on the Quick Access toolbar and choose a new shape for the comment from the Shape gallery.
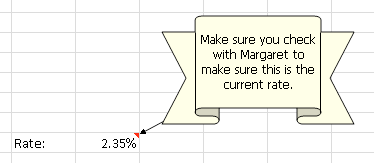
Figure 99-2:
A cell comment that uses a nonstandard shape.
Adding an image to a cell comment
Most users don’t realize it, but a cell comment can display an image. The image can reside in a file or can come from the Office.com Clip Art collection. You can’t use shapes or clip art images that are copied to the Clipboard.
To add an image to a comment, Ctrl+click the comment to select it as a shape and then click the Picture Fill icon in the Quick Access toolbar. Excel displays the Insert Pictures dialog box, in which you can select or search for an image.
Figure 99-3 shows a comment that contains a clip art image. Using an image in a comment increases the size of your workbook, so keep that in mind before you go overboard with images.

Figure 99-3:
Displaying an image in a cell comment.
Tip 100: Enhancing Images
A set of features that you might overlook is image enhancement. These tools allow you to modify and enhance images that you insert on a worksheet. This doesn’t mean you can uninstall your favorite image editing software, but you may be surprised at the type of enhancements you can perform without even leaving Excel.
To embed an image on a worksheet, choose Insert⇒Illustrations⇒Pictures (for an image stored on your hard drive) or Insert⇒Illustrations⇒Online Pictures (to search for and retrieve an image from an online source).
When you select an embedded image, use the tools in the Picture Tools⇒Format⇒Adjust group to work it. The tools include the following:
→
Remove Background:
Makes it very easy to remove an extraneous background from a photo.
→
Corrections:
Sharpen or soften the image or adjust the brightness and contrast.
→
Color:
Adjust the color saturation and color tone or convert the image to use just a few colors.
→
Artistic Effects:
Apply some Photoshop-like filters to the image.
→
Compress Pictures:
Make your images smaller.
→
Change Picture:
Substitute a different image for the selected image.
→
Reset Picture:
Undo all modifications you’ve made.
In most cases, you get a live preview of the effect when you move your mouse pointer over the icon. Just click to apply it. For more control over the enhancements, right-click the image and choose Format Picture. Then use the controls in the Format Picture task pane to adjust the parameters.
Figure 100-1 shows a photo before and after I removed the background. The parts of the image that are removed become transparent. This feature works surprisingly well.
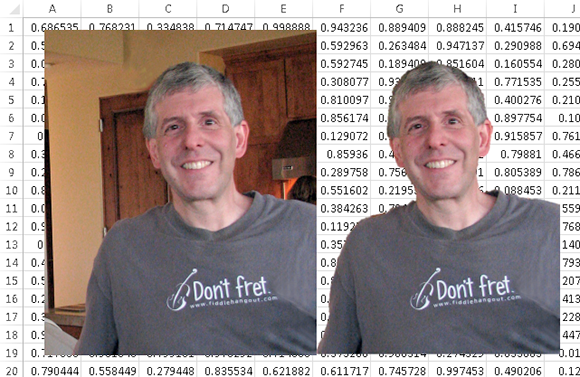
Figure 100-1:
The result of using the Remove Background command.
Figure 100-2 shows a clipart image before and after I applied the Pencil Grayscale effect.

Figure 100-2:
Applying an artistic effect to a photo.
Even if you have no need to adjust images, you might enjoy playing around with these features when you need a break from number crunching.
Tip 101: Saving Shapes, Charts, and Ranges as Images
Excel supports quite a few types of graphics, but it doesn’t provide a way to save the graphic as a separate file for use in another program. For example, you may want a separate PNG or GIF file created from a chart, a shape, SmartArt, or even a range pasted as a picture (see Tip 98).
Although Excel doesn’t provide a direct way to export a graphic, here’s a useful trick you can use. First, a bit of set-up work is required:
1.
Right-click the Quick Access toolbar and choose Customize the Quick Access Toolbar.
The Quick Access Toolbar tab of the Excel Options dialog box appears.
2.
In the upper-left drop-down control, choose Commands Not in the Ribbon.
3.
In the list box, scroll down and select Web Options and then click the Add button.
4.
In the list box, select Web Page Preview and click the Add button.
5.
Click OK to close the Excel Options dialog box.
Your Quick Access toolbar now has two new buttons.
Here’s how to use these tools to export graphic objects (including charts) from a worksheet.
1.
Make sure that your graphics appear the way you want.
2.
Click the Web Page Preview button in the Quick Access toolbar.
A copy of your workbook is converted to an HTML file and is displayed in your default browser.
3.
In the browser, right-click a graphic object, choose Save Image As, and specify a location for the file.
Your browser may have a different, but equivalent, command. Or you can just drag the graphic image to your desktop.
If the quality of the images in your browser is lacking, click the Web Options button in your Quick Access toolbar. The Web Options dialog box is shown in Figure 101-1.
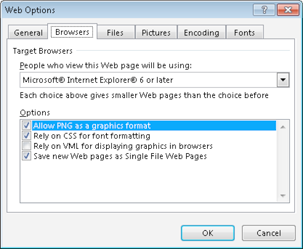
Figure 101-1:
The Web Options dialog box.
In the Web Options dialog box, click the Browsers tab and make sure Allow PNG as a Graphics Format is enabled. If graphics don’t appear in your browser at all, remove the check mark from Rely on VML for Displaying Graphics in Browser. Next, click the Pictures tab and choose the 120 Pixels Per Inch option. Click OK and do the web preview again. You should see higher-quality graphics (transparent PNG files).