Sew What! Bags: 18 Pattern-Free Projects You Can Customize to Fit Your Needs (5 page)
Read Sew What! Bags: 18 Pattern-Free Projects You Can Customize to Fit Your Needs Online
Authors: Lexie Barnes

NEEDLES AND PINS
. Sewing-machine needles can get dull after only a few hours, so check them regularly for burrs and dull points, and always have spares available. Who wants to run out to the store for replacements while in the middle of a project? They come in a variety of sizes and types. Smaller needles are better for lightweight fabrics, and larger needles should be used on heavier fabrics like denim or canvas. You can start out with a size 12 and go up or down from there. Pick up a package of assorted sizes to keep around. You can check your sewing machine manual for guidance on how to choose the right needles or you can ask someone at your neighborhood fabric shop.

Long straight pins with very big heads and very slender shafts are the best for most fabrics. Pins with glass heads are easier to see. Try not to leave pins in fabrics for weeks — you’ll be amazed at how fast some nonrust pins will rust! A good pincushion or two makes it easy to grab a pin when you need one — or try a magnetic pin holder.
SCISSORS, SCHMISSORS
. Technically, you call them scissors when the length is 6" or less and the finger holes are the same size. Shears are usually 7" to 12" long, with one larger finger hole (to fit two or more fingers). Whether you are using scissors or shears, it is important that they are comfortable and fit your hand. You’ll want something that feels good to you, is easy to open and close, and isn’t too heavy. To keep fabric shears sharp, do not use them to cut paper, cardboard, aluminum foil, or hair!

CUTTING CORNERS
Although building a collection of cutting tools is helpful in the long run, you can actually get by with one pair of shears (a.k.a. scissors), as long as they are very sharp.
See below
.)
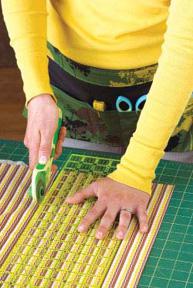
ROTARY CUTTERS AND MATS
. A rotary cutter and mat are excellent tools for all your sewing projects. They allow for speedy, tidy cutting and produce a perfectly straight line every time. But it’s important to use them carefully. A rotary cutter is a very sharp tool with a round blade that is used to cut fabrics. It should only be used with a rotary-cutting mat, to protect surfaces from being damaged, and nonslip rulers designed for use with your rotary cutter and mat. Protect your precious fingers or you’ll have to take a long break from your fun projects!
SEAM RIPPER
. This small, must-have tool is used to unpick stitches without cutting into fabric. Great for opening seams, cutting off buttons, and taking out basting stitches.
THREAD
. Thread comes in a variety of weights and types. Typically, you want to match the fiber content of your thread to your fabric. For the projects in this book, an all-purpose polyester or cotton-wrapped poly thread will do the trick. If you are using different types of fabrics on one project, you should match the thread to the heavier fabric. If you want to match the color of the thread to your bag, go for the dominant color in the print. And if you don’t find an exact match, go a shade darker to hide the thread. Lighter colors will pop and be more noticeable. That said, feel free to use thread as a decorative feature. A contrasting thread color is a great way to add spice to an otherwise simple bag. When in doubt, always turn to the staff in your local fabric shop — it’s better to ask for help than to suffer the consequences.
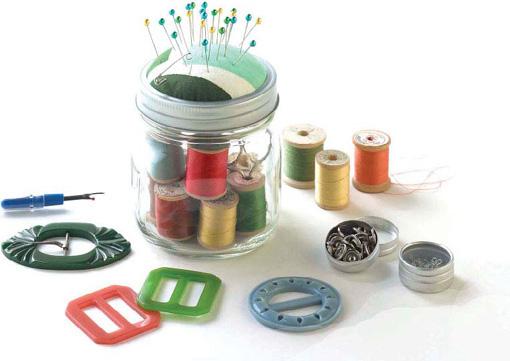
CLOSURES
. In this book, the bags either self-close (the Tissue Pouch), or have a drawstring (the Ditty Bag and Backpack), a tie closure (the Tool Tote), a zipper (the Zippered Wristlet), or a flap (check any of the messenger bags in
chapter 6
). But there are plenty of other ways to close a bag. You can use buttons and buttonholes, snaps, buckles, Velcro, hooks, clasps, and so on. If you are looking for a greater challenge, go ahead and modify your bag to add a more complicated closure.
NOT-SO-INVISIBLE MARKERS
Not all marking pencils, pens, and chalk will work on all fabrics. Read the manufacturer’s directions and test the marker or chalk on a scrap of fabric before using it on your projects. Make sure the chalk or marker doesn’t bleed through or stain your fabric.
Choosing fabrics is fun and exciting — but it can also be overwhelming. The key is to take your time. Whether you are browsing online or in your local fabric shop, take the time to look at everything. Take it all in. No matter what you are looking for, I urge you to make friends with the shop owners and staff. They know so much and are often your greatest ally in finding the very best materials for your projects. Once you start sewing, you’ll be back again and again, so it’s nice to get to know the people in your favorite shops.
RIGHT SIDE, WRONG SIDE
The right side of a fabric is the side on which the design or motif is printed. This is what you see on the outside of a bag. The wrong side of the fabric is the back or unprinted side. This is what you see on the inside if your bag is not lined.
