Sew What! Bags: 18 Pattern-Free Projects You Can Customize to Fit Your Needs (10 page)
Read Sew What! Bags: 18 Pattern-Free Projects You Can Customize to Fit Your Needs Online
Authors: Lexie Barnes

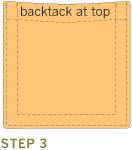
3. With right sides facing out, position and pin the pocket on the front of the bag you’re making. Topstitch the sides and bottom of the pocket to attach it, backtacking at the top on both sides. You might want to topstitch around the edge again about ¼" from the first line of stitching.
GET IT STRAIGHT
You’ll want to be sure that your pockets are straight, especially if you’re using fabric with stripes or other patterns that may accentuate any imperfections. Once you’ve placed the pocket on the body of the bag, measure the distance from each top pocket corner to the top edge of the bag. These measurements should match. Pin each pocket in place before stitching.
A casing is what you make to hold either a drawstring or elastic. For either one, the casing is made essentially same way. The stitching of the side seams will vary, depending on what you’re making (each project will tell you what to do). Often an opening is left on one or both sides, which is where you will insert the drawstring.
The example shown is for a casing that will have an opening for a drawstring on the outside of the bag (the most common casing in this book). Here’s what you do:
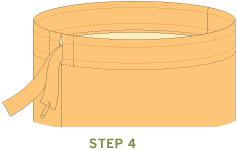
1. Stitch one side of the bag from bottom to top, but stop within 2½" of the top and backtack. Above it, leave a 1" gap unstitched, then stitch the last 1½", backtacking on both ends.
2. Press the seams open. Stitch down the seam allowance on both sides of the opening. This not only keeps them in place, it will be easier to thread the drawstring through the openings.
3. With the bag inside out, press under the top edge ½". Press under again by the amount needed to accommodate the drawstring or elastic (in this case 1") and edgestitch on the bottom fold. With drawstrings, make the casing about 1" wide, not because you need that much room, but because the gathers will look nicer. When using elastic, make the last fold equal to the width of the elastic plus another ⅛" to give you room to stitch the edge. Edgestitch the bottom fold.
4. Inserting a drawstring into a casing is easy. Just attach a safety pin to one end of the cord and use it to push the cord through the casing.


What is bias tape? Also called binding, it’s a narrow strip of fabric that has been cut on the bias (at a 45-degree angle to the grain) to give it more stretch. Bias tape can be used to reinforce the edges of pockets made from lighter weight fabrics, so the pockets don’t sag. It’s also a lovely way to add some color and definition to your bags. You can make your own bias tape or buy it prepackaged at your local fabric shop. For the projects in this book, we use double-fold bias tape in either ¼" or ½" widths.
To attach bias tape to a pocket or other raw edge, place the center fold of the bias tape over the top edge of the fabric and pin it in place. Then edgestitch along the bottom edge of the bias tape. Nothin’ to it. Here’s a little trick, though: When you look closely at the tape, you’ll see that the folded sides are not exactly the same width. This is not a manufacturing error, it’s intentional. When sewing on bias tape, put the narrower side on the top of the fabric and the wider side in back. When you stitch along the bottom edge (in front), you will automatically catch the back fold with your stitches.

By the way, if you decide to use bias tape, you won’t need to hem the edges of your fabric, so cut your pockets shorter than you would otherwise (in other words, subtract the hem allowance).
If you have an idea in mind for your bag, but you’re just not finding the color you want in a bias tape, the solution is to make it yourself. Creating your own bias tape from a matching or contrasting fabric can be just the touch you need to make your bag truly unique.
1. Decide how wide you want the finished tape to be and multiply by four (the bias fabric strip will be essentially folded in quarters). Cut a strip of fabric on the bias that is the width you need and as long as the pockets you want to bind.
2. The rest is pretty much like making a strap (
see page
42
). Fold and press the strip in half lengthwise. Open up the strip and turn the sides in to almost meet at the pressed center fold. (If you’re making ½" or wider tape, the side folds can be less, but should be a minimum of ¼"; adjust the cut width of the fabric accordingly.) As with the commercial bias tape, try to press one folded side slightly wider than the other. Refold and press on the center line and your tape is ready to use.
A bias-tape maker is a nifty tool that simplifies folding the edges of the tape.

3
Warm-up Projects
A SLIGHT DEPARTURE FROM TRADITIONAL BAGS
, the projects in this chapter fall into the category of “things that also hold stuff.” All are simple and some can be made using only scraps of fabric. These fun projects are great for learning the basics and a good opportunity to explore some ideas.