Sew What! Bags: 18 Pattern-Free Projects You Can Customize to Fit Your Needs (8 page)
Read Sew What! Bags: 18 Pattern-Free Projects You Can Customize to Fit Your Needs Online
Authors: Lexie Barnes

Next you need to get to know your sewing machine. Most sewing machines have the same basic stitch settings, which can be changed or adjusted by turning a dial, for instance: stitch length, stitch width, and stitch tension. Be sure to read the section in your manual on how to make these adjustments. Here’s a quick review of stitches and what they’re good for:
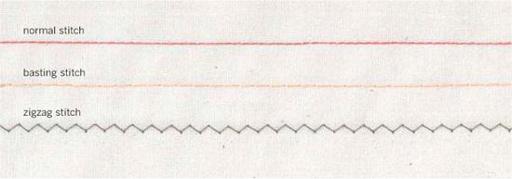
NORMAL STITCH
. This stitch is used for most seams. The normal stitch setting is 10–12 stitches per inch (2mm–2.5mm on metric machines).
BASTING STITCH
. At 6–8 stitches per inch (3mm–4mm), this is the longest stitch on your sewing machine. Basting stitches are considered temporary and are easily removed. You can also do your basting stitches by hand.
ZIGZAG STITCH
. This is used to stitch seams, finish raw edges, and for decoration. Your manual (or a friend) will show you how to control not only how many zigzag stitches per inch, but also the width of the stitch. It’s a good idea to test different combinations to get a feel for what the stitch will look like on your fabric. You may need a separate zigzag presser foot with a wider needle opening when using this stitch.
It’s a good idea to test your stitch length and tension when starting a new project. An easy way to perform the test is to take two scraps of the fabric you’ll be using and sew them together. Check (and adjust as needed) the top thread and the bobbin thread of the stitching to make sure the tension and stitch length work well for that fabric and thread. When the stitches meet in the middle (not floating on the top or bottom), pin a piece of paper to the scrap and label it with the stitch length, tension, and kind of thread that you used. This will help when you are making more than one project at a time or have to come back to a project later.
The following machine stitches are not settings on a dial. They describe how stitching is used for a particular purpose. In most cases, a normal stitch setting is used.
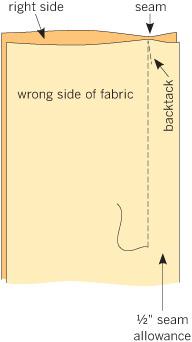
BACKTACK
. This term refers to backing up and stitching in the other direction. Backtacking stitches are used mostly at the beginning and end of a line of stitching to prevent it from coming undone. You don’t backtack on basting stitches, as they will be pulled out later.

EDGESTITCH
. This refers to stitching close to the edge of a fabric piece, on the top of the right side. Edgestitching is done for reinforcement, decoration, or to hold an edge in place.
STAYSTITCH
. This is a line of stitches sewn in the seam allowance before the seam is sewn, almost on the seamline. This helps prevent the seam from coming undone when the seam allowance is clipped.
TOPSTITCH
. This means that the stitching shows on the “top” or the right side of the fabric. This stitch is usually decorative and sewn in one or more straight parallel lines about ¼" from the fabric’s edge.
Once you’ve washed your fabric, notice which is the right side (outside) of the fabric and which is the wrong side (inside) of the fabric. With right sides together, fold the fabric lengthwise and lay it on a cutting surface. Keep the selvages together and adjust them until there are no bubbles on the folded edge. You may want to pin the selvages in a few places to keep the fabric edges from sliding around.
Sewing seams is simple, and basic to the act of sewing. Here’s how it’s done:
1. Pin two pieces of fabric with right sides together.
HOW TO PIN
Your pins should be inserted perpendicular to the seam or edge. Position the pinheads to the right so you can easily remove them as you are stitching. You can space the pins as needed; I suggest starting at about 2" apart.
2. Stitch the side you want to sew, ½" from the edge of the fabric. Remove the pins as you go, just before you stitch over them (otherwise, you might break the sewing-machine needle).
HEADS UP!
For the projects in this book, assume a ½" seam allowance unless the directions call for something different.
3. Backtack at the beginning and end of the seam.
4. Trim the threads at the ends of the seam and remove any remaining pins.
5. On the wrong side of the fabric, open up the seam allowances and press the seam flat. In some cases, directions might call for pressing both seam allowances to one side.
LINE IT UP!
Most sewing machines have marks to the right of the presser foot to help you measure and align your seams. The longest line is usually at ⅝", the seam width most commonly used in commercial patterns. Since we use ½" as our standard, place a strip of tape ½" from the needle hole of your presser foot to keep your seams uniform and straight. As you move the fabric under the needle, line up the edge of the fabric with the tape.

Along the outer edge of any seam allowance is a raw edge of fabric. This edge will not show, because it’ll be inside your bag. But it’s possible that the edge could fray or unravel with use or over time. You’ll see this for yourself when you prewash the fabric. Some fabrics fray very little, but others unravel quite a bit
and you’ll end up with a big mess. Whether or how you finish your raw edges is totally your call. Everyone who sews has a favorite method. Try different ones to see what suits you best.
ZIGZAG STITCH
. Using the zigzag stitch, sew every raw edge of each seam with the outside point of the stitch at the edge of the fabric.

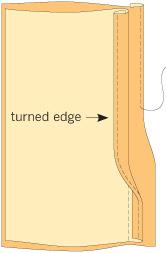
TURNED EDGE
. This is just what it sounds like — you turn over the edge and stitch it down. For a neat, accurate line, start with a single line of stitching about ¼" from the raw edge. Use this as a guide to press the edge under, and then sew another line of stitching close to the fold. As you gain more practice, you will be able to press without a guide, or even skip the pressing altogether and just fold the edge under as you sew.
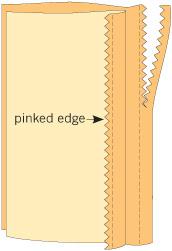
PINKING
. Pinking is very easy, and it’s worth it to invest in some good quality pinking shears. Just sew a straight line of stitching ¼" from the edge. Then use pinking shears to cut off the outer edge.