Sew What! Bags: 18 Pattern-Free Projects You Can Customize to Fit Your Needs (3 page)
Read Sew What! Bags: 18 Pattern-Free Projects You Can Customize to Fit Your Needs Online
Authors: Lexie Barnes

In my first year as a designer, I was working on some sketches at my parents’ house. I drew the bags in detail, with all of the dimensions “spec’d out.” I worked all weekend and I was just in love with the bags I was creating. After preparing my sketches and some notes to send off to a pattern maker, I proudly showed my work to my mother. With a puzzled look on her face, she asked, “You know the dimensions you have there don’t match the shapes of those bags, right?” I was horrified! I had measured out sizes that made sense to me and had drawn shapes that pleased me — but I hadn’t matched them up together! So I learned that weekend how to put graph paper to good use. And taught myself (okay, Mom helped!) how to create designs that made sense.
GRAPH, PAPER, SCISSORS!
Graph paper is great because it allows you to design to scale. You can easily see and adjust the proportions of what you are designing and keep track of your measurements. The kind I like to use is divided into ¼" squares, but it comes in other sizes. Using the ¼-inch-square graph, you can decide what scale you want to use. For instance, if ¼" = 1", each box will represent 1". To draw a bag that is 15" across, you would draw a line that is 15 squares long.
If you want to make a life-size paper cutout, you’ll want a 1:1 scale (meaning ¼" = ¼"). For bigger bags, you’ll have to tape several sheets together to draw it out. It’s fun to cut out your “paper bag” and play with it so you can see how you like it before stitching up the real thing.
HOW DO YOU MEASURE UP?
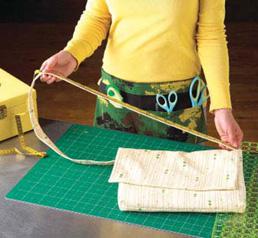
A simple way to make sure your bag fits you well is to take a look at what you already own. Do you have a favorite handbag or backpack? Measure the length of the straps and use that measurement as a standard for your personal fit. Working on the apron or holster in this book? Grab a belt from your closet or an apron from your kitchen, and check the length to see how long your waist belt needs to be. Don’t forget to add a few inches to that measurement so you can tie it — about 12" to 14" on each side is enough for an average bow.
EASE INTO IT
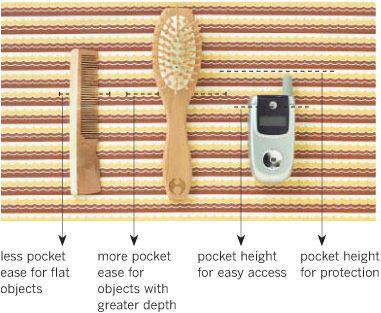
. When planning your pockets and pocket panels, be sure to lay out the objects that will go into them and to measure them carefully. Make the pockets a little shorter than the items you want easier access to (like pens and such) and higher for things that you want to tuck in and protect (like your new camera). For all pockets, you’ll want to add ease (a little extra breathing room) to your core measurements. For instance, a pocket for your comb can be pretty flat, but if you’re packing a hairbrush, you’ll want a pocket with a little more space to allow for the depth. It will be easy to see what you need once everything is laid out in front of you.
Sometimes, you might want to test out your design before making the final project. It’s a good way to try things out while you are developing your design skills. Here are a few ways to see how you’re doing.
1.
OH SEW PRETTY
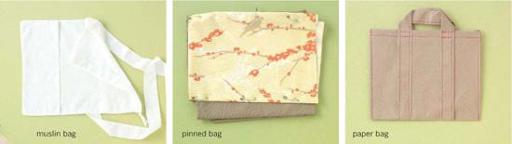
. If you are an experienced sewer, you can make a mock-up bag out of muslin or other inexpensive fabric to test your bag design before making the final version. This can help you save money and time on your final project, so you don’t make mistakes on the fabulous imported fabric you just fell in love with!
2.
KNOW WHEN TO FOLD ‘EM
. A fun way to test out your design is to map out your bag and then fold your fabric to the size and shape you’d like it to be. But don’t cut the fabric yet — this is just a test! Simply pin it together the way you think it should go. For this, I recommend safety pins, rather than straight ones. They’ll hold the mock-up together safely so you can play with it without getting pricked by straight pins. This kind of test bag may be a little bulky and it won’t be as pretty as the real thing, but you can get a good sense of where you’re headed. You can try out pockets, strap lengths, embellishments and other playful options. Once you’ve patched it together the way you want it to be, make some notes and then get sewing.
Inspiration3.
THE PAPER CHASE
. Here’s an even easier test. I lay out my goodies, draw my sketch on graph paper to get the scale right, then draw or trace the bag onto plain paper and cut out the pieces. Then I stitch up the paper! Sometimes, I even skip the sewing: I just staple and/or tape the pieces together. To this day, I use this test method. Sometimes I’ll reduce the scale to make a miniature version of the bag so it will be more manageable. Often, I use my kids’ construction paper or scrap paper from my recycling bin. It’s cheap, easy, and quick. You can tell right away if you’ve got a good design or if you need to go back to the drawing board.
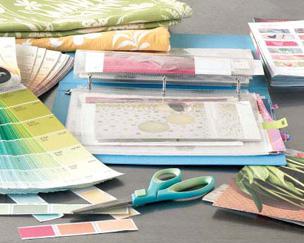
A terrific tool that I highly recommend is an idea board or notebook. In my studio, I dedicate an entire wall to this. At home, I keep binders full of ideas and inspirations. In the binders, I categorize the pages so I can find what I’m looking for later.
There are great ideas all around you. Rip out pictures from magazines, find swatches or paint chips, anything that strikes your fancy. Keep them up on your board for inspiration. When you are working, look up at it. See what shapes you picked. Which colors are you most into these days? Have you been dying to play with polka dots? Even if you think you don’t have a personal style yet — you probably do. You just need to let it surface!
If you are going through magazines, you can use a technique I call the “flip and rip.” I go through the magazine really quickly, just flipping through it. When something catches my
eye — a color, pattern, shape, vibe, or what-have-you — I rip out the page. Those are the images that hit me first and fast. I don’t stop to ask myself what I like in the picture, I just rip it out and keep flipping. That page goes up on my board (or in a notebook) until I use the inspiration or I grow tired of the image. Every few weeks, I like to strip the board and put up new ideas for inspiration. I tend to file the old images away, but you don’t have to. The best ideas will stick with you.
Here’s what you need to get started. The basic tools are easy to find at your local fabric store. You can order online, but be sure to ask any questions you have and check the return policies
before
you make your purchase. There are a few things you don’t want to skimp on, like needles, shears, and of course, your sewing machine. If you find a deal that looks too good to be true, it very well may be. Talk to the shop clerk or owner and get the skinny. Buyer beware = sewer prepared!
We assume that you have a basic sewing machine and know how to use it. With so many different sewing machines out there, we can’t give specific instructions on how to operate yours. Refer to your manual if you need to. If you don’t have a manual, you can find one online (
see
Resources) or invite a friend or family member to help get you started. The rest is just practice.
Once you can thread your machine and fill the bobbin, you can pick up your scrap fabric and practice some stitching. Most of the projects in this book don’t require zippers, but if you’d like to add them, you’ll need a zipper foot. If you want to add buttons to anything you are making, your machine may have a buttonhole attachment. Get familiar with your machine, your manual, and how all of your attachments work. All of the projects in
chapter 2
are made from scraps, so once you are comfortable with the basics, you’re good to go.
MISSING MANUAL?
If you’ve inherited or bought a second-hand sewing machine that doesn’t have a manual, all is not lost. You can often locate and order a manual for your machine online. Just do a search for the brand name and model number of your machine.
In addition to your sewing machine, you will want to have the following items on hand:
good pair of sharp shears used only for cutting fabric