How to Find and Download Free eBooks Survival Guide (4 page)

 Figure 2: Nook Top View
Power Switch
- Use the power switch to turn the Nook on and off. The switch may also be used to put the Nook in sleep mode.
 Figure 3: Nook Bottom View
Headphone Jack
- Plug headphones in here to listen to music.
USB Jack -
Connect the Nook to your computer by plugging the provided USB cable in the USB jack.
To turn the Nook
ON
, push and hold the power switch for five seconds. The Nook turns on. It takes a couple of minutes for the Nook to load at startup.
To turn the Nook
OFF
, push and hold the power switch until the screen goes blank. The Nook turns off.
To put the Nook in
Sleep
mode, push the power switch once while the Nook is turned on. Do not hold the switch down. Sometimes you may need to press the power switch again if the touchscreen lights up but nothing else happens. A screensaver is displayed and the Nook goes to sleep. Push the power switch again to wake up the Nook.
Note: You may turn off the Nook directly from Sleep Mode by holding the power button for three seconds. When you turn it back on, it will not be in sleep mode.
Your Nook must be charged before its first use. To do this, plug the provided power adapter into the USB/Power port at the bottom of the Nook. A light turns on to indicate that the Nook is charging. When the charge indicator light turns off, the Nook is fully charged. Charging may take several hours.
To connect your Nook to your PC:
1. Unplug the USB cable from the power adapter that came with your Nook.
2. Plug the small end of the USB cable into the bottom of your Nook. Plug the other end into a USB port on your computer.
3. Go to
My Computer
. Double-click the Nook removable drive as shown in
Figure 4
. The Nook folders appear.
4. Double-click a folder. The folder opens.
5. Drag a file into the folder. Drop the file to move it to the Nook.
 Figure 4: Nook Connected to a PC
To transfer the Nook to your Mac:
1. Unplug the USB cable from the power adapter that came with your Nook. Plug the small end of the USB cable into the bottom of your Nook.
2. Plug the other end into a USB port on your computer. On most versions of Mac OS, the Nook drivers are automatically installed.
3. The Mac should detect the Nook automatically. The icon is displayed on the desktop.
4. Double-click theicon. The Nook folders appear, as shown in
Figure 5
.
5. Double-click a folder. The folder opens.
6. Drag a file into the folder. Drop the file to move it to the Nook.
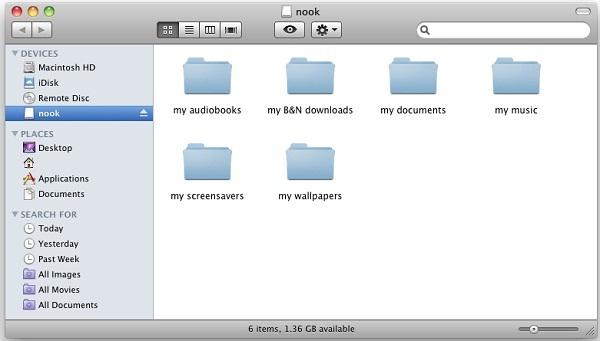 Figure 5: Nook Folders on a Mac
Before using your Nook, register it to an BarnesandNoble.com account. To register the Nook:
1. Touch the touchscreen and move your finger to the left to scroll. Touch the icon. The Nook summary appears on the main screen and settings options appear on the touch screen.
2. If your Nook is already registered, your registered email appears in the profile section. If not,
Not Registered
is shown next to Email address.
3. Touch
Device
. The device settings options appear on the touchscreen. Touch
Register your nook
. The registration screen appears on the main screen.
4. Use the keyboard on the touchscreen to enter your information. Touch the return key to switch to the password field.
5. When you are finished, touch
Submit
. It takes a few moments to verify your information. If the "Registration Successful" message is shown, your Nook is registered.
Giving a name to your Nook is useful if it is ever lost, since someone may be able to return it to you. To change your Nook's name:
1. Touch the touchscreen and move your finger to the left to scroll. Touch theicon. The Nook summary appears on the main screen and settings options appear on the touch screen.
2. If your Nook is already registered, your registered email appears in the profile section. If not,
Not Registered
is shown next to 'Email address'.
3. Touch
Device
. The device settings options appear on the touchscreen.
4. Touch
Edit your profile
. The Owner and Nook Profile window appears on the main screen. You also have the option of entering an owner name.
5. Enter the information and touch
Submit
. Your new Nook name appears on the summary screen.
While 3G is always on (as long as airplane mode is turned off), Wi-Fi needs to be turned on and set up the first time you use your nook. If you have access to a Wi-Fi hotspot, you can connect to a network using the Nook's built-in wireless chip. To turn on Wi-Fi and connect to a network:
1. Touch the touchscreen and move your finger to the left to scroll. Touch the icon. If the Nook is already connected to a network,
Connected to
2. Touch
Wi-Fi off
. The Wi-Fi is turned on. The Nook automatically searches for a network to which to connect.
3. If the Nook does not find your network, touch
Wi-Fi hotspot
. A list of all available networks appears. Touch the network to which you would like to connect. Touch
Connect
.
4. If the network requires a password, enter the password when prompted. Touch
Submit
to connect to the network.