How to Find and Download Free eBooks Survival Guide (2 page)

Before using the kindle, you must register it to an Amazon.com account. To register the kindle:
1. At the home screen, press the
Menu Button
. The main menu appears, as shown in
Figure 6
.
2. Use the five-way controller to select
Settings
and push down on the middle button to select the option. The Settings screen appears. If the Kindle is already registered, the registered name and date appear. If not, the screen shown in
Figure 7
appears.
3. Select
Register
and push down the five-way controller. The registration screen appears as shown in
Figure 8
.
4. Enter the information using the keyboard. To enter an "@", press the
SYM
button in the bottom row of the keyboard. Navigate through the fields using the five-way controller.
5. When finished, select submit and push down on the five-way controller. After several seconds, the Kindle is registered through the Amazon account.
 Figure 6: Main Menu
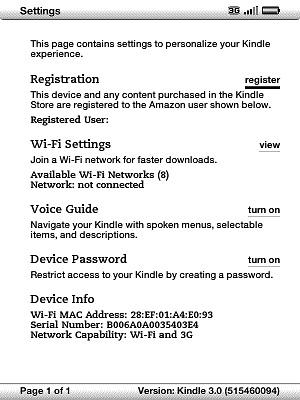 Figure 7: Unregistered Screen
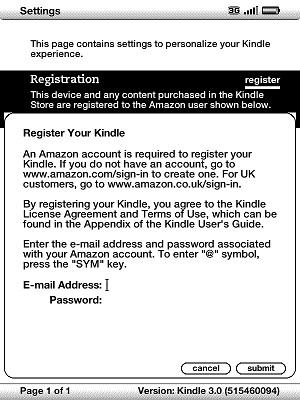 Figure 8: Registration Screen
You may give a name to the Kindle. When purchasing media online, select the name of the Kindle in order to allow the media to be delivered via Whispernet. To change the Kindle's name:
1. At the home screen, press the
Menu Button
. The main menu appears.
2. Use the five-way controller to select
Settings
and push down on the controller to select the option. The Settings screen appears.
3. Move the five-way controller down once to select
Edit
next to
Device Name
. Push down on the controller. At the bottom of the screen, a field appears with the current name highlighted.
4. Start typing a new name for the Kindle. When finished, select submit and push down the controller. The new name is registered to the Kindle.
You may enter personal information in case you ever lose the Kindle and someone is kind enough to return it to you. To edit personal information:
1. At the home screen, press the
Menu Button
. The main menu appears.
2. Use the five-way controller to select
Settings
. Push down on the controller to select. The Settings screen appears. Press the
Next Page
button twice to move to the third page.
3. Use the five-way controller to select
Edit
next to
Personal Info
. Push down the controller. An empty field appears.
4. Enter the personal information, such as the name, address, and/or phone number. Select
OK
and push down the controller.
While previous models of Kindle supported only free 3G connectivity, one of the Kindle 3 models is able to use both Wi-Fi and 3G. To connect to a Wi-Fi network:
1. At the home screen, press the
Menu Button
. The main menu appears.
2. Use the five-way controller to select
Settings
. Push down on the controller to select. The Settings screen appears.
3. Use the five-way controller to select
View
next to
Wi-Fi Settings
. Push down the controller to select.
4. If wireless is turned off, the Kindle will ask if you wish to turn it on. Select
OK
and push down the five-way controller. The Kindle searches for any available networks within range.
5. If any networks are found, the screen shown in
Figure 9
appears. Use the five-way controller to select
Connect
next to the network to which you wish to connect. Push down the controller to select.
6. If a password is required, enter the password for the network. This password is often found right on the wireless router supplied by your provider.
7. Select
Submit
when finished and push down the five-way controller. The Kindle connects to the wireless network and returns to the Settings screen. The Kindle is connected to the network, as shown in
Figure 10
. If you enter an incorrect password, the Kindle displays the message "Unable to Connect to Wireless Network".
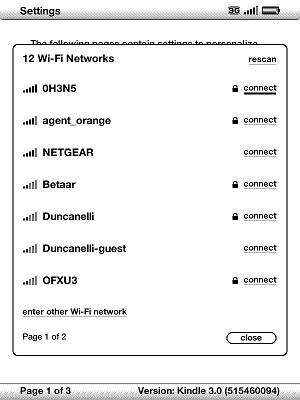 Figure 9: Available Wi-Fi Networks
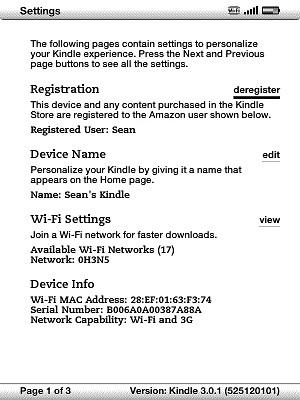 Figure 10: Connected to Wi-Fi Network
Amazon.com automatically assigns an email address to the Kindle, allowing you to receive documents directly to the ereader. Any documents sent to the Kindle’s email will automatically appear in the library.To view the Kindle's current email address:
1. At the home screen, press the
Menu Button
. The home screen menu appears.
2. Use the five-way controller to select
Settings
. Push down on the controller to select. The Settings screen appears.
3. Press the next page button. The second settings page appears, as shown in
Figure 11
. the Kindle's email appears under
Device Email
.
the Kindle's email address may be changed to the liking. To change the device email:
1. Go to
www.amazon.com/myk
. If you are not logged in, Amazon will prompt you for the login name and password. Once logged in, the Kindle information screen appears.
2. Click
Edit Info
under
the Kindle(s)
. The device name and email appear.
3. Type the desired email in the Kindle email address field. Provided that the requested name is not already in use, the new email is entered.
4. Click the
Update Information
button. The email is updated immediately and automatically appears on the second page of the Kindle's settings screen.
 Figure 11: Second Settings Page
Note: Before clicking BUY, make sure you want the book. The Kindle Store on the Kindle uses one-click purchasing. You may still cancel the order after you buy, but only before the item is downloaded to the Kindle.
You can buy an eBook from the Amazon Kindle Store using the Kindle. To buy an eBook:
1. Press the
Menu
button. The main menu appears, as shown in
Figure 12
.
2. Use the five-way controller to select
Shop in Kindle Store
(usually selected by default). Push the controller down to enter the store. The Kindle Storefront screen appears, as shown in
Figure 13
.
3. Use the five-way controller to select
Books
. Push the five-way controller down. The book categories appear.
4. Use the five-way controller to select a category, then push the controller down. The related books appear.
5. Search for a book by typing the name of a book or author and then selecting
Search Store
. To view a subcategory of a list of books, move the cursor to the top right of the screen and select
"View Subcategories within…"
Go back up to a category by moving the cursor to the top left of the screen or select a previous category, as shown in
Figure 14
.
6. Select a book. The book description screen appears, as shown in
Figure 15
.
7. Select
Buy
and push down the five-way controller. The book is purchased and a confirmation screen appears. The book will appear in the library on the home page after a few moments.
Figure 12: Main Menu