Canning and Preserving For Dummies (21 page)
Read Canning and Preserving For Dummies Online
Authors: Amelia Jeanroy

3
Combine the salt, water, and vinegar in a 3- to 4-quart saucepan. Bring the liquid to a boil over high heat, stirring occasionally to dissolve the sugar. Keep the liquid hot over medium heat.
4
Snuggly pack the cucumbers into your prepared jars. To each pint jar, add 1/2 teaspoon of pickling spices, 3 peppercorns, and 1 1/2 teaspoons of dill seed. To each quart jar, add 1 teaspoon of pickling spices, 6 peppercorns, and 1 tablespoon of dill seed. If you’re using fresh dill, add a sprig or two to each pint or quart jar in between the inside edge of the jar and the cucumbers.
5
Ladle the hot liquid into your filled jars, leaving 1/4-inch headspace in the pint jars and 1/2-inch headspace in the quart jars. Completely submerge the cucumbers in the liquid. If they protrude from the jar, adjust them until you have the proper headspace, because the lids may not properly seal from the internal pressure. Release any air bubbles with a nonreactive tool (refer to Chapter 3), adding more liquid as necessary to maintain the proper headspace. Wipe the jar rims; seal the jars with the two-piece caps, hand-tightening the bands.
6
Process your filled jars in a water-bath canner for 10 minutes (pints) or 15 minutes (quarts) from the point of boiling.
7
Remove the jars with a jar lifter. Place them on a clean kitchen towel away from drafts. After the jars cool completely, test the seals (see Chapter 4). If you find jars that haven’t sealed, refrigerate and use them within two months.
8
Keep the pickles on the pantry shelf for at least two weeks for the taste to develop.
Vary It!
For kosher-style dill pickles, add 2 cloves of peeled, halved garlic to each jar of pickles.
Per 2-ounce serving:
Calories 11 (From fat 1); Fat 0g (Saturated 0g); Cholesterol 0mg; Sodium 1,308mg; Carbohydrates 2g (Dietary fiber 1g); Protein 1g.

Zucchini Bread and Butter Pickles
Wait until you try these tartly sweet pickles. These are the perfect solution to being overrun with zucchini. Pick your vegetables when they are cucumber sized, and use that day for the best texture.
Note:
These pickles are ready to eat as soon as they cool.
Preparation time
: 40 minutes plus 3 hours soaking time
Processing time
: 10 minutes
Yield
: 12 pints
6 pounds thinly sliced zucchini
2 cups thinly sliced onions
1/2 cup kosher or pickling salt
2 cups sugar
2 quarts ice water
2 quarts distilled white vinegar
1/4 cup whole mustard seed
1/4 cup celery seed
1 teaspoon turmeric
1
Slice the zucchini into 1/4-inch thick rounds. Peel the onions and cut them in half lengthwise from the tip to the bottom core. Lay them on a cutting board, cut side down; then slice them, starting at the top of the onion, to a thickness of 1/4 inch.
2
Place the zucchini and onion slices in a 12-quart nonreactive stock pot. Sprinkle them with salt. Add ice water to cover the vegetables. Stir them once; then cover the bowl and let the veggies stand at room temperature for 3 hours. Transfer the veggies to a colander and rinse them thoroughly with running water (you may need to do this in more than one batch). Drain well. Roll the pieces in a clean, dry kitchen towel to partially dry them.
3
Prepare your canning jars and two-piece caps (lids and screw bands) according to the manufacturer’s instructions. Keep the jars and lids hot. (For information on preparing your jars, see Chapter 4.)
4
In the nonreactive pot, combine the sugar, vinegar, mustard, celery seed, and turmeric. Bring the liquid to a boil over high heat, stirring occasionally to dissolve the sugar and mix the spices. Add the vegetables and return the mixture to a boil.
5
Pack the boiling hot pickles into the prepared jars and add the hot liquid, leaving 1/2-inch headspace. Release any air bubbles with a nonreactive tool (refer to Chapter 3), adding more pickles and liquid as necessary to maintain the proper headspace. Wipe the jar rims; seal the jars with the two-piece caps, hand-tightening the bands.
6
Process your filled jars in a water-bath canner for 10 minutes from the point of boiling.
7
Remove the jars with a jar lifter. Place them on a clean kitchen towel away from drafts. After the jars cool completely, test the seals (see Chapter 4). If you find jars that haven’t sealed, refrigerate and use them within two months.
Per 2-ounce serving:
Calories 22 (From fat 0); Fat 0g (Saturated 0g); Cholesterol 0mg; Sodium 116mg; Carbohydrates 6g (Dietary fiber 1g); Protein 0g.
Pickled Vegetables
Pickled vegetables are delicious additions to green salads or a relish plate. Enjoy these treats for a change of pace from plain, raw vegetables. They still retain their crisp texture, but with an extra added bite from the brine.
 Avoid long boiling periods for your vinegar solution. Lengthy boiling reduces the acetic-acid level in vinegar, changing the pH level of the food. This change may compromise the safety of your pickled food.
Dilly Beans
Serve these beans in a Bloody Mary in place of a piece of celery. For a variation, use a combination of green and yellow string beans.
Preparation time:
16 minutes
Processing time:
10 minutes
Yield
: 4 to 5 pints
2 1/2 cups distilled white vinegar
2 1/2 cups water
1/4 cup coarse kosher or pickling salt
2 1/2 pounds fresh green beans, washed, with the ends and strings removed
4 stalks fresh dill, washed and drained
4 cloves garlic, peeled
4 dried whole red chile peppers
1 teaspoon cayenne pepper
1 teaspoon dill seed
1
Prepare your canning jars and two-piece caps (lids and screw bands) according to the manufacturer’s instructions. Keep the jars and lids hot. (For information on preparing your jars, see Chapter 4.)
2
Combine the vinegar, water, and salt in a 6- to 8-quart pot. Bring the liquid to a boil over high heat; boil for 1 minute, stirring to dissolve the salt. Reduce the heat to low and keep the mixture hot.
3
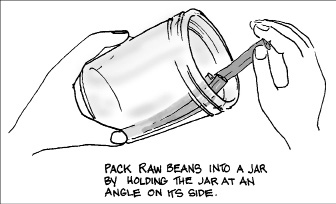
Pack the beans into the prepared jars (see Figure 8-2), leaving 1/4-inch headspace (trim the tops of the beans, if necessary). Add the following to each jar: a sprig of dill, 1 garlic clove, 1 dried red chile pepper, 1/4 teaspoon cayenne pepper, and 1/4 teaspoon dill seed.
4
Ladle the hot liquid over the beans, leaving 1/4-inch headspace, covering the tops of the beans. Release any air bubbles with a nonreactive tool (refer to Chapter 3), adding more liquid as necessary to maintain the proper headspace. Wipe the jar rims; seal the jars with the two-piece caps, hand-tightening the bands.
5
Process your filled jars in a water-bath canner for 10 minutes from the point of boiling.
6
Remove the jars from the boiling water with a jar lifter. Place them on a clean kitchen towel away from drafts. After the jars cool completely, test the seals (see Chapter 4). If you find jars that haven’t sealed, refrigerate them and use them within two months.
7
Let the beans sit for two weeks on your pantry shelf for the flavors to fully develop.
Per 1/2-cup serving:
Calories 40 (From fat 2); Fat 0g (Saturated 0g); Cholesterol 0mg; Sodium 167mg; Carbohydrates 10g (Dietary fiber 2g); Protein 1g.
Figure 8-2:
Packing raw beans into a jar.
Pickled Asparagus
Asparagus is one of those foods that you either wish for or have too much of. Pickling the young asparagus spears provides a great way to add a new dimension to this early spring vegetable. Put these up in pints, as part of their charm is the look of the straight spears packed like soldiers inside.
Preparation time
: 10 minutes
Processing time:
10 minutes
Yield:
8 pints
12 pounds young asparagus spears
8 small dried peppers (optional)
4 tablespoons dill seed
4 teaspoons whole mustard seed
8 cloves garlic
5 cups distilled vinegar
5 cups water
1/2 cup canning salt
1
Prepare your canning jars and two-piece caps (lids and screw bands) according to the manufacturer’s instructions. Keep the jars and lids hot. (For information on preparing your jars, see Chapter 4.)
2
Wash the asparagus thoroughly and cut it into lengths to fit your pint jars.
3
Place 1 hot pepper, 1/2 teaspoon dill, 1/2 teaspoon mustard seed, and 1 clove of garlic in each jar.
4
Firmly pack the asparagus spears vertically into the jars, but don’t force them. If necessary, trim the spears to leave 1/2-inch headspace.
5
In a 8-quart nonreactive pot, combine the vinegar, water, and salt and heat to boiling. Pour the boiling hot solution over the asparagus spears, leaving 1/2-inch headspace. Release any air bubbles with a nonreactive utensil (refer to Chapter 3), adding more liquid as necessary to maintain the proper headspace. Wipe the jar rims; seal the jars with the two-piece caps, hand-tightening the bands.