Canning and Preserving For Dummies (22 page)
Read Canning and Preserving For Dummies Online
Authors: Amelia Jeanroy

6
Process the filled jars in a water-bath canner for 10 minutes from the point of boiling.
7
Remove the jars from the boiling water with a jar lifter. Place them on a clean kitchen towel away from drafts. After the jars cool completely, test the seals (see Chapter 4). If you find jars that haven’t sealed, refrigerate them and use them within two weeks.
8
Let these beautiful spears sit for two weeks on the pantry shelf for the flavors to develop.
Per 1/4-cup serving:
Calories 26 (From fat 5); Fat 1g (Saturated 0g); Cholesterol 0mg; Sodium 358mg; Carbohydrates 4g (Dietary fiber 2g); Protein 2g.

Spiced Pickled Beets
Use beets that are small and tender, not larger than 2 inches in diameter. Purchase beets with the top leaves attached. If the leaves are wilted and quite dark, the beets aren’t fresh; continue your search for fresher beets.
Note:
Once canned, these beets are ready for eating.
Preparation time
: 1 hour and 35 minutes
Processing time:
30 minutes
Yield:
4 to 5 pints
4 pounds beets
3 cups thinly sliced white or yellow onions (about 3 medium)
2 1/2 cups cider vinegar
1 1/2 cups water
2 cups granulated sugar
1 teaspoon kosher or pickling salt
1 tablespoon mustard seed
1 teaspoon whole allspice
1 teaspoon whole cloves
3 cinnamon sticks, broken into pieces
1
Trim your beets, leaving the taproots and 2 inches of the stems. Wash and drain the beets, using a stiff brush to remove any clinging soil. Cover the beets with water in a 5- to 6-quart pot. Bring the water to a boil over high heat and cook the beets until they pierce easily with a fork, about 20 to 30 minutes. Drain the beets. Run cold water over them and remove the skin. Remove the stem and taproot. Slice the beets into 1/4-inch-thick slices. Place the beets in a bowl; set them aside.
2
Prepare your canning jars and two-piece caps (lids and screw bands) according to the manufacturer’s instructions. Keep the jars and lids hot. (For information on preparing your jars, see Chapter 4.)
3
Place the onions, vinegar, water, sugar, salt, mustard seed, allspice, cloves, and cinnamon sticks in the pot. Bring the mixture to a boil over high heat; reduce the heat and simmer for 5 minutes. Add your beet slices and simmer the mixture to heat the beets, about 3 to 5 minutes. Remove the cinnamon stick pieces.
4
Pack the hot beets and onions into the hot jars and ladle the hot liquid over the beets, leaving 1/4-inch headspace. Release any air bubbles (refer to Chapter 3), adding more beets and liquid as necessary to maintain the proper headspace. Wipe the jar rims; seal the jars with the two-piece caps, hand-tightening the bands.
5
Process your jars in a water-bath canner for 30 minutes from the point of boiling.
6
Remove the jars with a jar lifter. Place them on a clean kitchen towel away from drafts. After the jars cool completely, test the seals (see Chapter 4). If you find jars that haven’t sealed, refrigerate them and use them within two months.
Per 1/4-cup serving:
Calories 71 (From fat 2); Fat 0g (Saturated 0g); Cholesterol 0mg; Sodium 107mg; Carbohydrates 17g (Dietary fiber 1g); Protein 1g.
Pickled Brussels Sprouts
Brussels sprouts are an unusual treat when pickled and canned. In fact, you can eat them as a condiment.
Preparation time
: 15 minutes
Processing time:
10 minutes
Yield:
6 pints
12 to 14 cups young Brussels sprouts
1/2 cup canning salt
2 cups distilled vinegar
3 tablespoons dill weed
1
Prepare your canning jars and two-piece caps (lids and screw bands) according to the manufacturer’s instructions. Keep the jars and lids hot. (For information on preparing your jars, see Chapter 4.)
2
Wash the Brussels sprouts and remove any outer leaves that have insect damage or brown edges. Cook the sprouts for 5 minutes in boiling water and then dip them immediately into cold water. Drain.
3
Pack the sprouts into your hot pint jars, leaving 1/2-inch headspace. To each jar, add 1 1/2 teaspoons dill weed. Combine the vinegar and salt and pour this solution over the sprouts, leaving 1/2-inch headspace. Release any air bubbles with a nonreactive utensil (refer to Chapter 3), adding more liquid as necessary to maintain the proper headspace. Wipe the jar rims; seal the jars with the two-piece caps, hand-tightening the bands.
4
Process the filled jars in a water-bath canner for 10 minutes from the point of boiling.
5
Remove the jars from the boiling water with a jar lifter. Place them on a clean kitchen towel away from drafts. After the jars cool completely, test the seals (see Chapter 4). If you find jars that haven’t sealed, refrigerate them and use them within two weeks.
6
Let your pickled Brussels sprouts sit for two weeks so that the flavors can develop.
Per 1/4-cup serving:
Calories 26 (From fat 2); Fat 0g (Saturated 0g); Cholesterol 0mg; Sodium 475mg; Carbohydrates 6g (Dietary fiber 1g); Protein 1g.
Part III
Pressure Canning

In this part . . .
The chapters in this part explore the world of pressure canning, the canning method you use to preserve vegetables, meat, poultry, seafood, and other low-acid foods. Preserving low-acid foods requires more care than processing high-acid foods (discussed in Part II), but the rewards are well worth the additional effort. With this part, you’ll safely be preserving your favorite low-acid foods in no time.
Chapter 9
Don’t Blow Your Top: Pressure Canning
In This Chapter
Exploring pressure canning
Selecting a pressure canner
Understanding low-acid foods
Processing low-acid foods to perfection
P
ressure canning
is a process for preserving food with a low-acid content by exposing the food to a high temperature (240 degrees) under a specific pressure for a specific period of time in a specific type of pot: the pressure canner.
People who hear someone talking about pressure canning often ask, “Is it safe?” or “Won’t the pressure canner explode?” These concerns are certainly valid ones, but rest assured, when you know the right way to use a pressure canner, you can safely process a variety of low-acid foods. While pressure cookers and canners of the past may have once exploded if not closed properly, the new generation of canners and cookers are much lighter in weight and have built-in safety features that release steam if the pressure gets too high. None of your grandparents’ pressure cooking equipment had this.
This chapter leads you step by step through the pressure-canning process, including an explanation of pressure canning, what to look for when purchasing a pressure canner, and how to fill your canner and safely process your filled jars.
 Only one form of canning — pressure canning — is approved for safely processing low-acid foods. And only one piece of equipment — a pressure canner — is approved for safely processing low-acid foods. Don’t allow yourself to think you can use a substitute process or piece of equipment.
Understanding the Fuss about Low-Acid Foods
Low-acid
foods
contain little natural acid and require more care during the canning process than other types of foods. (If you’re a techie, note that low-acid foods are foods with a
pH factor
— that’s a measure of acidity in food — higher than 4.6.) Foods in this category include vegetables, meats, poultry, seafood, and combination foods (like soups, meat sauces, and salsas) that contain low-acid and high-acid ingredients. Exceptions to these low-acid foods sometimes include tomatoes, which are really a fruit and can be water-bath canned (although for safety’s sake, you still add acid to tomatoes) and vegetables converted to high-acid foods such as sauerkraut, pickles, or pickled vegetables (discussed in Chapter 8).
 Low-acid foods require pressure canning to kill microorganisms that are harmful if not destroyed before ingesting the food. Pressure canning at 240 degrees kills the botulism bacteria. If this temperature isn’t achieved and the bacteria isn’t destroyed, one taste of this spoiled food can kill you. And to make matters worse, these botulism-causing bacteria are odorless, have no taste, and actually thrive in low-acid foods that are in a moist environment and not in contact with air — the exact condition provided in a jar of canned food. Simply boiling food on the stovetop will not kill any botulism and should not be considered a safety step.
In a water-bath canner, the temperature of boiling water never increases above 212 degrees (the boiling point for water). While 212 degrees is fine for water-bath canning high-acid foods, it’s
not
sufficient to safely can low-acid foods. For that, you need to superheat your filled jars to a temperature of 240 degrees, which only a pressure canner can achieve. Be sure to use a pressure canner that’s approved for pressure canning by the United States Department of Agriculture (USDA).
Choosing Your Pressure Canner
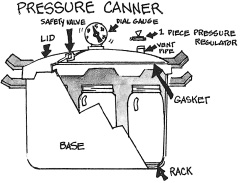
A
pressure canner,
shown in Figure 9-1, is a heavy kettle made for processing home-canned food. It includes a locking, tight-fitting cover that makes the kettle airtight. The purpose of pressure canning is to sterilize the food by destroying hard-to-kill microorganisms, especially the bacteria that cause botulism (see Chapter 3).
Figure 9-1:
A pressure canner.
Don’t confuse pressure canners with pressure cookers. A pressure canner is used to process and sterilize home-canned, low-acid foods. The purpose of a pressure cooker is to cook food fast. Check out
Pressure Cookers For Dummies,
by Tom Lacalamita (Wiley Publishing, Inc.), for the low down on pressure cooking. Pressure canners and pressure cookers are
not
interchangeable. Pressure cookers are not large enough to hold the jars and the amount of water necessary to can properly. They also do not have pressure gauges that allow you to maintain the constant pressure required.
When shopping for a pressure canner, keep these things in mind:
Size:
Pressure canners come in many sizes, holding from 4- to 19(!)-quart jars. For the home canner, however, a pressure canner with a capacity of 16 to 22 quarts is fine. This size holds seven 1-quart jars and permits good air circulation during processing.
Price:
The cost of a pressure canner may vary from $100 on the low end to upward of $600. Some reasons for the variance are size, features, and reputation of the manufacturer.
 When making your purchasing decision, study your options and estimate how frequently (or infrequently) you plan to pressure-can. You may even consider co-owning a pressure canner with a friend. If you’re buying a pressure canner secondhand, take it to your local county extension office to have it checked for proper seal and be sure it’s still safe to use.
Features:
All pressure canners — regardless of features — safely process your filled jars of low-acid food in the same manner because a pressure canner operates in only one way. Each pressure canner has a locking cover, a pressure gauge, and an overpressure plug. Manufacturers of pressure canners, however, slightly vary the same features and add accessories in much the same way car manufacturers add extras to a basic car model.
The following sections explain the different features various pressure canners offer so that you can determine which features you prefer. The type of pressure canner you choose doesn’t matter as long as the model is made and approved for processing home-canned foods.
No matter which type or size of pressure canner you choose, the goal is always the same: to superheat and process low-acid food at a high temperature (240 degrees) that destroys microorganisms.
Cover: With a gasket or without
You can find two types of covers for pressure canners: a lock-on cover and a metal-to-metal cover that’s attached with wing nuts. The difference is that one has a rubber gasket to ensure an airtight seal; the other one doesn’t. For a beginner, a lock-on cover is the easiest and most fail-proof to use.
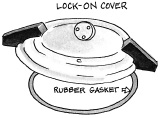
Lock-on cover
A lock-on cover (see Figure 9-2) usually has a rubber gasket between the cover and the base unit to ensure to the airtight seal. To securely fasten the cover to the pressure canner, rotate the cover on the base to the locked position (matching up the handles or matching arrows or other markings on the unit) or with a type of clamping handle. To ensure that the pressure canner is properly closed, refer to your owner’s manual for precise instructions.
Figure 9-2:
A lock-on cover and rubber gasket.