Canning and Preserving For Dummies (16 page)
Read Canning and Preserving For Dummies Online
Authors: Amelia Jeanroy

In addition to different sizes, powdered pectin comes in two varieties: fruit pectin for homemade jams and jellies, and fruit pectin for lower-sugar recipes. Use the variety your recipe calls for; they’re not interchangeable.
Setting Up without Adding Pectin
Not all recipes require the addition of extra pectin. Some recipes cook the fruit mixture for a long period of time, which reduces the liquid in the mixture to achieve the desired consistency.
For this process, you need patience and the knowledge of what to look for when testing your cooked product. Basically, you need to know what the spread’s gel point is. (
Gel point
is the cooking point at which jelly is considered done.)
 The gel point temperature is 8 degrees above boiling at an elevation of 1,000 feet above sea level or lower (220 degrees). If you’re at an altitude higher than 1,000 feet above sea level, you can determine the temperature of your gel point by bringing a pot of water to a boil. When the water boils, check the temperature on your thermometer and add 8 degrees. This is the gel point for your altitude.
Use one of the following methods for testing the gel point:
A candy thermometer:
This is the most accurate method for testing the gel point of your spread. Use a thermometer that’s easy to read. One degree over or under the gel point makes a difference in your final product.
 It’s a good idea to have two candy thermometers. They are inexpensive and critical for perfect jelly making. If one breaks, you’ll have a second one for backup during canning.
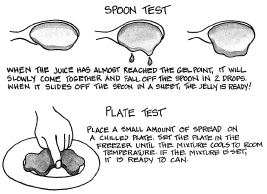
The spoon, or sheet, test (see Figure 6-2):
Dip a cool metal spoon into your cooked fruit and hold it so the fruit runs off the spoon. When the temperature of the fruit approaches the gel point, it falls off in a couple of drops. When it slides off the spoon in one sheet, the fruit’s done. Proceed with your next step.
This test takes a bit of practice to master. Until you master it, use a candy thermometer in conjunction with this test. When the temperature of the fruit climbs toward the gel point, you’ll be able to see the changes in the liquid and compare it to the sheeting from the spoon.
The plate test (see Figure 6-2):
Place about 1 tablespoon of cooked fruit onto a chilled plate. Put the plate in the freezer and cool the spread to room temperature. If the fruit is set and doesn’t roll around on the plate, the mixture is done. Proceed to your next step.
Figure 6-2:
Gel testing your food: the spoon test and the plate test.
The Road to Sweet Canning Success
The only method for safely processing your sweet spreads, as approved by the United States Department of Agriculture (USDA), is water-bath canning. The harmful bacteria and microorganisms living in high-acid foods are destroyed at the temperature of boiling water (212 degrees at 1,000 feet or lower above sea level) by sterilizing the food and vacuum-sealing the jar. For that reason, the recipes in the following sections all use water-bath canning. For complete details on water-bath canning, refer to Chapter 4.
Here are a couple of other tips to help you ensure your canning success:
Stick with tested recipes.
They’re always the best. Don’t experiment with different quantities of ingredients in any canning method. Quantity adjustments to your fruit or your sugar can seriously change the acid (pH level) in your food. And if the acidity changes, you may not use the correct home-canning method to produce a safe product, free from microorganisms.
Always practice safe food-handling procedures.
Complete each recipe, start to finish, without interruption. Any break between cooking your fruit to filling the jars and processing them may produce a product of inferior quality and one that may be unsafe for eating.
Jamming and canning
Jam is fun to make. It takes me (Karen) back to my childhood days when I created my own daily specials from crushed leaves, flowers, dirt, rocks, and water. I’ve grown up, but I still love playing with food. My husband is pleased to report that I now use real food instead of dirt and rocks!
Strawberry-Rhubarb Jam
Strawberries and rhubarb go together famously. This jam is a great way to get your family to try rhubarb, and it makes a great gift. You can make it throughout the year because frozen rhubarb works just like fresh.
Preparation time
: 45 minutes
Processing time:
20 minutes
Yield:
3 pints
4 cups strawberries, crushed
2 1/2 cups chopped rhubarb
1/4 cup lemon juice
One 1.75-ounce package pectin powder
6 cups sugar
1
Prepare your canning jars and two-piece caps (lids and screw bands) according to the manufacturer’s instructions. Keep the jars and lids hot. (For detailed instructions on preparing your jars, see Chapter 4.)
2
Hull and crush the strawberries. Clean the rhubarb; trim the ends and remove the leaves. Cut the rhubarb into 1/2-inch pieces.
3
Combine the strawberries, rhubarb, lemon juice, and pectin powder in a large saucepan. Bring the mixture to a boil over medium-high heat. Add the sugar, stirring to dissolve. Return the mixture to a full, rolling boil and boil hard for 1 minute. Remove the saucepan from the heat. Skim any foam from the surface with a foam skimmer, if necessary.
4
Ladle the boiling-hot jam into your hot jars, leaving 1/4 inch headspace. Release any air bubbles with a nonreactive utensil (refer to Chapter 3), adding more jam as necessary to maintain the proper headspace. Wipe the jar rims; seal the jars with the two-piece caps, hand-tightening the bands.
5
Process the filled pint jars in a water-bath canner for 20 minutes from the point of boiling. (
Note:
It doesn’t matter if you have a less-than-full canner. Simply arrange the jars so that they’re evenly spaced, if possible.)
6
Remove the jars from the canner with a jar lifter. Place them on a clean kitchen towel away from drafts. After the jars cool completely, test the seals. If you find jars that haven’t sealed, refrigerate them and use them within two weeks.
Per 1-tablespoon serving:
Calories 53 (From fat 0); Fat 0g (Saturated 0g); Cholesterol 0mg; Sodium 1mg; Carbohydrates 14g (Dietary fiber 0g); Protein 0g.

Jiggling with jelly
Jelly always has such a bright, cheerful look. It’s a great last-minute appetizer that doesn’t taste last-minute. Spoon a tart jelly, such as cranberry, over a block of cream cheese, allowing it to cascade over the sides. Serve it with rich, buttery crackers.
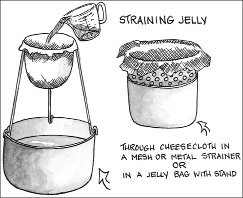
In order to achieve a bright, crystal-clear jelly, you need to properly strain your fruit. You can use a commercially manufactured stand and a jelly bag, or you can make your own by using a mesh strainer lined with several layers of cheesecloth (see Figure 6-3).
Dry fabric absorbs flavor from your fruit, weakening the flavor of your final product. Moisten your jelly bag (or cheesecloth) with cold water, wringing out any excess moisture before straining your liquid through it.
Figure 6-3:
Straining jelly using a jelly bag and stand or a cheesecloth-lined strainer.