The New Drawing on the Right Side of the Brain (6 page)
Read The New Drawing on the Right Side of the Brain Online
Authors: Betty Edwards

BOOK: The New Drawing on the Right Side of the Brain
3.98Mb size Format: txt, pdf, ePub
When you begin the drawing exercises in Chapter Four, you’ll have some background in the underlying theory, how the exercises have been set up, and why they work. The sequence is designed to enhance success at every step of the way and to provide access to a new mode of information processing with as little upset to the old mode as possible. Therefore, I ask you to read the chapters in the order presented and to do the exercises as they appear.
I have limited the recommended exercises to a minimum number, but if time permits, do more drawings than are suggested: Seek your own subjects and devise your own exercises. The more practice you provide for yourself, the faster you will progress. To this end, in addition to the exercises that appear in the text, supplementary exercises often appear in the margin. Doing these exercises will reinforce both your skills and your confidence.
For most of the exercises, I recommend that you read through all of the directions before you start drawing and, where directed, view the examples of students’ drawings before beginning. Keep all of your drawings together in a folder or large envelope, so that by the time you’ve come to the end of the book you can review your own progress.
Definitions of termsA glossary of terms appears at the end of the book. Certain terms are defined fairly extensively in the text, and the glossary contains other terms not so extensively defined. Words that are commonly used in everyday language, such as “value” and “composition,” have very specific, and often different, meanings in art terminology. I suggest that you glance through the glossary before starting to read the chapters.
Drawing materialsThe materials list for the first two editions was very simple: some inexpensive bond typing paper or a pad of inexpensive drawing paper, a pencil, and an eraser. I mentioned that a #4B drawing pencil is pleasant to use, as the lead is smooth and makes a clear, dark line, but an ordinary number 2 writing pencil is nearly as good. For this edition, you still need these basic materials, but I wish to suggest a few additional aids that will help you learn to draw quickly.
• You will need a piece of clear plastic, about 8" x 10" and about 1/16" thick. A piece of glass is fine, but the edges must be taped. Use a
permanent
marker to draw two crosshairs on the plastic, a horizontal line and a vertical line crossing at the center of the plane. (See the sketch in the margin.)
permanent
marker to draw two crosshairs on the plastic, a horizontal line and a vertical line crossing at the center of the plane. (See the sketch in the margin.)
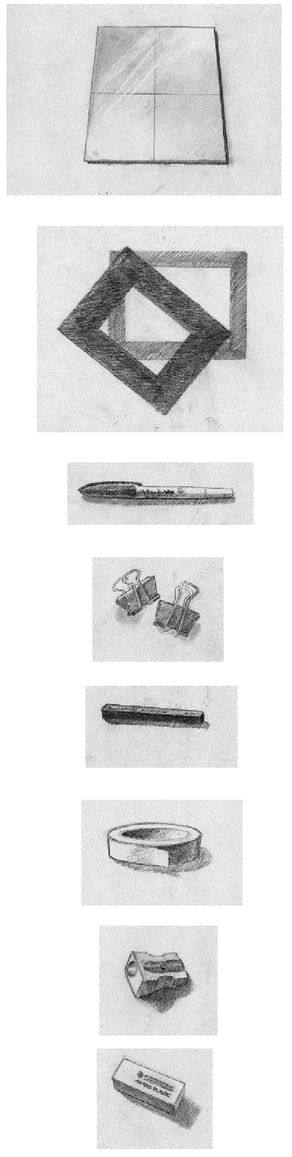
• Also, you will need two “viewfinders,” made of black cardboard about 8" x 10". From one, cut a rectangular opening of 4¼" x 5¼" and from the other, cut out a larger opening of 6" x 7⅛". See Figure 2-1.
• A nonpermanent black felt-tip marker
• Two clips to fasten your viewfinders to the plastic picture plane
• A “graphite stick,” #4B, available at most art supply stores
• Some masking tape
• A pencil sharpener—a small, hand-held sharpener is fine
• An eraser, such a “Pink Pearl” or a white plastic eraser
Gathering these materials requires a bit of effort, but they will truly help you to learn rapidly. You can buy them at any art materials or crafts store. My staff of teachers and I no longer attempt to teach our students without using viewfinders and the plastic picture plane, and they will help you just as much. Because these items are so essential to students’ understanding of the basic nature of drawing, for years now we have put together—by hand!—portfolios containing the special learning tools that we have developed for our five-day intensive workshops. The portfolios also contained all of the necessary drawing materials and a lightweight drawing board. Now I have made our Portfolio available for purchase. It includes as well a two-hour instructional video of the lessons in this book.
Construct a viewfinder as follows:
1.
Take a sheet of paper or use thin cardboard of the same size as the paper you use for drawing. The viewfinder must be the same format, that is, the same proportional shape, as the paper you are using to draw on.
Take a sheet of paper or use thin cardboard of the same size as the paper you use for drawing. The viewfinder must be the same format, that is, the same proportional shape, as the paper you are using to draw on.
2.
Draw diagonal lines from opposite corners, crossing in the center. In the center of the paper, draw a small rectangle by connecting horizontal and vertical lines at points on the diagonals. The rectangle should be about 1 x 1¼". (See Figure 2-1.) Constructed this way, the inner rectangle has the same proportion of length to width as the outer edges of the paper.
Draw diagonal lines from opposite corners, crossing in the center. In the center of the paper, draw a small rectangle by connecting horizontal and vertical lines at points on the diagonals. The rectangle should be about 1 x 1¼". (See Figure 2-1.) Constructed this way, the inner rectangle has the same proportion of length to width as the outer edges of the paper.
3.
Next, cut the small rectangle out of the center with scissors. Hold the paper up and compare the shape of the small opening with the shape of the whole format. You can see that the two shapes are the same, and only the size is different. This perceptual aid is called a viewfinder. It will help you to perceive negative spaces by establishing an edge to the space around forms.
Next, cut the small rectangle out of the center with scissors. Hold the paper up and compare the shape of the small opening with the shape of the whole format. You can see that the two shapes are the same, and only the size is different. This perceptual aid is called a viewfinder. It will help you to perceive negative spaces by establishing an edge to the space around forms.
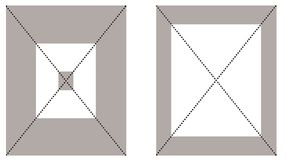
Fig. 2-1.
If you are interested in purchasing a Portfolio, you will find an order slip at the end of the book, or you can contact my website at
www.drawright.com
. But the few items listed above will be sufficient if you would rather put together your own set of materials.
Pre-instruction drawings: A valuable record of your art skillswww.drawright.com
. But the few items listed above will be sufficient if you would rather put together your own set of materials.
Now, let’s get started. First, you need to make a record of your present drawing skills. This is important! You don’t want to miss the pleasure of having a real memento of your starting point to compare with your later drawings. I’m fully aware how difficult this is, but just do it! As the great Dutch artist Vincent Van Gogh wrote (in a letter to his brother, Theo):
“Just dash something down if you see a blank canvas staring at you with a certain imbecility. You do not know how paralyzing it is, that staring of a blank canvas which says to a painter, ‘You don’t know anything.’ ”
Soon, you will “know something,” I promise. Just gear yourself up and do these drawings. Later, you’ll be very happy that you did. The drawings have proved to be invaluable in aiding students to see and recognize their own progress. A kind of amnesia seems to set in as drawing skills improve. Students forget what their drawing was like before instruction. Moreover the degree of
criticism
keeps pace with progress. Even after considerable improvement, students are sometimes critical of their latest drawing because it’s “not as good as da Vinci’s.” The
before
drawings provide a realistic gauge of progress. After you do the drawings, put them away and we will look at them again later on in the light of your newly acquired skills.
What you’ll need:criticism
keeps pace with progress. Even after considerable improvement, students are sometimes critical of their latest drawing because it’s “not as good as da Vinci’s.” The
before
drawings provide a realistic gauge of progress. After you do the drawings, put them away and we will look at them again later on in the light of your newly acquired skills.
• Paper to draw on—plain white bond paper is fine
• Your #2 writing pencil
• Your pencil sharpener
• Your masking tape
• A small mirror, about 5” x 7”, that could be attached to a wall, or any available wall or door mirror
• Something to use as a drawing board—a breadboard or a sturdy piece of cardboard, about 15" x 18"
• An hour to an hour and a quarter of uninterrupted time
You will do three drawings. This usually takes our students about an hour or so, but feel free to take as long as you wish for each of them. I will first list the drawing titles. Instruction for each drawing follows.
• “Self-Portrait”
• “A Person, Drawn from Memory”
• “My Hand”
1. Tape a stack of two or three sheets of paper to your drawing board or work in your pad of paper. (Stacking the sheets provides a “padded” surface to draw on—much better than the rather hard surface of the drawing board.)
2. Sit at arm’s length (about 2 to 2½ feet) from a mirror. Lean your board up against the wall, resting the bottom of the board on your lap.
3. Look at the reflection of your head and face in the mirror and draw your “Self-Portrait.”
4. When you have finished, title, date, and sign the drawing in the lower right-hand or lower left-hand corner.
1. Call up in your mind’s eye an image of a person—perhaps someone from the past or a person you know now. Or you may recall a drawing you did in the past or a photograph of a person well known to you.
2. To the best of your ability, make a drawing of that person. You may draw just the head, a half-figure, or the whole figure.
3. When you have finished, title, sign, and date your drawing.
Pre-instruction drawing #3: Your hand1. Seat yourself at a table to draw.
2. If you are right-handed, draw your left hand in whatever position you choose. If you are left-handed, draw your right hand.
3. Title, date and sign your drawing.
When you have finished the pre-instruction drawings:Be sure that you have titled, signed, and dated each of the three drawings. Some of my students have enjoyed writing a few comments on the back of each drawing, noting what is pleasing and what is perhaps displeasing, what seemed easy and what seemed difficult in the process of drawing. You’ll find these comments interesting to read later on.
Spread the three drawings on a table and look at them closely. If I were there with you, I would be looking for small areas in the drawings that show you were observing carefully—perhaps the way a collar turns or a beautifully observed curve of an eyebrow. Once I encounter such signs of careful seeing, I know the person will learn to draw well. You, on the other hand, may find nothing admirable and perhaps dismiss the drawings as “childish” and “amateurish.” Please remember that these drawings are made before instruction. Would you expect yourself to solve problems in algebra without any instruction? On the other hand, you may be surprised and pleased with parts of your drawings, perhaps especially the drawing of your own hand.
The reason for doing the memory drawingI’m sure that drawing a person from memory was very difficult for you, and rightfully so. Even a trained artist would find it difficult to draw a person from memory. Visual information from the real world is rich, complicated, and unique to each thing we see. Visual memory is necessarily simplified, generalized, and abbreviated—frustratingly so for artists, who often have only a limited repertoire of memorized images. “Then why do it?” you may well ask.
The reason is simply this: Drawing a person from memory brings forth a memorized set of symbols, practiced over and over during childhood. While doing the drawing from memory, can you recall that your hand seemed to have a mind of its own? You knew that you weren’t making the image you wanted to, but you couldn’t keep your hand from making those simplified shapes—perhaps the nose shape, for example. This is the so-called “symbol system” of children’s drawing, memorized by countless repetitions during early childhood. You’ll learn more about this in Chapter Five.
Now, compare your Self-Portrait with your memory drawing. Do you see the symbols repeated in both drawings—that is, are the eyes (or the nose or mouth) similar in shape, or even identical? If so, this indicates that your symbol system was controlling your hand even when you were observing the actual shapes in the mirror.
Other books
Enemies in Love [High-Country Shifters 4] by Melody Snow Monroe
Every Day is Like Doomsday by Selena Jones
Woof at the Door by Laura Morrigan
A Man Like No Other by Aliyah Burke
Betrayal by Naomi Chase
Up From Hell by David Drake
California's Calling (Hunt Family Book 3) by Brooke St. James
Tyler by C. H. Admirand
The Color of Home: A Novel by Rich Marcello
The Bellerose Bargain by Robyn Carr