Programming Python (52 page)

Let’s get back to coding GUIs.
Although functions and lambdas suffice in many cases,
bound methods of class instances work particularly well as callback
handlers in
GUIs—
they record both
an instance to send the event to and an associated method to call. For
instance,
Example 7-14
shows
Examples
7-12
and
7-13
rewritten to register a bound class
method rather than a function or lambda result.
Example 7-14. PP4E\Gui\Intro\gui3c.py
import sys
from tkinter import *
class HelloClass:
def __init__(self):
widget = Button(None, text='Hello event world', command=self.quit)
widget.pack()
def quit(self):
print('Hello class method world')   # self.quit is a bound method
sys.exit()                          # retains the self+quit pair
HelloClass()
mainloop()
On a button press, tkinter calls this class’squitmethod with no arguments, as usual. But
really, it does receive one argument—the originalselfobject—even though tkinter doesn’t pass
it explicitly. Because theself.quitbound method retains bothselfandquit, it’s compatible with a simple
function call; Python automatically passes theselfargument along to the method function.
Conversely, registering an unbound instance method that expects an
argument, such asHelloClass.quit,
won’t work, because there is noselfobject to pass along when the event later occurs.
Later, we’ll see that class callback handler coding schemes
provide a natural place to remember information for use on events—simply
assign the information toselfinstance
attributes:
class someGuiClass:
def __init__(self):
self.X = 42
self.Y = 'spam'
Button(text='Hi',command=self.handler)
def handler(self):
...use self.X, self.Y...
Because the event will be dispatched to this class’s method with a
reference to the original instance object,selfgives access to attributes that retain
original data. In effect, the instance’s attributes retain state
information to be used when events occur. Especially in larger GUIs,
this is a much more flexible technique than global variables or extra
arguments added by lambdas.
Because Python
class instance objects can also be called if they inherit
a__call__method to intercept the
operation, we can pass one of these to serve as a callback handler too.
Example 7-15
shows a class
that provides the required function-like
interface
.
Example 7-15. PP4E\Gui\Intro\gui3d.py
import sys
from tkinter import *
class HelloCallable:
def __init__(self):                        # __init__ run on object creation
self.msg = 'Hello __call__ world'
def __call__(self):
print(self.msg)                        # __call__ run later when called
sys.exit()                             # class object looks like a function
widget = Button(None, text='Hello event world', command=HelloCallable())
widget.pack()
widget.mainloop()
Here, theHelloCallableinstance registered withcommandcan
be called like a normal function; Python invokes its__call__method to handle the call operation
made in tkinter on the button press. In effect, the general__call__method replaces a specific bound
method in this case. Notice howself.msgis used to retain information for use
on events here;selfis the original
instance when the special__call__method is automatically invoked.
All fourgui3variants create
the same sort of GUI window (
Figure 7-11
), but print different
messages tostdoutwhen their button
is pressed:
C:\...\PP4E\Gui\Intro>python gui3.pyHello, I must be going...
C:\...\PP4E\Gui\Intro>python gui3b.pyHello lambda world
C:\...\PP4E\Gui\Intro>python gui3c.pyHello class method world
C:\...\PP4E\Gui\Intro>python gui3d.pyHello __call__ world
There are good reasons for each callback coding scheme (function,
lambda, class method, callable class), but we need to move on to larger
examples in order to uncover them in less theoretical terms.
For future
reference, also keep in mind that usingcommandoptions to intercept user-generated
button press events is just one way to register callbacks in tkinter. In
fact, there are a variety of ways for tkinter scripts to catch
events:
- Button command options
As we’ve just seen, button press events are intercepted by
providing a callable object in widgetcommandoptions. This is true of other
kinds of button-like widgets we’ll meet in
Chapter 8
(e.g., radio and check
buttons and scales).- Menu command options
In the upcoming tkinter tour chapters, we’ll also find that
acommandoption is used to
specify callback handlers for menu selections.- Scroll bar protocols
Scroll bar widgets register handlers with
commandoptions, too, but they have a
unique event protocol that allows them to be cross-linked with the
widget they are meant to scroll (e.g., listboxes, text displays,
and canvases): moving the scroll bar automatically moves the
widget, and vice versa.- General widget
bindmethods A more general tkinter event
bindmethod mechanism can be used to register callback
handlers for lower-level interface events—key presses, mouse
movement and clicks, and so on. Unlikecommandcallbacks,bindcallbacks receive an event object
argument (an instance of the tkinterEventclass) that gives context about
the
event—
subject widget,
screen coordinates, and so on.- Window manager protocols
In addition, scripts can also intercept window manager
events (e.g., window close requests) by tapping into the window
managerprotocolmethod
mechanism available on top-level window objects. Setting a handler
forWM_DELETE_WINDOW, for
instance, takes over window close buttons.- Scheduled event callbacks
Finally, tkinter scripts can also register callback handlers
to be run in special contexts, such as timer expirations, input
data arrival, and event-loop idle states. Scripts can also pause
for state-change events related to windows and special variables.
We’ll meet these event interfaces in more detail near the end of
Chapter 9
.
Of all the options
listed in the prior section,bindis the most general, but also perhaps the
most complex. We’ll study it in more detail later, but to let you sample
its flavor now,
Example 7-16
rewrites the prior section’s GUI again to usebind, not thecommandkeyword, to catch button
presses.
Example 7-16. PP4E\Gui\Intro\gui3e.py
import sys
from tkinter import *
def hello(event):
print('Press twice to exit')             # on single-left click
def quit(event):                             # on double-left click
print('Hello, I must be going...')       # event gives widget, x/y, etc.
sys.exit()
widget = Button(None, text='Hello event world')
widget.pack()
widget.bind('', hello)             # bind left mouse clicks
widget.bind('', quit)              # bind double-left clicks
widget.mainloop()
In fact, this version doesn’t specify acommandoption for the button at all. Instead,
it binds lower-level callback handlers for both left mouse clicks
(
mouse clicks (
within the button’s display area. Thebindmethod accepts a large set of such event
identifiers in a variety of formats, which we’ll meet in
Chapter 8
.
When run, this script makes the same window as before (see
Figure 7-11
). Clicking on the
button once prints a message but doesn’t exit; you need to double-click
on the button now to exit as before. Here is the output after clicking
twice and double-clicking once (a double-click fires the single-click
callback first):
C:\...\PP4E\Gui\Intro>python gui3e.pyPress twice to exit
Press twice to exit
Press twice to exit
Hello, I must be going...
Although this script intercepts button clicks manually, the end
result is roughly the same; widget-specific protocols such as buttoncommandoptions are really just
higher-level interfaces to events you can also catch withbind.
We’ll meetbindand all of the
other tkinter event callback handler hooks again in more detail later in
this book. First, though, let’s focus on building GUIs that are larger
than a single button and explore a few other ways to use
classes in GUI work.
It’s time to
start building user interfaces with more than one widget.
Example 7-17
makes the window
shown in
Figure 7-12
.
Example 7-17. PP4E\Gui\Intro\gui4.py
from tkinter import *
def greeting():
print('Hello stdout world!...')
win = Frame()
win.pack()
Label(win,  text='Hello container world').pack(side=TOP)
Button(win, text='Hello', command=greeting).pack(side=LEFT)
Button(win, text='Quit',  command=win.quit).pack(side=RIGHT)
win.mainloop()
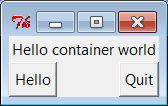
Figure 7-12. A multiple-widget window
This example makes aFramewidget (another
tkinter class) and attaches three other widget objects to it, aLabeland twoButtons, by passing theFrameas their first argument. In tkinter terms,
we say that theFramebecomes a parent
to the other three
widgets
. Both
buttons on this display trigger callbacks:
Pressing the Hello button triggers the
greetingfunction defined within this file,
which prints tostdoutagain.Pressing the Quit button calls the standard tkinter
quitmethod, inherited bywinfrom theFrameclass (Frame.quithas the same effect as theTk.quitwe used earlier).
Here is thestdouttext that
shows up on Hello button presses, wherever this script’s standard streams
may be:
C:\...\PP4E\Gui\Intro>python gui4.pyHello stdout world!...
Hello stdout world!...
Hello stdout world!...
Hello stdout world!...
The notion of attaching widgets to containers turns out to be at the
core of layouts in tkinter. Before we go into more detail on that topic,
though, let’s get small.
Earlier, we saw
how to make widgets expand along with their parent window,
by passingexpandandfilloptions to thepackgeometry manager. Now that we have a
window with more than one widget, I can let you in on one of the more
useful secrets in the packer. As a rule, widgets packed first are
clipped last when a window is shrunk. That is, the order in which you
pack items determines which items will be cut out of the display if it
is made too small. Widgets packed later are cut out first. For example,
Figure 7-13
shows what happens when thegui4window is shrunk interactively.
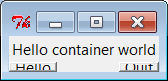
Figure 7-13. gui4 gets small
Try reordering the label and button lines in the script and see
what happens when the window shrinks; the first one packed is always the
last to go away. For instance, if the label is packed last,
Figure 7-14
shows that it is
clipped first, even though it is attached to the top:sideattachments and packing order both impact
the overall layout, but only packing order matters when windows shrink.
Here are the changed lines:
Button(win, text='Hello', command=greeting).pack(side=LEFT)
Button(win, text='Quit',  command=win.quit).pack(side=RIGHT)
Label(win,  text='Hello container world').pack(side=TOP)
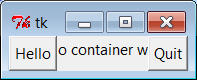
Figure 7-14. Label packed last, clipped first
tkinter keeps track of the packing order internally to make this
work. Scripts can plan ahead for shrinkage by callingpackmethods of more important widgets first.
For instance, on the upcoming tkinter tour, we’ll meet code that builds
menus and toolbars at the top and bottom of the window; to make sure
these are lost last as a window is shrunk, they are packed first, before
the application components in the middle.
Similarly
, displays that include scroll
bars normally pack them before the items they scroll (e.g., text, lists)
so that the scroll bars remain as the window shrinks.
In larger terms, the
critical innovation in this example is its use of frames:Framewidgets are just containers for
other widgets, and so give rise to the notion of GUIs as widget
hierarchies, or trees. Here,winserves as an enclosing window for the other three
widgets
. In general, though, by attaching
widgets to frames, and frames to other frames, we can build up arbitrary
GUI layouts. Simply divide the user interface into a set of increasingly
smaller rectangles, implement each as a tkinterFrame, and attach basic
widgets
to the frame in the desired screen
position.
In this script, when you specifywinin the first argument to theLabelandButtonconstructors, tkinter attaches them to
theFrame(they become children of
thewinparent).winitself is attached to the default
top-level window, since we didn’t pass a parent to theFrameconstructor. When we askwinto run itself (by callingmainloop), tkinter draws all the widgets in
the tree we’ve built.
The three child widgets also providepackoptions now: thesidearguments tell which part of the
containing frame (i.e.,win) to
attach the new widget to. The label hooks onto the top, and the buttons
attach to the sides.TOP,LEFT, andRIGHTare all preassigned string variables
imported from tkinter. Arranging widgets is a bit subtler than simply
giving a side, though, but we need to take a quick detour into packer
geometry management details to see why.
When a widget tree is
displayed, child widgets appear inside their parents and
are arranged according to their order of packing and their packing
options. Because of this, the order in which widgets are packed not only
gives their clipping order, but also determines how theirsidesettings play out in the generated
display.
Here’s how the packer’s layout system works:
The packer starts out with an available space cavity that
includes the entire parent container (e.g., the wholeFrameor top-level window).As each widget is packed on a side, that widget is given the
entire requested side in the remaining space cavity, and the space
cavity is shrunk.Later pack requests are given an entire side of what is left,
after earlier pack requests have shrunk the cavity.After widgets are given cavity space,
expanddivides any space left, andfillandanchorstretch and position widgets within
their assigned space.
For instance, if you recode thegui4child widget creation logic like
this:
Button(win, text='Hello', command=greeting).pack(side=LEFT)
Label(win,  text='Hello container world').pack(side=TOP)
Button(win, text='Quit',  command=win.quit).pack(side=RIGHT)
you will wind up with the very different display shown in
Figure 7-15
, even though you’ve moved the
label code only one line down in the source file (contrast with
Figure 7-12
).
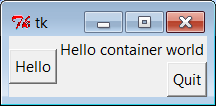
Figure 7-15. Packing the label second
Despite itssidesetting, the
label does not get the entire top of the window now, and you have to
think in terms of
shrinking cavities
to understand
why. Because the Hello button is packed first, it is given the entireLEFTside of theFrame. Next, the label is given the entireTOPside of what is left. Finally,
the Quit button gets theRIGHTside
of the remainder—a rectangle to the right of the Hello button and under
the label. When this window shrinks, widgets are clipped in reverse
order of their packing: the Quit button disappears first, followed by
the label.
[
30
]
In the original version of this example (
Figure 7-12
), the label spans the entire top
side just because it is the first one packed, not because of itssideoption. In fact, if you look at
Figure 7-14
closely, you’ll
see that it illustrates the same point—the label appeared between the
buttons, because they had already carved off the entire left and right
sides.
Beyond the effects of
packing order, thefilloption we met earlier can be used to stretch the widget to occupy all
the space in the cavity side it has been given, and any cavity space
left after all packing is evenly allocated among widgets with theexpand=YESwe saw before. For
example, coding this way creates the window in
Figure 7-16
(compare this to
Figure 7-15
):
Button(win, text='Hello', command=greeting).pack(side=LEFT,fill=Y)
Label(win, text='Hello container world').pack(side=TOP)
Button(win, text='Quit', command=win.quit).pack(side=RIGHT,expand=YES, fill=X)

Figure 7-16. Packing with expand and fill options
To make all of these grow along with their window, though, we also
need to make the container frame expandable; widgets expand beyond their
initial packer arrangement only if
all of their parents
expand, too
. Here are the changes in
gui4.py
:
win = Frame()
win.pack(side=TOP,expand=YES, fill=BOTH)
Button(win, text='Hello', command=greeting).pack(side=LEFT, fill=Y)
Label(win, text='Hello container world').pack(side=TOP)
Button(win, text='Quit', command=win.quit).pack(side=RIGHT, expand=YES,fill=X)
When this code runs, theFrameis assigned the entire top side of its parent as before (that is, the
top parcel of the root window); but because it is now marked to expand
into unused space in its parent and to fill that space both ways, it and
all of its attached children expand along with the window.
Figure 7-17
shows how.
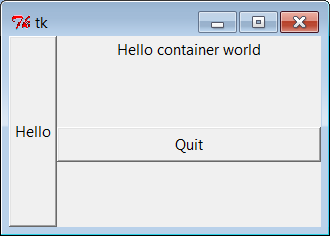
Figure 7-17. gui4 gets big with an expandable frame