Programming Python (50 page)

In
gui1c.py
(shown in
Example 7-4
),
I started packing labels without assigning them to names.
This works, and it is an entirely valid coding style, but because it
tends to confuse beginners at first glance, I need to explain why it
works in more detail here.
In tkinter, Python class objects correspond to real objects
displayed on a screen; we make the Python object to make a screen
object, and we call the Python object’s methods to configure that screen
object. Because of this correspondence, the lifetime of the Python
object must generally correspond to the lifetime of the corresponding
object on the screen.
Luckily, Python scripts don’t usually have to care about managing
object lifetimes. In fact, they do not normally need to maintain a
reference to widget objects created along the way at all unless they
plan to reconfigure those objects later. For instance, it’s common in
tkinter programming to pack a widget immediately after creating it if no
further reference to the widget is required:
Label(text='hi').pack() # OK
This expression is evaluated left to right, as usual. It creates a
new label and then immediately calls the new
object’spackmethod to
arrange it in the display. Notice, though, that the PythonLabelobject is temporary in this expression;
because it is not assigned to a name, it would normally be garbage
collected (destroyed and reclaimed) by Python immediately after running
itspackmethod.
However, because tkinter emits Tk calls when objects are
constructed, the label will be drawn on the display as expected, even
though we haven’t held onto the corresponding Python object in our
script. In fact, tkinter internally cross-links widget objects into a
long-lived tree used to represent the display, so theLabelobject made during this statement
actually is retained, even if not by our code.
[
29
]
In other words, your scripts don’t generally have to care about
widget object lifetimes, and it’s OK to make widgets and pack them
immediately in the same statement without maintaining a reference to
them explicitly in your code.
But that does not mean that it’s OK to say something like
this:
widget = Label(text='hi').pack()               # wrong!
...use widget...
This statement almost seems like it should assign a newly packed
label towidget, but it does not do
this. In fact, it’s really a notorious tkinter beginner’s mistake. The
widgetpackmethod packs the widget
but does not return the widget thus packed. Really,packreturns the Python objectNone; after such a statement,widgetwill be a reference toNone, and any further widget operations
through that name will fail. For instance, the following fails, too, for
the same reason:
Label(text='hi').pack().mainloop() # wrong!
SincepackreturnsNone, asking for itsmainloopattribute generates an exception (as
it should). If you really want to both pack a widget and retain a
reference to it, say this instead:
widget = Label(text='hi')                      # OK too
widget.pack()
...use widget...
This form is a bit more verbose but is less tricky than packing a
widget in the same statement that creates it, and it allows you to hold
onto the widget for later processing. It’s probably more common in
realistic scripts that perform more complex widget configuration and
layouts.
On the other hand, scripts that compose layouts often add some
widgets once and for all when they are created and never need to
reconfigure them later; assigning to long-lived names in such programs
is pointless and
unnecessary.
In
Chapter 8
, we’ll meet
two exceptions to this rule. Scripts must manually retain a reference
to
image
objects because the underlying image
data is discarded if the Python image object is garbage collected.
tkinter variable class objects also temporarily unset an associated
Tk variable
if reclaimed, but this is uncommon
and less harmful.
[
27
]
If you study the main tkinter file in the Python source library
(currently,
Lib\tkinter\__init__.py
), you’ll notice
that top-level module names not meant for export start with a single
underscore. Python never copies over such names when a module is
accessed with the*form of thefromstatement. The constants
module is today
constants.py
in
the same module package directory, though this can change (and has)
over time.
[
28
]
In fact, Python’s pass-by-name keyword arguments were first
introduced to help clean up tkinter calls such as this one.
Internally, keyword arguments really are passed as a dictionary
(which can be collected with the**nameargument form in adefheader), so the two schemes are
similar in implementation. But they vary widely in the number of
characters you need to type and debug.
[
29
]
Ex-Tcl programmers in the audience may be interested to know
that, at least at the time I was writing this footnote, Python not
only builds the widget tree internally, but uses it to automatically
generate widget pathname strings coded manually in Tcl/Tk (e.g.,.panel.row.cmd). Python uses the
addresses of widget class objects to fill in the path components and
records pathnames in the widget tree. A label attached to a
container, for instance, might have an assigned name such as.8220096.8219408inside tkinter.
You don’t have to care, though. Simply make and link widget objects
by passing parents, and let Python manage pathname details based on
the object tree. See the end of this chapter for more on Tk/tkinter
mappings.
So far, we’ve
learned how to display messages in labels, and we’ve met
tkinter core concepts along the way. Labels are nice for teaching the
basics, but user interfaces usually need to do a bit more…like actually
responding to users. To show how, the program in
Example 7-10
creates the window in
Figure 7-5
.
Example 7-10. PP4E\Gui\Intro\gui2.py
import sys
from tkinter import *
widget = Button(None, text='Hello widget world', command=sys.exit)
widget.pack()
widget.mainloop()

Figure 7-5. A button on the top
Here, instead of making a label, we create an instance of the
tkinterButtonclass. It’s attached to
the default top level window as before on the defaultTOPpacking side. But the main thing to notice
here is the button’s configuration arguments: we set an option calledcommandto
thesys.exitfunction.
For buttons, thecommandoption
is the place where we specify a callback handler function to be run when
the button is later pressed. In effect, we usecommandto register an action for tkinter to
call when a widget’s event occurs. The callback handler used here isn’t
very interesting: as we learned in
Chapter 5
, the built-insys.exitfunction simply shuts down the calling
program. Here, that means that pressing this button makes the window go
away.
Just as for labels, there are other ways to code buttons.
Example 7-11
is a version that packs
the button in place without assigning it to a name, attaches it to theLEFTside of its parent window
explicitly, and specifiesroot.quitas
the callback handler—a standardTkobject method that shuts down the GUI and so ends the program.
Technically,quitends the currentmainloopevent loop call, and thus the
entire program here; when we start using multiple top-level windows in
Chapter 8
, we’ll find thatquitusually closes all windows, but its
relativedestroyerases just one
window.
Example 7-11. PP4E\Gui\Intro\gui2b.py
from tkinter import *
root = Tk()
Button(root, text='press', command=root.quit).pack(side=LEFT)
root.mainloop()
This version produces the window in
Figure 7-6
. Because we didn’t tell the button to
expand into all available space, it does not do so.
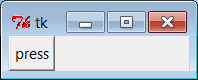
Figure 7-6. A button on the left
In both of the last two examples, pressing the button makes the GUI
program exit. In older tkinter code, you may sometimes see the stringexitassigned to thecommandoption to make the GUI go away when
pressed. This exploits a tool in the underlying Tk library and is
less Pythonic thansys.exitorroot.quit.
Even with a GUI this
simple, there are many ways to lay out its appearance with
tkinter’s constraint-basedpackgeometry manager. For example, to center the button in its window, add
anexpand=YESoption to the button’spackmethod call in
Example 7-11
. The line of changed
code looks like this:
Button(root, text='press', command=root.quit).pack(side=LEFT, expand=YES)
This makes the packer allocate all available space to the button
but does not stretch the button to fill that space. The result is the
window captured in
Figure 7-7
.
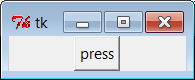
Figure 7-7. pack(side=LEFT, expand=YES)
If you want the button to be given all available space
and
to stretch to fill all of its assigned space
horizontally, addexpand=YESandfill=Xkeyword arguments to thepackcall. This will create the scene
in
Figure 7-8
.
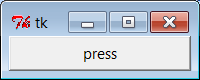
Figure 7-8. pack(side=LEFT, expand=YES, fill=X)
This makes the button fill the whole window initially (its
allocation is expanded, and it is stretched to fill that allocation). It
also makes the button grow as the parent window is resized. As shown in
Figure 7-9
, the button
in this window does expand when its parent expands, but only along the X
horizontal axis.
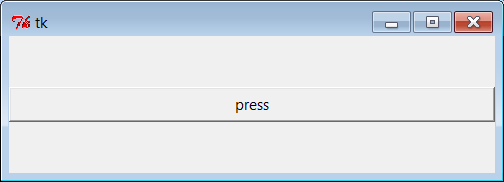
Figure 7-9. Resizing with expand=YES, fill=X
To make the button grow in both directions, specify bothexpand=YESandfill=BOTHin thepackcall; now resizing the window makes the
button grow in general, as shown in
Figure 7-10
. In fact, for more
fun, maximize this window to fill the entire screen; you’ll get one very
big tkinter button indeed.
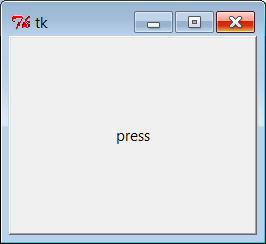
Figure 7-10. Resizing with expand=YES, fill=BOTH
In more complex displays, such a button will expand only if all of
the widgets it is contained by are set to expand too. Here, the button’s
only parent is theTkroot window of
the program, so parent expandability isn’t yet an issue; in later
examples, we’ll need to make enclosingFramewidgets expandable too. We will revisit
the packer geometry manager when we meet multiple-widget displays that
use such devices later in this tutorial, and again when we study the
alternativegridcall
in
Chapter 9
.