Read Making It: Radical Home Ec for a Post-Consumer World Online
Authors: Kelly Coyne,Erik Knutzen
Making It: Radical Home Ec for a Post-Consumer World (43 page)

70>
Make a Native Pollinator Habitat

PREPARATION:
2 hours
In this time of honeybee decline, native pollinators—like bumblebees, orchard mason bees, and leafcutter bees—become all the more important. However, they are under threat, too, because their habitat is vanishing.
Native pollinators need wild places to build their homes: dead branches, empty mouse nests, undisturbed patches of soil. In the wild, they live in the unattended margins of nature, where forest meets field, where field meets ditch. Our suburbs stretch out to eat open fields, replacing these marginal spaces with tidy lawns interspersed with acres of concrete and asphalt. Hanging a native bee house in your backyard is a good deed—and it’s fascinating, too. There are too many different types of native pollinators to mention, but most are solitary bees, and all are very gentle.
To start, make your yard an oasis for pollinators and all of the other little creatures that need a safe place to make their homes, like butterflies, ladybugs, lacewings and spiders, lizards, snakes, toads, and songbirds. The more complex your yard’s ecosystem, the healthier it will be. The best way to protect your vegetable beds and fruit trees is by letting other plants and creatures thrive in your yard. A diverse garden finds its own balance between pests and predators.
We believe that every garden should have a corner left entirely to nature, a zone off-limits to humans. This corner should never be tidied or improved. Leaves are not collected. Wildflowers and weeds are allowed to bloom and seed there unimpeded. The most you might do is lay down an armload of sticks there as an offering to the lizards and toads. This ground is an incubator for the wild spirit of the garden.
Beyond that, you can support native pollinators by doing a few things. First and foremost, you must banish all pesticides and herbicides from the garden. Second, plant lots of flowering native plants, short-lived wildflowers, fruit trees, and flowering herbs. Plant enough of these so that there’s always something blooming in your yard throughout the growing season. Then add water, in the form of birdbath or a pond. Our birdbath draws everything from honeybees to fierce hawks. Do these simple things and your yard will hum with life. Ladybugs and lacewings will patrol your crops, while dragonflies and butterflies color the air. Obliging little birds show up to eat up your aphids and grasshoppers. And in the meantime, hardly noticeable in the background, modest little native pollinators will establish themselves in your yard—if they can find a spot.
Thirty percent of native pollinators live in dead wood or the hollows of plant stalks. The rest live underground—including bumblebees. Bumblebees prefer to live in old mouse nests. Who knew? Some garden stores sell bumblebee houses. While this is a charming idea, the truth is, bumblebees rarely adopt these artificial homes. Support ground-dwelling pollinators by simply leaving bare patches of ground for them to dig into—some like soil, some like clay, others like sand.
The pollinators that live in stalks and wood are easier to help. The first thing you can do, as mentioned already, is to just leave dead plant stalks in the ground to overwinter, and let a few dead branches or logs accumulate on your property. Beetles bore holes into the wood, and the pollinators adopt those holes as nests.
Or you can build a house full of stalks to tempt native pollinators to move in.
Pollinator Condo
The bees served by this project are solitary bees that build their nests in tubes—in plant stems or holes in wood. A solitary female lays several eggs in each tube, starting at the back and working forward. Each egg is sealed in its own compartment along with a supply of pollen for the hatchling. In profile view, these nests look like train cars. When the bee fills the entire tube, she seals the front with a plug of mud or plant matter. The next generation hatches in the following spring and begins building its own nests.
It’s hard to predict which types of pollinators might pass through your yard. Different types of native bees have different preferences in the size of the nest they prefer and the materials from which it’s made. So you’re going to collect a variety of potential nesting materials, put them in a bee house, and see who moves in. The first step is to build the house.
YOU’LL NEED
- 1x10 lumber, 20 inches total
- 1x8 lumber, 21 inches total
- Galvanized nails or wood screws, about 1½inches long
- Exterior (waterproof) wood glue
- Mounting hardware of your choice
PUTTING IT TOGETHER
PRECUT THE LUMBER
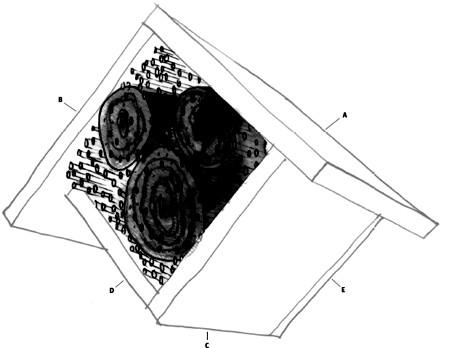
Cut the 1x10 lumber into two pieces: one 10 inches long
A
and the other 9¼ inches.
B
These two pieces will form the roof.
Cut the 1x8 lumber into three pieces: 2 pieces that are 7¼ inches and one 6 ½inches. These will form the sides
C,D
and the back.
E
”GLUE AND SCREW” THE PIECES TOGETHER
Start by assembling the roof. Apply a bead of wood glue to both surfaces of the roof pieces, then attach the two pieces together with two nails or screws, one on each side. If you predrill guide holes, it will be easier to drive in the screws. Wipe up any excess glue with a damp cloth.
Next, in exactly the same way, join one 7¼-inch piece
C
with the 6½-inch piece
D
to form the body of the house. Then attach the back, the other 7¼-inch piece.
E
Attach the assembled body of the house to the roof, aligning the back sides of both roof and house so that the roof projects 2 inches over the front of the house.
FINISH THE PIECE
You could hang the bee house as is. If you built it out of redwood or cedar, it will last a long time untreated. If it’s made of pine, it may start breaking down after a few years. If you want it to last longer, coat the exterior with latex house paint or a water-based polyurethane finish. Leave the interior unfinished because the bees might be sensitive to the chemicals in finishes.
NOTES ON WOOD
You can use any type of wood you wish, except pressure-treated lumber, which is full of chemicals that will harm the insects. Cedar and redwood are more expensive than pine but last longer outdoors untreated. Newbie woodworkers should note that the nominal dimensions of 1x8 lumber are actually 3/4 x 7¼ inches, and 1x10 lumber actually measures 3/4 x 9¼ inches. This project is designed so that you only have to cut the lumber to the proper length. The widths are standard.
MOUNT IT
The house must be mounted against a wall or secured to a post. It’s not meant to dangle from a tree like a birdhouse. So you’ll need to decide where you’re going to mount it and choose the correct mounting hardware for that location. The most direct method would be to screw the box directly to a wooden fence or wall. If you’re going to do that, predrill 2 to 4 holes in the back of the box to make this easier. If you don’t want to drill lots of holes in your walls, attach a mounting bracket to the back of the box, which would allow you to hang it from one nail. Hardware stores sell mounting hardware designed for different situations.
GATHER NESTING MATERIALS
Take a pair of shears and forage for plant stalks with soft piths (cores). Some solitary bees like to chew their way into old plant stalks. Good candidates are wild rose, raspberry canes, mullein stalks, and thistle stalks. Poke around and see what you can find. The more variety in size and type, the better.
Also look for plants with hollow stalks, like reeds and bamboo, dry or fresh, in various widths. There’s a common type of patio-screening material made up of dried reeds. If you have some of this around, slice off a few reeds from one end.
For wood-dwelling bees, you’ll want a thick branch or log section of dry hardwood or fruitwood, cut 6½inches long, width variable. You’ll pack one or more branches in the house along with the stalks or reeds. (See the illustration on page 305.) How many branch pieces you use depends on their width—how many will fit in the house—and your preference. The house could be filled mostly with wood chunks, entirely with plant stalks, or with a mix.
Note:
Instead of branches, you could use scraps of hardwood lumber.
PREPARE THE MATERIALS
The house looks neatest if all the nesting material is cut to the same length, but the native bees don’t care. So let aesthetics be your guide. Using pruning shears, cut all plant stalks, canes, and reeds to approximately 6½inches.
Cut bamboo canes just beneath the nodes (where there’s a ridge on the outside). The nodes indicate the presence of an interior wall. Let one of those nodes be a back wall for your tube. Bees like back walls, which make them feel secure. Make sure you arrange the bamboo so the walls are at the “back” of the canes and the front portion of the cane is open.
Drill holes in the branches you collected to tempt wood-dwelling bees. One of the most widespread native pollinators in North America is the orchard mason bee. It prefers nests that are ¼ inches wide and 6 inches deep. Using a ¼-inch drill bit, drill 6-inch tunnels into the hardwood you collected. Space the holes about 3/4 inches apart. It doesn’t matter if the holes are drilled with or against the grain of the wood, as long as the holes are 6 inches deep. But make sure to leave a back wall in the wood—in other words, don’t drill all the way through to the other side. If you wish, you can also make a few holes with finer bits
(3/16
inch, 1/8 inch, etc.) to attract smaller-bodied pollinators that might live in your area.
Note:
If you don’t have a drill, just fill your house with stalks.
MOUNT AND FILL THE HOUSE
First, mount the house in its final location. Choose a spot that gets some morning sun; an east- or southeast-facing position is ideal. It should be mounted at least 5 feet off the ground to discourage animals from disturbing it.
Then fill the house with your assembled materials. Pack them in so everything is nice and snug, arranging them any way that pleases you. All that matters is that everything is pressed flush against the back of the house and none of it protrudes past the protection of the roofline.
MAINTENANCE
You don’t have to do much from here on out but watch. If the bees are interested, you’ll see them flying around the house, entering and exiting the tubes and holes. If they plug up some of the holes, you’ll know your house is successful. If it’s not adopted the first year, consider planting more flowering plants the next year and trying again. Native bees don’t travel far from their nest in search of pollen. If your yard isn’t rich with flowers, they won’t stick around.
If you notice birds pecking at the bee nests, curl a piece of chicken wire around the front of the house.
Orchard mason bees start building their nests in the early spring, when the blossoms appear, and use mud in their construction, so if your yard is dry (unlikely as that is in the spring), you could make it a point to maintain a little mud puddle near their house.
When winter comes, leave the house where it is. The eggs in the sealed holes will incubate until the next year. The baby bees will be fine over winter. They actually depend on the cold as part of their life cycle. The one thing that can harm them, though, is unusual winter wetness—unusual for your climate, that is. If you usually have snowy winters but are getting driving rainstorms instead, you could take down the box and move it somewhere cold but sheltered, like a garage or shed or covered porch. Move it carefully and put it where it will not be disturbed—either by people or mice. Return the house to the outdoors as soon as you can, before you see the first signs of spring. The bees won’t want to miss the first blooms.