Just in Case (25 page)

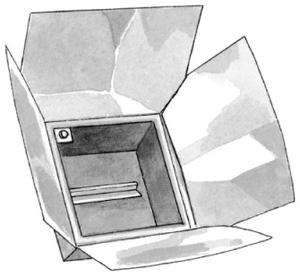
SOLAR COOKER
•
It takes time.
In general, a solar cooker takes quite a bit more time to cook foods than a conventional oven, usually about twice as long. Having ingredients at room temperature or warmer before you put them in the cooker cuts down on cooking time.
•
Smaller is better.
Smaller amounts of food cook better than larger amounts. After turning out several loaves of undercooked bread, I began using soup cans to make smaller loaves, and that solved the problem. Rolls worked well when I began leaving an empty space in the middle of the pie tin I baked them in.
•
Pans matter.
Wide, shallow pans work better than deep ones, and dark pans work better than light-colored or glass ones.
PROJECT INNER TUBE SOLAR COOKER
This very simple cooker, while not the most efficient of cookers, serves to illustrate the basic principle of solar cooking: magnifying the power of the sun to cook food.
YOU WILL NEED
• Inner tube
• Sheet of glass
• Stable bottom surface (a board will do; covering it with aluminum foil will make the cooker more efficient)
1. Set the board in direct sunlight.
2. Place the inflated inner tube on the board.
3. Put an aluminum cooking vessel, of a dark color or painted black on the outside, in the middle of the inner tube. Fill it with the food you wish to cook.
4. Cover the tube with the sheet of glass and wait for the food to cook!
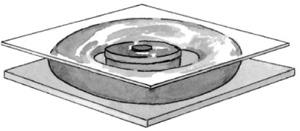
AN INNER TUBE SOLAR COOKER
•
Temperature matters.
Cool temperatures of, say, less than 60°F or brisk breezes will reduce an oven’s efficiency. They will work indoors in a sunny window, though.
•
Direct sun moves around.
As the sun moves, so does the path of its light to your cooker. You must move the oven as necessary so that it stays in direct sunlight.
•
Water-hungry foods need precooking.
Foods that absorb a lot of water during cooking, such as rice, dried beans, and potatoes, benefit from being cooked
before
they are added to any dish that will be cooked in a solar cooker. Otherwise they end up a little crunchy.
•
Solar cookers don’t burn food.
The heat is so gentle that it is nearly impossible to burn anything. Cookies or breads may get hard after a while, but they won’t burn the way they will in a traditional oven. This is a real advantage for those of us who get busy and forget to check on our dinner.
Good foods to try in a solar cooker are those with a lot of liquid that need heating more than cooking, such as canned soups or stews or instant oatmeal. A solar cooker will do a good job with hot dogs, too. I am able to cook meat, even a roast, in a solar cooker, but it takes a long time, even on a warm day. Potatoes will bake as well, but plan on baking them for at least two hours.
Another plus for the solar cooker is the cost. You can make a good cooker from mostly recycled materials for under ten dollars. I made one with nothing but everyday items I had at home for no cash outlay at all. More efficient, sturdier stoves can be made as well, with only slightly more effort. There are plenty of plans available on the Internet; the Solar Cooking Archives (
www.solarcooking.org
) is a good starting place. Pick a sunny day for construction — you will want to use your cooker right away, and if it’s raining you won’t be able to.
I like the idea of knowing how to make a solar oven, and I want my children to know how to make one as well; but if you don’t have the inclination, you can purchase a commercially made solar oven. A lightweight solar oven that will fit in a backpack can be had for less than twenty dollars. More substantial cookers run up to several hundred dollars and come with all the bells and whistles: self-stabilizing shelves so you can tilt the oven toward the sun, tempered glass doors, wellinsulated sides with rubber gaskets, and a heating capacity of 375°F, even in winter.
PROJECT BOX SOLAR COOKER
This stove can be made from any thin box, such as a pizza box. This is a good afternoon project for a group of kids, and it might help get them interested in the concept of solar cooking. You need just a few simple household items.
YOU WILL NEED
• Thin box, such as a pizza box
• Heavy-duty aluminum foil
• White glue
• Marker
• Utility knife
• Scissors
• Large sheet of black construction paper
• Plastic wrap
• Masking or duct tape
• Couple of feet of string
1. Assemble the box and open it up.
2. Glue aluminum foil to all the inside surfaces of the box except for the top. Keep the shiny side of the foil facing out, and avoid wrinkling it as much as possible.
3. On the top of the box, use a marker to draw a rectangle one inch in from the edges of the lid on all sides.
4. Cut the front and two sides of that rectangle with the utility knife. Leave the back side intact.
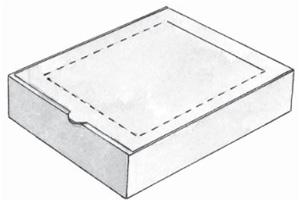
5. Cut out a piece of aluminum foil the same size as the flap in the top. Glue it to the inside of the flap, again with the shiny surface facing out and smoothing out as many wrinkles as possible.
6. Tape the black construction paper to the bottom of the box over the aluminum foil.
7. Close the box lid and open the flap. Cover the opening in the box top with plastic wrap. Seal the edges with tape.
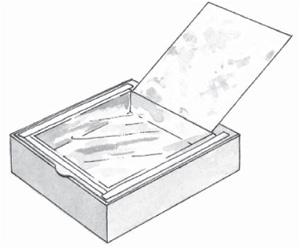
8. When you are ready to cook, place your cooker in a spot that receives direct sun and orient it so the open flap faces the sun.
9. Put your food on a dark-colored paper plate or a small metal or foil pan. Pull up one side of the plastic-wrap top, put your food inside the box, and reseal the plastic. Use the string and the duct tape to tie back the reflector lid (this is the most difficult part).
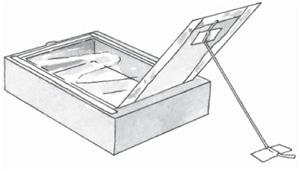
10. Wait for the food to cook, and then enjoy.
HEATING
I
T IS REMARKABLE,
even in a wellinsulated house, how fast the cold creeps in when the furnace goes out, especially if the wind is blowing. If you are dry, dressed properly, and getting enough calories, you can withstand a good deal of cold, but who would want to?
The first step in preparing your home for a power disruption is to have an energy audit. Most utility companies offer them for free. The audit technician can show you where you are losing energy (and money) and offer solutions for making your home more energy efficient. Making your home as tight and efficient as possible is an excellent investment of preparedness resources.
Next you’ll need to be sure that you have a nonelectric heat source and plenty of fuel for it. A woodstove might keep all or most of your home warm and provide a cooking surface. But heating with wood is no small undertaking; the wood needs to be acquired and stacked, the fire started and fed, the ashes dumped. If you’re using a woodstove as your backup heating system, be sure you get plenty of practice using it before you actually need it. A blackout is no time to be fiddling with the damper and getting exasperated trying to get the fire started. There are a number of excellent stoves on the market. But the price tags are high; you might check the classified ads for a used stove.
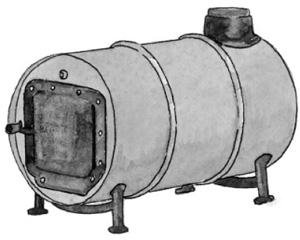
You can make a woodstove with a clean fifty-five-gallon steel barrel that has permanently attached, nonremovable ends. Kits that will help you convert such a barrel to a stove can be had for less than a hundred dollars. You need to cut a hole in the end of a drum and bolt on the Castiron pipe connection, doorframe, and legs. A second barrel mounted above the first as a smoke chamber will increase the heat output by 20 percent. I grew up with one of these stoves in our family room. It was not attractive, but it kept our downstairs warm.
BURNING WOOD
Make no mistake. Committing to burning wood is a huge undertaking. You need to cut or purchase cordwood and have a place to store it. You need to understand the intricacies of wood and how it’s priced to avoid being taken by unscrupulous dealers wanting to make a quick buck by selling short cords of unseasoned wood. But the rewards of the energy independence are immense and not just financial. See
chapter 16
for more information. And if you plan to burn wood, I would suggest a copy of Frank and Stephen Philbrick’s book,
The Backyard Lumberjack
(Storey, 2006).
