Grow a Sustainable Diet: Planning and Growing to Feed Ourselves and the Earth (10 page)
Read Grow a Sustainable Diet: Planning and Growing to Feed Ourselves and the Earth Online
Authors: Cindy Conner
Tags: #Gardening, #Organic, #Techniques, #Technology & Engineering, #Agriculture, #Sustainable Agriculture

A recipe for making a 30/1 compost is: for every 2 five-gallon buckets of carbon material, you would need 2 five-gallon buckets of nitrogen (green) material, plus half of a five-gallon bucket of soil. (I take soil for this from a garden bed that is being prepared for the next crop.) Since I need to keep detailed records to maintain my certification as an
intermediate-level Biointensive teacher, I record everything that goes in and out of the compost piles in my research areas. You can see that garden and watch me make compost that way in my DVD
Cover Crops and Compost Crops IN Your Garden
. You might have what I refer to as wild piles. Those are compost piles made as the summer progresses with anything and everything you have in the garden to throw in there. That’s okay (I have some of those, too) — you pile it up and it eventually becomes compost. Once you begin to focus on what you are putting in there, and realize that you can grow things specifically for compost materials, your world begins to change in the garden.
If the ingredients in your compost piles are mostly leaves and other carbon materials, the pile will have a higher carbon-to-nitrogen ratio and take longer to break down. That’s not a bad thing, you just have to be aware of it. If it has more green nitrogenous material, it will get hot fast and might smell. Did you ever leave some grass clippings in your wheelbarrow, forgetting to put them somewhere as mulch or add them to your compost? A pile of damp grass clippings, left for a few days, can stink worse than any manure. A compost pile built with a higher concentration of green material is a hot compost. It breaks down faster, but you don’t have the diversity of microbes that you do with cooler, slower compost. The compost I’m talking about making is the cool, slow kind. My compost piles are made on a garden bed and are part of my rotation. The piles I make spring through summer only get turned in the fall as I move them to the next bed. Those piles will have become finished compost by the following summer when I add it to the beds as needed. The pile I make in the fall is made on the new compost bed and fed out to the garden the following fall. That pile is never turned. I try to make sure my compost piles have enough moisture; otherwise I leave them alone over the course of the year. Sometimes I put a post at each corner of the pile to keep its shape as I build it, and sometimes not. When the compost is removed from the garden bed in the fall, that bed is planted to rye. In the spring, the rye is cut down at pollen shed (I’ll explain that soon) and left as mulch. As it is growing, the rye soaks up any nutrients leached into the soil from the compost over the year and gives them back as it decomposes under the corn that is
planted into that mulch. My best corn crop is in that bed following the compost.
To grow enough compost materials yourself, you would need to have those crops growing in at least sixty percent of your garden over the course of the year. Of that sixty percent area, two thirds would be in carbon crops and one third grown for their nitrogen contribution. Too often, gardens are productive for only part of the year and left to whatever Mother Nature wants to put there for the rest. If Mother Nature’s choice is not yours, you will have to expend energy getting it out. Once you incorporate cover/compost crops into your garden rotation, and understand the process, everything will just be a matter of planting and harvesting. Your harvests of green biomass and brown stalks and straw are food for the compost pile. Properly managed, you don’t need to till before planting again. Keep in mind I said
once you understand the process
.
Some of these crops will already be in your food plan. The stalks of corn, sunflowers, and Jerusalem artichokes, and the straw from rye, wheat, and other grains, are your carbon sources. Using a machete, the stalks can be cut and chopped into lengths suitable for composting. I use a Japanese-style sickle to cut the small grains. You’ll find photos of these tools in the color section of this book. You need to keep the sickle sharp for the job and remember to wear gloves. Accidents can happen in an instant. Just ask me how I know.
The nitrogen contributing crops are legumes grown not for food but to provide biomass for the compost. Some of these crops; such as hairy vetch, Austrian winter peas, and crimson clover; are planted in the fall and grown through the winter. Many gardeners might already be familiar with them. Fava beans are winter hardy in some areas. Summer crops would be cowpeas and buckwheat. Most of my cowpea plantings are grown out for dried seed for us to eat, but if I needed biomass for the compost from cowpeas I would grow it just for compost and cut it when it is flowering. That’s when it has reached its most mass. After that
the plant energy goes into making seed. Just as with the small grains, I use the sickle to cut the legumes. I’m working in four-foot wide beds. If I was cutting a larger area I would use a scythe.
Legumes can be planted with the small grains (wheat and rye). “The mixture may produce more biomass, form more soil organic matter and suppress weeds more effectively than either component alone.”
1
The more diverse habitat of the combination will also attract a more diverse community of beneficial insects and soil microorganisms. You only need a small amount of legume seed added to the grain when planting, or else the legume will overwhelm the grain. It is not so much of a concern if you’ve planted a legume with rye and you are cutting it at pollen shed for mulch. However, if you are growing the grain out to save the seeds too much legume will pull down the grain plants, diminishing your grain harvest. Also, by that time, the legume would have set seed itself. The legumes I use for this combination are either Austrian winter peas or hairy vetch. If I’m growing wheat and rye to seed, I pull out the legume plants when they are flowering. Austrian winter peas are easier to do that with than hairy vetch. As a result, I add only Austrian winter peas to the grain beds destined for a seed harvest. Hairy vetch is a bit more wild and vining, tangling itself with the grain plants, which is okay if it is cut and left as a mulch when it is flowering.
Red clover (different from crimson clover) and alfalfa are legumes that will be in your garden for more than one year. Red clover can be planted in early spring one year and grow through the next year before another crop replaces it. I get one cutting the first year and two the second year. Alfalfa could stay in even longer than that. Red clover is shown in a rotation on the Garden of Ideas Map (
Figure 8.4
). These crops take a little more skill to work into your garden rotation than the other legumes I’ve mentioned, but they will reward you with more nutrient-packed material.
Buckwheat is not a legume, but it is a good filler in the summer, flowering in 30 days. It crowds out weeds, scavenges phosphorus in the soil, and the bees and other beneficial insects love it. However, it doesn’t offer much biomass. Keep some handy for when you find there is a space open for a few weeks between crops, but don’t depend on it for much compost
material. To find which cover crops grow best in your area inquire at your state’s Cooperative Extension Service. It used to be that we had to stop by the local office to pick up their publications, but now everything is online. One of the best books to have as a cover crop reference is the third edition of
Managing Cover Crops Profitably
.
To help in determining if I have at least 60 percent of my garden in soil building compost crops, I use a worksheet (
Figure 5.1
) to determine Bed Crop Months (BCM). Each garden bed has 12 BCM for the year. If you were to have a compost crop in one bed for 60 percent of the year it would be in there for 7.2 months (or 7.2 BCM), leaving 4.8 BCM for other crops. In practice some beds may have compost crops in for a whole year, such as a bed with winter rye followed by corn followed by winter peas. Some may not have any at all if they are filled with summer vegetables and garlic or greens for the winter. Everything gets rotated, so you don’t have to think of the individual beds themselves having the 60 percent. Your target will be at least 60 percent of the BCM of the whole garden for the year. Assuming your beds are the same size, multiply the number of beds you have by 12 to find the total BCM. If your garden has ten beds, you will have 120 BCM. Sixty percent of that is seventy-two.
When I use the worksheet I have my “proposed” garden map as a guide and, beginning with one bed, list every crop that is in there for the year. Continue for each bed. In the appropriate column (compost crops in 60%, other crops in 40%) multiply the number of beds times the months that crop is in the bed. Most often the number of beds is one, but sometimes it is a partial bed, so that number is a decimal. I might have corn and sweet potatoes planted in the same bed. The corn would be 0.5 beds in the 60% column and the sweet potatoes would be 0.5 beds in the 40% column.
I go by the calendar year. A compost crop that would have been planted in the fall and harvested in mid-June would count as 5.5 months. Those months from planting through December 31 would show up on the previous year’s worksheet that goes from January through December. In
Chapter 8
you will find examples of garden maps with all the crops filled in. It might be that you haven’t determined all your crops yet and are using this worksheet just to see how things look so far.
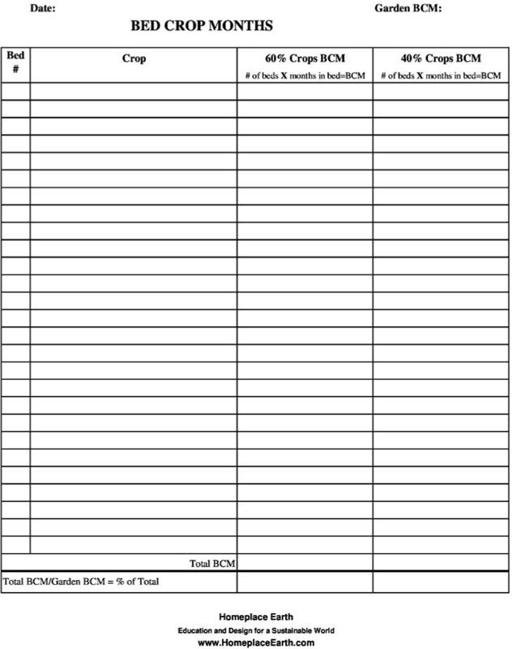
Figure 5.1. 60/40 Bed Crop Months
Download this worksheet at
http://tinyurl.com/mf4a33r
When you have all your crops listed and in the appropriate columns, and you have determined the BCM, total the columns. Divide each column total by the number of BCM for your garden and you will have the percentage of compost crops and of your other crops. If you are not at your target, don’t despair. You know what you have to work on. If this is new to you, it will take some time to make the transition. Eventually you can fine-tune the compost crops so two thirds of the 60 percent BCM are carbon crops and one third is legumes.
Using the term Bed Crop Months works if all your garden beds are the same size. If they aren’t, you might prefer to do your calculations using the amount of square feet per crop. Multiply the planted area of your garden (in square feet) by 12 (months). We’ll call that number
A
(for area). On the worksheet, instead of the number of beds that is planted to a crop, you would put the number of square feet that is planted for that crop. At the end, divide the total square feet for each column by
A
to find the percentage.
I’ve found that cereal rye, sometimes known as winter rye, gives me more straw than wheat does to use as a carbon material in the compost pile. Whatever you see on top of the ground, rest assured that there is at least that much organic matter below ground that will decompose and feed back the soil. Just cut the top off and leave the roots there. There are some places in my garden plan that cutting the rye at pollen shed is the best choice for me. Pollen shed is the point at which the plant is flowering. You will find a photo of rye shedding pollen in the color section. Once it has reached that point it is most likely that if you cut it near the ground it won’t grow back. You can cut it and just let it lie on the bed, providing mulch to the next crop. Since the rye was actively growing up to that point, it will take a couple weeks for the roots to loosen their grip, so wait until then to transplant into that bed. At this point the soil is suitable for transplants but not seeds. In my area in Zone 7 the rye is shedding pollen about May. Waiting two weeks, the next crop would be transplanted into that bed around May. If you wait too long after pollen
shed to cut the rye, viable seeds will have formed, something you don’t want in your mulch. Unseasonably warm winter temperatures, such as we had in 2012, will alter the timing.
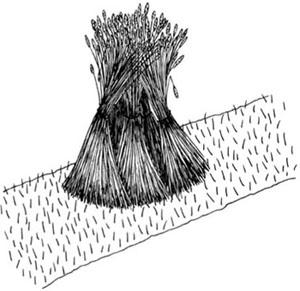
If the goal is to harvest mature grain and straw from wheat and rye, it would be cut when the grain is ready — about the middle of June at my place. Wheat is ready here a week before the rye. I cut these grain crops close to the ground with the sickle and gather some together into bundles. Using a fairly green straw from what I cut, I wrap the straw around each bundle and tie it. If that doesn’t work for you, you could use baling twine for tying the bundles. I make a shock out of about five bundles, standing them up and leaning them against each other. The shocks stay in the garden for about a week until the grain is threshed. Nightly dew and an occasional rain won’t hurt the grain. You could store the bundles in a barn until threshing if you can protect the grain from mice.