125 Physics Projects for the Evil Genius (55 page)
Read 125 Physics Projects for the Evil Genius Online
Authors: Jerry Silver

Figure 92-3
Normally soft and pliable objects when deep frozen become brittle. Courtesy PASCO
.
- Form the piece of solder into a coil roughly ¾ inch (1–2 centimeters) in diameter.
- Notice the lack of stiffness in the spring.
- Immerse the spring in the liquid nitrogen for roughly 15–30 seconds.
- Hang a 20 g (or so) hooked mass from the frozen spring and compare its stiffness with that of the room-temperature version.
- Blow up the balloon and tie a knot in the open end.
- Immerse the balloon in the liquid nitrogen.
- Observe what happens as the balloon is cooled.
- Remove the balloon from the liquid nitrogen and again observe what happens.
- Pour a small amount (start with about 10 mL) of liquid nitrogen in a balloon.
- Tie a knot in the open end.
- Set the balloon on a table.
- Step back and
make sure no one is near the (expanding) balloon
and especially
make sure no one’s face is close to the balloon
. - Observe what happens as the balloon is exposed to the warmer air temperature.
- Place the film canister (or a plastic prescription container with a snap-off lid) on a table top or on the floor.
Do not
use a prescription container with a screw-on or a child-proof lid that does not easily snap off with moderate force. - Pour some of the liquid nitrogen into the plastic beaker.
- Pour some of the liquid nitrogen from the plastic beaker into the film canister. Fill the film canister about
¼ full
with liquid nitrogen. - Snap on the top.
- Stand back as pressure builds up in the container.
- Place the cork gun where it is aiming in a
safe direction
(and specifically
not
directed toward anyone’s face). - Pour about 50 mL of liquid nitrogen into the cylinder.
- Lightly
place the cork in the open end of the cylinder. Do not jam the cork in so tightly that it cannot be pushed out by the pressure that will build up in the cylinder. - Stand back. Pressure will build up as the liquid nitrogen evaporates.
The frozen banana and flowers will shatter. The solder will temporarily become much more spring-like. The air-filled balloon will shrink as the air inside contracts from the extreme cold, and then it will re-inflate as it warms up again. The liquid nitrogen-filled balloon will expand and possibly burst. The lids of the film canister/prescription bottle will pop off. The cork will shoot out of the metal cylinder.
Objects become more brittle and contract from the extreme cold. As the liquid nitrogen evaporates, it occupies a much larger volume. For a given volume, the gas has a much larger pressure.
For many experimenters, liquid nitrogen may not be easily available on a daily basis. While you have a supply of liquid nitrogen available, you may want to consider doing the other projects that also require liquid nitrogen, such as
Project 101
(effect of temperature on resistance) and
Project 106
(superconductivity).
Liquid nitrogen provides an opportunity to explore low-temperature physics. This includes making normally elastic materials brittle. Materials cooled by liquid nitrogen contract. As liquid nitrogen evaporates, it expands.
Boiling water in a paper cup
.
Is it possible to boil water over a flame in a paper cup? This project lets you find out why this is possible.
- 2 paper cups—most “paper” cups have a thin coating of wax, which can still be used, but if you can get them, uncoated cups are preferable
- water
- flame—a match or a Bunsen burner
- thermometer or digital temperature sensor
- Styrofoam cup
- sand (enough to partially fill a paper cup)
- water balloon
- paper bag
- Fill the paper cup nearly to the top with water.
- Hold the cup over the flame.
- Continue doing this until either the paper burns or the water boils. Optional: measure the temperature as it is heating up.
- Fill the second paper cup with sand.
- Hold this cup over the flame and observe the effect of the flame on the cup.
- Fill the Styrofoam cup nearly to the top with water.
- Hold this cup of the flame and observe the effect of the flame on the cup, as shown in
Figure 93-1
.
The water will boil in the paper cup. If the cup is coated with wax, the wax may melt, especially above the waterline. If there is a circular rim on the bottom, it may burn without burning through the cup. The paper cup filled with sand will char, but it won’t necessarily burst into flames. The Styrofoam will melt and, where the flame is applied, possibly leave a hole in the side of the cup.

Figure 93-1
Boiling water in a paper cup
.
When heat is added to water, its temperature increases until it reaches the boiling point of water at 100°C. The paper doesn’t burn because heat is conducted away from the paper before it can reach its kindling point (the temperature where it begins to burn). Paper begins to burn at around 233°C (which is close to the nominal value 451°F for paper, made famous in Ray Bradbury’s novel
Fahrenheit 451
). The water temperature can increase until it boils and still remain well below the kindling temperature of paper.
Sand conducts heat away from the paper. However, unlike the paper, sand does not undergo a phase changes as water does at its boiling point. The temperature increases above 100°C. This is why we see charring in the paper cup containing sand.
The Styrofoam is an insulator. As a result, the water does not conduct heat away from the Styrofoam cup as it does with the paper cup, which conducts heat much more readily. This explains why the flame melts the Styrofoam.
An alternative approach is to wrap a piece of paper around a metal pipe and note its response to a flame. In a similar manner, the metal pipe conducts heat away from the paper before it can start to burn.
Fill the paper bag with water and hold it over the flame. The water conducts heat away from the paper at a fast enough rate to keep it from burning.
Phase changes in matter, such as the transition from liquid to vapor, take place at a constant temperature called the
boiling point
. A liquid cannot exceed the boiling point until all the liquid has evaporated. Materials such as sand conduct heat much better than air. Some materials such as Styrofoam are much better insulators than other materials, such as paper.
Boiling water with ice
.
In this project, you use a piece of ice to cause a container of very warm water to start boiling. This is definitely not what most people would expect.
- Pyrex Erlenmeyer flask (or a Florence flask with a partially flat bottom)
- rubber stopper (without holes)
- beaker tongs (or oven mitt)
- water
- few ice cubes
- hotplate
- ring stand with a ring small enough to support the flask upside down
- optional: bell jar and vacuum pump, beaker
- Partially fill the flask with water. There should be a gap of an inch or two above the water level when it is upside down.
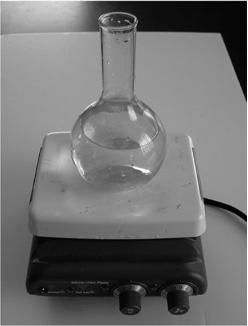
- Place the flask on the hotplate, as shown in
Figure 94-1
. - Keep the flask on the hotplate until the water boils.
- Remove the flask from the hotplate.
- Without delay, put the rubber stopper (snuggly) in the flask,
carefully
turn it upside down, and place it in the ring. Use an oven mitt or tongs to handle the flask. - The water (having cooled slightly) should now be still quite hot, but no longer boiling.
- Position a few ice cubes on the flat of the flask and observe.
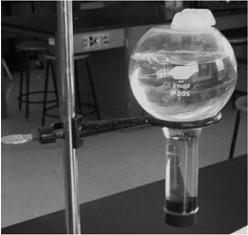
Shortly after the ice cubes are placed on the bottom of the flask, bubbles start to emerge from the top (near the stopper). These bubbles continue and the water in the flask boils for a short time. Careful observation should convince anyone watching that the bubbles are coming from the liquid itself and are not a leak in the rubber stopper. See
Figure 94-2
.

Figure 94-1
Bringing a flask filled with water to (just under) boling
.
When a vapor (such as the air/water vapor mixture) is cooled, it contracts. As the volume of gas above the hot water decreases, the pressure also decreases. Water boils at 100°C (212°F) at standard atmospheric pressure, but at a slightly
lower
temperature when the pressure above the liquid is reduced.

Figure 94-2
Boiling water with ice
.
You can try this another way:
- Fill a beaker with water.
- Place it on a hotplate and bring it to a boil.
- Remove the beaker from the hotplate and let it cool until the boiling just stops.
- Place the beaker in a vacuum chamber (bell jar on a vacuum plate).
- Attach and turn on the vacuum pump to evacuate the chamber.
- Compare the effect of directly applying a vacuum to the reduced pressure caused by the ice.
Water boils at a lower temperature when the pressure of the air above it is lowered.
Seebeck effect/Peltier effect. Semiconductor heating
.
Much of physics concerns itself with how one form of energy is changed into another. This experiment explores how heat can cause an electrical current to flow. Although this is not yet efficient enough to be used as a significant source of electrical power, it is widely used in the form of thermocouples to measure temperature. This is known as the
Seebeck effect
.