The Baking Answer Book (47 page)
Read The Baking Answer Book Online
Authors: Lauren Chattman
Tags: #Cooking, #Methods, #Baking, #Reference


Boule.
When shaping a boule, or a round, you want to transform the dough from a rough ball into a tight, almost bouncy-looking one. To do this, follow these steps: On a loosely floured countertop, gather your dough together in a rough ball by cupping your hands around the dough and rotating it on the counter several times. With your hands still cupped around the dough, continue to rotate it as you drag it across the counter, dragging any loose bits of dough underneath the dough and forming a tight “skin” over the surface as you move it.

Baguette.
On a lightly floured countertop, pat your dough into a rough rectangle, measuring about 4 by 7 inches. Fold the bottom third of the longer side inward toward the center of the rectangle, pressing lightly on the edge with your fingertips to seal it. Fold the top third down (as if you were folding a letter) over the other two layers, again pressing the edge to seal it. Now use the side of your hand (in karate chop position) to press a wide crevice into the center of the rectangle, lengthwise. Pinch together the dough on either side of the crevice to seal it up.
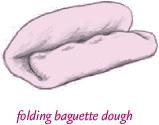
Turn the dough over so it is facing seam-side-down on the countertop. Place both hands on the dough and use gentle pressure to roll it back and forth in small motions to stretch it into a log. To taper the ends, move
your hands outward, one at each end, and use the same rolling motion, pressing a bit harder on the far ends, until the tips of the baguette are pointy.
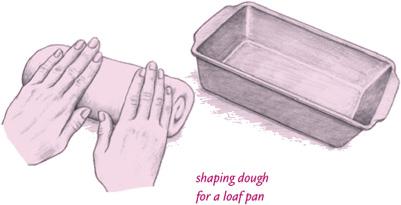
Loaf breads.
It is not just freeform loaves that need special shaping. Doughs intended for loaf pans need to be preshaped, not just plopped into the pan, for the best rise. To shape dough for a loaf pan, follow these steps: Press the dough into an 8-inch square. Roll the square into a tight cylinder and then gently roll the cylinder back and forth on the counter until it is 9 inches long. Place the bread, seam side down, into a greased 9-inch loaf pan.
Q
When I dragged my knife through the bread to score it, the blade got stuck and the dough deflated slightly. How can I score more cleanly next time?
A
It takes nerve, experience, and the right tool to perfectly score bread. First, the tool: Use only the very sharpest chef’s knife to cut through sticky dough. Anything less than a razor-sharp blade will stick to the dough. Better than a knife is an actual razor blade or a lame, a special bread-slashing knife used by professionals and available at baking supply stores (see Resources). But even the sharpest blade will catch in the dough if you hesitate mid-slash. Use quick, decisive motions to make your cuts. And remember, the bread will taste great no matter how imperfectly it is scored. Baking the next batch will give you an opportunity to improve your technique.
Q
Is a baking stone necessary for making good bread?
A
For European-style kneaded hearth breads, a baking stone is absolutely necessary. It will hold heat much more effectively than a baking sheet will, giving your breads a more crisp and well-browned crust than breads baked on a baking sheet. Preheated, it will conduct heat instantly into the bottom of your loaves, allowing them to achieve maximum oven spring. Even if you are baking bread in loaf pans, it is a good idea to place a baking stone on a rack underneath
your bread, or on the oven floor itself. The heat radiating from the stone will give these breads a higher rise and chewier crust than they would get from the heat of the oven alone.
Choose the largest stone that will fit in your oven (see Resources). I own a thick rectangular stone that I bought years ago and that can accommodate the largest breads. Previously I had a thin, round pizza stone, but I found it too small for long baguettes or two large rounds. In any case, it cracked down the center after several years of use, a common occurrence with thinner stones. Place the stone in the oven and preheat it for at least 30 minutes, and up to 1 hour, before baking to get the most out of it.
Q
Are there tricks for slicing bread without tearing it?
A
Invest in a good serrated knife with a blade that’s at least 8 inches long and you will not mangle even the freshest, softest bread. I own a Viking serrated slicer (see Resources). With its super-sharp teeth it slices effortlessly through all types of bread, from thick-crusted artisan sourdough boules to challah. It does double-duty slicing poultry and meat.
When you have a good knife, practice your technique. Use long strokes to saw through the loaf, and when you are almost at the bottom crust tilt the bread so that its side, rather than its bottom crust, is resting against the cutting board, so that you don’t saw at the cutting board underneath.
Q
Is steaming bread necessary?
A
Many bread recipes call for introducing steam into the oven when the bread goes in. The idea is that steam keeps the crust moist and supple and prevents it from hardening during the first few minutes of baking, when the bread needs to rise. Without steam, the crust is more likely to dry out, holding the dough down and preventing it from rising to its full potential.
Steaming makes the most sense for larger hearth breads. It will have little or no impact on breads baked in loaf or other pans, since the larger area of crust on these breads is protected from drying out by the sides of the pan. Small rolls may benefit a bit from steaming but not as much as larger breads, since there is a smaller dough-to-crust ratio and a full rise is accomplished quickly in comparison with larger breads. When baking pizza and other doughs that have moist toppings, even a drizzling of olive oil, steaming isn’t necessary, since the topping will provide the moisture necessary for keeping the crust moist during the first few minutes of baking.
Q
What is the best way to introduce steam into the oven?
A
Some people use a spray bottle to spritz the bottom and sides of the oven, but there is a danger of accidentally spraying water on the oven lightbulb and shattering it. (I did this years ago and it scared me half to death.) Another
downside to this method is that you don’t create much steam, so you need to repeat the process several times, and every time you open the oven you lose precious heat. Some people prefer to slide some ice cubes onto the oven floor when the bread goes in. The ice cubes supply a burst of steam when they hit the hot floor, and then more steam as they continue to melt. But sometimes water can drip out of the oven and onto the floor, making a bit of a mess, especially if your oven floor isn’t clean. It’s neater to place a baking pan, or even better a cast iron pan, on the bottom rack of the oven when you begin to preheat. Then, when you put the dough in the oven, place the ice cubes or some water into the pan, where they will continue to give off steam while the bread rises.
Yeast can survive in the heat of the oven for only 15 minutes or so. A half-cup to a cup of ice cubes should be enough to steam your bread during this time. There’s no point in adding more water or ice cubes after this first batch has melted. When the yeast has stopped working and the bread has reached its full height, you’ll want the oven to dry out so the crust can crisp.
Q
How do I test my bread for doneness?
A
Older recipes will instruct you to knock on the underside of the bread to test for doneness. If you hear a hollow sound, your bread is baked through. But this isn’t the most scientific or surest method for judging if your bread is ready to come out of the oven.
An instant-read thermometer will tell you in seconds whether or not your loaf has reached an internal temperature indicating it is fully baked. For soft breads such as white sandwich bread, dinner rolls, and challah, look for a temperature of 185°F (85°C). For crusty artisan-style breads, let the temperature go to 205°F (96°C). To take a bread’s temperature, insert the thermometer into the center of the dough, which will be cooler than parts closer to the top or bottom.
When your loaf has reached the internal temperature indicating it is fully baked, take a moment to evaluate the bread’s crust before pulling it from the oven. If it is firm, resisting pressure when you squeeze it (using an oven mitt, of course), then the bread can be transferred to a cooling rack. If the bread crust gives under pressure, close the oven door and let the crust dry out for 5 minutes longer before removing the bread.
Q
Can I eat my bread straight from the oven?
A
The aroma of freshly baked breads is almost irresistible, but remember when you pull your loaves from the oven they’re not through baking. As bread cools, the process of starch retrogradation (a fancy term for the drying out of the interior of the loaf) is completed. Water molecules inside the bread migrate to the crust and evaporate. This is why if you cut into a piping hot loaf of bread, it is spongy and damp inside and difficult to slice neatly. This doesn’t mean that you can’t eat warm bread. Small rolls and thin baguettes
will be more or less ready to eat after 15 or 20 minutes. For larger loaves, it may take up to 2 hours for the interior to finish baking.
Q
What is the best way to store bread so it stays fresh?
A
Unfortunately, once bread has cooled, starch retrogradation continues until all of the moisture has evaporated from the bread and it is dry and hard. In this late phase, starch retrogradation is a fancy term for staling.
Refrigeration hastens staling, believe it or not. With the exception of breads that contain a large proportion of oily nuts and seeds or breads that contain ingredients that may mold or spoil quickly, store breads at room temperature and not in the refrigerator. Keep your bread in a plastic bag. Its crust may get soft, but you can recrisp it in a 350°F (180°C) oven for 5 minutes. Not only will reheating bread crisp the crust, but it will also draw moisture back into the crumb, refreshing it if it has begun to stale.