The Baking Answer Book (45 page)
Read The Baking Answer Book Online
Authors: Lauren Chattman
Tags: #Cooking, #Methods, #Baking, #Reference

 cup (3.5 ounces) unbleached all-purpose flour
FOR THE DOUGH:
1¾ cups (15 ounces) warm water
2 teaspoons (0.4 ounce) instant yeast
3¼ cups (17.6 ounces) unbleached all-purpose flour
1½ teaspoons (0.4 ounces) salt
1.
To make the biga, combine the water, yeast, and flour in a medium mixing bowl. Stir with a rubber spatula until a rough dough forms.
2.
Lightly dust the countertop with flour and knead the dough until it is smooth, 1 to 2 minutes. Transfer the dough to a lightly oiled clean bowl, cover the bowl with plastic wrap, and let stand at room temperature for 1 hour. Then, refrigerate it until it has doubled in volume, at least 8 hours but no longer than 12 hours.
3.
To make the dough, scrape the biga into the bowl of an electric mixer fitted with a dough hook. Add the water, yeast, flour, and salt to the bowl and mix a few times with a rubber spatula to moisten. Mix on medium-high speed until the dough is creamy and very elastic, 10 to 15 minutes, watching the mixer at all times to make sure it does not “walk” off the counter.
4.
Give the dough the “windowpane” test: Scoop up a plumsize piece of dough and stretch it until you can see the light coming through. If it does not tear, it is ready. If it does, knead it 2 to 3 minutes longer and perform the test again.
5.
Transfer the dough to a large oiled bowl or clear 2-quart container. Cover with plastic wrap and let the dough rise until it triples in size, 3 to 4 hours.
6.
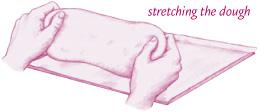
Scrape the dough onto a lightly floured countertop and use a bench scraper or sharp chef’s knife to cut it into two equal pieces. Line a baker’s peel or rimless baking sheet with parchment paper and sprinkle the paper with flour. Flour your hands and lift a piece of dough, holding an end in each hand and gently stretching the dough into an oblong shape as you transfer it to the parchment. Repeat with the second piece of dough, placing it at least 2 inches away from the first piece.
7.
Pleat the parchment paper down the center, so the loaves are lying right next to each other but separated by the fold of paper (this will prevent them from rising into each other as they proof). Sprinkle the loaves with flour and then gently press your fingertips into the surface of the loaves, dimpling them all over. Lightly drape with plastic wrap and let rise until puffy, 30 to 40 minutes.
8.
Place a baking stone on the middle rack of the oven and a baking pan or cast-iron skillet on the bottom rack. Preheat the oven to 475°F (240°C). Slide the loaves, still on the parchment, onto the baking stone. Stretch the parchment out flat, removing the pleat, to separate the loaves. Pour ½ cup of water into the baking pan or skillet. Bake the loaves until they are golden and well risen, about 30 minutes.
9.
Slide the loaves, still on the parchment, onto a wire rack. Let them cool for 1 hour before serving.
Q
Then what is San Francisco sourdough bread?
A
There are thousands of known strains of yeast and lactobacilli. Different strains thrive in different climates.
Lactobacillus Sanfrancisco
is a strain found around San Francisco. Breads baked with a natural starter cultivated in the area are believed to develop a distinctive flavor because they contain this particular strain of bacteria.
You might be tempted, when visiting San Francisco, to take home a portion of local sourdough starter in the hopes of recreating this legendary bread where you live. But you should be aware that as soon as you get your “San Francisco starter” home, it will begin to trap local yeast and lactobacilli that live in your own kitchen. Week after week, as you feed your San Francisco starter with water from your tap and flour from your canister to keep it alive and healthy, it will become less like the starter it once was and more like a starter native to your area.
Q
What is a straight dough?
A
While doughs made with preferments or a sourdough starter are mixed in two stages — first the preferment or sourdough is made and allowed to ferment, and then it is mixed into a larger portion of dough — straight doughs don’t employ a preferment (see
page 324
). Straight dough relies only on packaged yeast for its rise.
Q
Why do some recipes tell you to mix the ingredients briefly and then let them rest before getting down to real kneading?
A
A brief (10 to 20 minute) rest before real kneading is called
autolyse
in France. It is a technique employed to maximize gluten formation while minimizing kneading time. During autolyse, the flour continues to absorb water, becoming more fully hydrated and developing gluten on its own, without kneading. So after this rest, the dough will require less kneading than it would have if you had begun kneading immediately.
Many European artisan breads get their uniquely bubbly structure and open crumb from a high percentage of water in the dough. If you were to attempt kneading a very wet dough immediately, it would be very sticky and hard to handle. Letting the flour become fully hydrated during autolyse makes the dough easier to handle.
Q
What is the proper technique for hand-kneading bread dough?
A
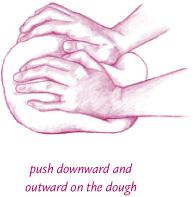
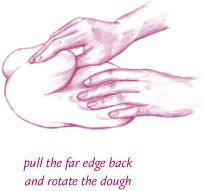
There are many ways to work the dough to fully develop its gluten. Most American bread-baking manuals will tell you to place the dough on a lightly floured work surface, flour your hands, and push downward and outward on the dough with the heels of both hands, then pull the far edge of the dough back over the top, rotate the ball, and repeat.
As you knead, scrape the dough off of the counter with a bench scraper and continue to sprinkle flour on the countertop and your hands to avoid sticking. But resist the urge to add too much flour, which will dry out your dough and inhibit its rise. As you knead, your dough will become smoother, less sticky, and easier to work with.
There are many variations on this kneading method: Using one hand instead of two, using a bench scraper to roll and press the dough inside a mixing bowl, even picking up the dough with one hand and slapping it against the countertop until it stretches into a long rope before folding it up and slapping it against the counter again. Any one of these methods will eventually develop gluten.
No-Knead Bread
If kneading develops gluten, and gluten is necessary to create the structure of a crusty loaf of bread, then how is it possible to make no-knead bread? The answer lies in autolyse, the French technique for allowing the dough to rest in order that the flour may absorb water, its proteins organizing themselves into a web of gluten as they become hydrated. Some bakers have discovered that if they employ an extended autolyse, they can skip kneading altogether. But when I say extended, I mean extended. Recipes that skip kneading often call for the bread to rest at room temperature for up to 24 hours.
Here is a no-knead bread recipe, employing master baker Jim Leahy’s ingredients and some of
Cook’s Illustrated’s
techniques, that demonstrates the power of autolyse to create a loaf with a large, shiny crumb and chewy crust similar to those of artisan breads that have indeed been kneaded. The tiny amount of instant yeast multiplies many times over during the extended fermentation.
MAKES 1 LOAF
3 cups (15 ounces) unbleached all-purpose flour plus more for dusting
¼ teaspoon instant yeast
1½ teaspoons salt
1½ cups room temperature water
1.
In a large mixing bowl combine the flour, yeast, salt, and water. Stir the mixture with a rubber spatula until it comes together into a rough dough. Cover the bowl with plastic wrap and let stand at room temperature overnight, or for up to 18 hours.
2.
Place a piece of parchment paper inside another large mixing bowl, with its corners overhanging the edges of the bowl and spray the parchment with nonstick cooking spray. Lightly flour a work surface and turn the dough out onto it.
3.
Sprinkle the dough with a little more flour and knead it two or three times, folding it over itself, flattening, and folding over again. Form a ball by gathering the edges of the dough together and twisting them into a topknot.

4.
Transfer the ball of dough, topknotside down, to the parchmentlined bowl. Cover the bowl with plastic wrap and let the dough rise at room temperature until it has doubled in size. It will be very soft, not springy. An hour and a half into the rise, position an oven rack on the bottom third of the oven and place an 8-quart covered cast-iron or enamel Dutch oven on the rack. Preheat the oven to 425°F (220°C).