Stitch 'n Bitch: The Knitter's Handbook (30 page)
Read Stitch 'n Bitch: The Knitter's Handbook Online
Authors: Debbie Stoller

Changing Knit and Purl Stitches
Now that you can pick up a yarn rung as either a knit or a purl stitch, you’re ready for one of the stitch doctor’s greatest secrets: re-creating mismade stitches. If you accidentally knit when you should have purled, or vice versa, you can fix it, even if you don’t discover the problem until many rows later. Start by purposely dropping the stitch that’s in the same column as the bad stitch and letting it unravel to the place where the mistake was made. Now, using your crochet hook, pick that stitch up correctly (making it a knit or a purl, following the instructions on
page 105
), then pick up the rest of the stitches in the column all the way back to the top of your knit piece. Of course, at a certain point you have to ask yourself whether it would be quicker just to unravel your work and reknit it correctly, but I’ve used this technique many times to make time-saving corrections to my work.
Fixing Extra Stitches
Sometimes when you count your stitches, you discover you have one too many. This can happen for a number of reasons. If you’re not careful, it’s easy to knit twice into the stitch at the beginning of a row. (See
page 38
for how to avoid this.) You might also have accidentally treated stitches made with two strands of yarn—like when you’re joining new yarn—as two separate stitches. Or you may have split your yarn so that it looked like two stitches instead of one, and you knit each one. You can easily fix these mistakes in a couple of ways:
Figure out where the extra stitch was created, then drop both the extra stitch and the stitch just before it down to the place where the error was made. Next, pick up the rungs as a single stitch. (See instructions for picking up dropped stitches on
page 105
.) If you end up with some floppy extra yarn before and after each stitch, don’t worry about it. Later in this chapter, I’ll show you how to give saggy stitches a face-lift. You can also correct the problems when blocking your garment.
If you’re using fine wool, or if the extra stitch was added way back and didn’t leave a hole, you might be better off just decreasing a stitch at either end of your work, one or two stitches in from the edge, to correct for the error. (See
page 63
for how to decrease stitches.) And if the extra stitch left a hole in your work (which can happen very easily), you can sew it closed with a short piece of yarn after you’re done knitting.
Unknitting
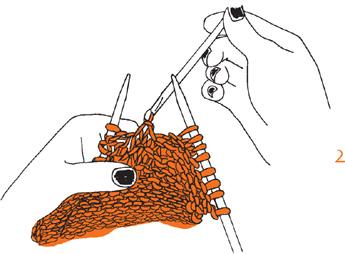
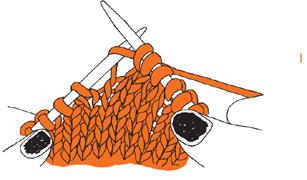
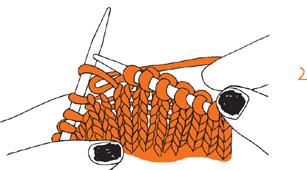
Sometimes you will need to unknit part of a row so you can get back to correct an error. Unknitting is the easiest way to undo your work if you have to unravel only one or two rows. Here’s how: Hold your yarn and needles in the usual way. Then insert the left needle from front to back into the loop
below
the last stitch you made
(figure 1)
. Slide the stitch off the right needle and pull out the yarn
(figure 2)
. Carry on until you get to the point where you made your mistake. Keep at it, and soon you’ll find that unknitting can be done just as quickly as knitting.
Unraveling Your Work
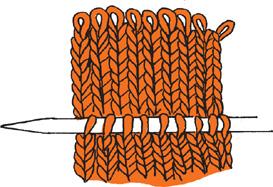
When you need to undo a large number of rows, it’s too time-consuming to unknit them stitch by stitch. Instead, you can just unravel them. The most common way to do this is to simply pull the needle completely out of your stitches, unravel a number of rows until you get to a point before you made your mistake, then reinsert the needle into all of the stitches. I always feel kind of panicky when I’m trying to catch all those stitches again or see some loops dropping farther down than I intend them to. Using a smaller-sized needle to catch the loops can make this task easier, but I still feel safer using the following method when I need to unravel a number of rows:
1
Using a needle substantially smaller than the one you were using, weave the needle under the right-hand loop of each stitch in the row you will unravel to. Here’s the tricky part, though: You have to make sure that all the stitches you pick up are from the same row; carefully following the path of the yarn can help you do this correctly. Also, count the stitches you have on the needle to make sure that you have gotten them all.
2
Pull out the other needle, and unravel the yarn back to the row where your thin needle is. If you did it correctly, you will have a needle full of stitches. Jump up and kiss yourself.
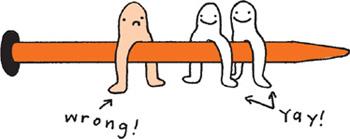
At this point you may find that your needle is pointing in the wrong direction. Just take a regular-sized needle and transfer all the stitches by slipping them purlwise from the tiny needle to the regular one. As you do this, check for stitches that may have twisted the wrong way, and set them straight. Remember that the correct way for stitches to sit on the needle is with the leg on the right side of each stitch in front of the needle, and the leg on the left in the back. Your little friends below are happy to demonstrate this for you one more time.
Tightening Saggy Stitches
You may find, at certain points in your knitting, that you are left with saggy, wacked-out stitches. It happens a lot in intarsia projects, where it is almost impossible to make all your stitches come out perfectly, or when you’ve picked up a dropped stitch and are making two stitches back into one, or at other points in your knitting. Not to worry; this too can be fixed.
1
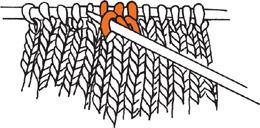
A number of rows after the loose stitch (or even after the entire piece is done), take a smaller needle and pull the stitch tighter by pulling up on the right-side arm of the stitch. You may end up with quite a big, slack loop.
2
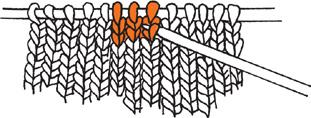
Then follow that stitch along to the right by pulling up the left-side arm of the next stitch, then the right-side arm of that stitch, and so on, making each stitch just slightly looser than it was originally (remember—just slightly, and imperceptibly) and distributing the slack across 10 or more stitches. Now your stitch is purty as can be.
The Unintentional Crop Top
Even if you’ve checked your gauge carefully, sometimes a sweater just doesn’t come out right—maybe it was supposed to reach your hips, but instead your belly is hanging out. If this happens, you sure don’t want to unravel the whole sweater and reknit it. Instead, you can undo the cast-on stitches at the bottom of the sweater and put the freed-up stitches on a needle. Then just knit from there. In effect, you are now knitting downward, therefore adding length to your knit piece.
There are some things to keep in mind with this method, however. As I explained on
page 77
, when you are grabbing stitches from the bottom of your work, you are really getting the Vs that are in between the original knit Vs, and, as a result, you will end up with one stitch less than you started out with. This means that your new knitting will be offset by half a stitch from your original knitting. For many types of stitches, this doesn’t matter, but in ribbing and other knit-and-purl designs, it will matter a lot—you’ll never get your new ribs to line up with your original ribs. Therefore, if you are extending a sweater that has a ribbed bottom, you should first unravel all the ribbing. Then, when you knit downward, you will need to create new ribbing. If you’re extending a sweater with some other kind of knit-and-purl pattern, consider adding a couple of decorative purl or seed stitch rows before continuing on in your pattern. That way, no one can tell that the bottom part doesn’t match up exactly with the top part.