Stitch 'n Bitch: The Knitter's Handbook (13 page)
Read Stitch 'n Bitch: The Knitter's Handbook Online
Authors: Debbie Stoller

Still, if you’re going to knit things on two needles, back and forth, you’re going to need to learn to purl. Why, you ask? Allow me to explain.
Whether knitting or purling, the loop you make looks like a droplet, only upside down, with the point at the bottom and the curved part at the top. When you make a knit stitch, the bottom of the loop (the “V”) lands on the front of your work, while the rounded part of the loop (the little bump) lands on the back of your work. When you purl, the reverse happens: The bump winds up in the front, and the little V winds up in the back. Once you can both knit and purl, you can control whether your Vs land on the front of your fabric or on the back, no matter which side of the fabric you’re working on. Knowing how to purl means you can create fabric that has
all
the little Vs on one side and
all
the little bumps on the other—and that makes a very nice fabric indeed.
But the purl stitch will let you do more than just hide all those unsightly stitch bumps in the back. Some folks like to use the bumps and Vs to make designs in their fabric—for instance, they might make a heart shape out of purl bumps on a flat background of knit Vs. In any case, once you know both knit and purl, you know all of the knitting stitches there are. Really, it’s all based on those two little stitches. And even they are just two ways of making the same stitch.
Okay, so let’s purl already. But fasten your seat belts; it’s going to be a bumpy (get it?) ride.

Having all the Vs of your stitches on the front makes a nice flat fabric
.
Purling with Yarn in the Right Hand (English)
1
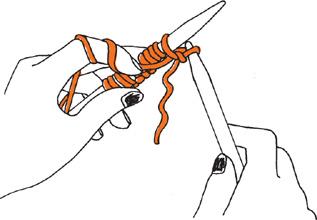
Hold your yarn and needles the same way you would to make a knit stitch, with the yarn in your right hand, but before you begin, bring the yarn between the tips of your needles so that it is
in front
of your right needle.
2
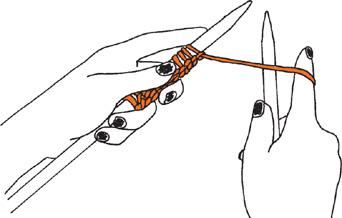
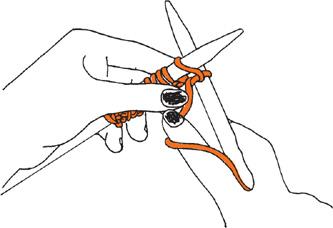
Insert the right needle from back to front (and from right to left) through the first stitch on the left needle. It’s like your needle is playing a game of limbo by going under the front leg of that first stitch. Your needles are now in an X shape.
3
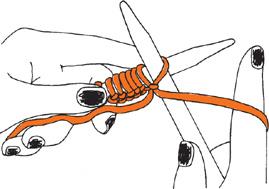
Hold the center of the X with the thumb and forefinger of your left hand so that the needles don’t fall, take the yarn in your right hand, and loop it around the point of your right needle counterclockwise (from back to front).

4
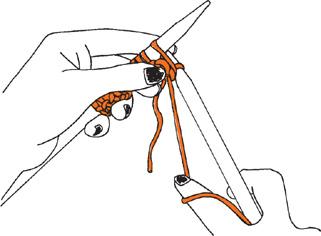
Holding the yarn down below the center of the X with your right forefinger, carefully slide your right needle down along the base of the left needle, pushing the point of the right needle—and your new loop—out through the back of the stitch you came in through.
5
Push the right needle back up again (it should now be behind the left needle). You have an X once more.
6
Slide the old loop up and off the left needle.
Admire your new stitch. You did it, Purly McPurlsalot!

Purling with Yarn in the Left Hand (Continental)
1
Hold your yarn and needles the same way you would to make a knit stitch, holding the yarn in your left hand, but before you begin, bring the yarn between the tips of your needles so that it is
in front
of your left needle.

2
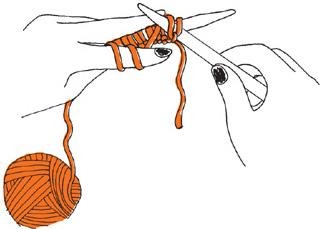
Insert your right needle from back to front (and from right to left), through the loop on the first stitch on the left needle, passing the right needle
underneath
the front leg of that stitch. The ends of your needles are now in an X shape.

3
Bring the yarn in your left hand around the point of your right needle counterclockwise, then bring your left pointer finger (the one with the yarn around it), down below the center of the X.
4
Continue to hold the yarn in this position while you carefully slide your right needle down along the base of the left needle, pushing the point of the right needle out through the back of the stitch you came in through. Be careful not to let the new loop you created fall off!
