Stitch 'n Bitch: The Knitter's Handbook (24 page)
Read Stitch 'n Bitch: The Knitter's Handbook Online
Authors: Debbie Stoller

2
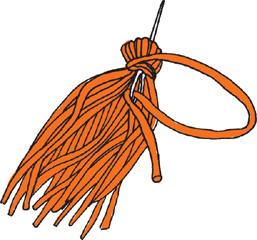
Stop when your wrapped yarn is about ¼ inch thick all around, then cut the yarn at one end. Take another piece of yarn about 8 inches long, thread it through a needle, and pass it along the edge of your rectangular object, underneath the wrapped yarn. Take out the needle and make a square knot—a very, very tight square knot—leaving a long tail on one end of the yarn. This has to hold all the yarn together, so don’t be afraid to pull it really tight and choke the life force out of that thing. Then cut through the loops of yarn that are on the opposite side of the rectangle.

3
Tuck the short tail inside the tassel, take the long yarn tail, and wrap it around the folded top of the tassel about ¼ to ½ inch from the fold. Again, do this nice and tightly. Thread the yarn through a needle and stick it up through the “head” of the tassel, right up the center. This is the bit of yarn you’ll use to attach the tassel to your piece. Sew it on.

I CORD, YOU CORD, WE ALL CORD FOR I-CORD
I-cord, invented by Elizabeth Zimmermann (see
page 120
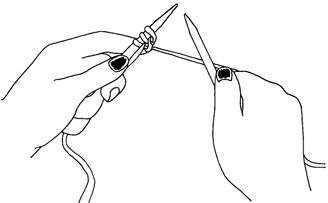
), is short for “idiot cord”—because it’s what you might make if you knit the wrong way. I-cord is great to use as a drawstring, a tie cord for a hat, or even as handles on a purse. To make it, you’ll need a pair of double-pointed needles. Start by casting on 3 stitches (or as many as your knitting pattern tells you to). Knit those stitches. Then, instead of turning your work and knitting back the other way, switch the needles in your hands without turning your work. Slide the stitches to the other side of the needle in your left hand—with the yarn still hanging from the left, instead of the right, as it usually would—and knit across. Be sure to pull the yarn tight when you make your first stitch so that the fabric rolls in on itself, like a teeny-tiny little tube. Keep knitting and what will you get? I-cord! Doesn’t everybody?

Some folks insist on calling these fuzzy balls “pompons,” but to me that final
n
makes this item sound like some kind of feminine protection product. I have no idea what the derivation of this word is, but if you want to know how to make a pom-pom, follow the instructions below.
1
Pom-poms require that you first create a little pompom maker, which is nothing more than two doughnut-shaped pieces of cardboard or plastic (you can also buy these ready-made at your local yarn store). The hole in the center should be about half the size of the circle itself—that’ll give you a nice, full pom-pom. (There are few things more pathetic than a wimpy, wispy, thin-haired pom-pom.) Then take your yarn, either threaded on a needle or with your fingers, and wind it around the two stacked doughnut shapes, until the center hole is filled with yarn.

2
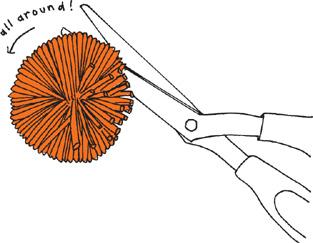
Cut through the loops all the way around the outside of the doughnut.

3
Pull an 8-inch length of yarn up between the two halves of the pom-pom maker, wrap it tightly around the core of the pom-pom, and make a sturdy square knot to hold the whole thing together. Pull or cut the cardboard rings out, fluff up your pom-pom, and trim it as necessary to even up the ends.

Attach the pom-pom to your knitting with the same yarn you used to tie it together.
Using Embroidery
Below are two cute ’n crafty ways to add color to your knit pieces, as an edging or as a design right on the body of your work. Both of them are done using a yarn needle and a bit of yarn. Best of all, it won’t take you very long to learn either of these techniques.
How to Make the Blanket Stitch
Blanket stitch
is a very simple stitch that was once used to keep woven blankets from unraveling. Often done in a contrasting color yarn, the blanket stitch can be made around the bottom of hats and mittens or even along the entire border of a cardigan—and don’t be afraid to use a different yarn texture, either. Mohair, for instance, would make a very nice blanket-stitch edging on a wool sweater.
1
Thread a yarn needle with a long length of yarn. Begin by passing the needle from back to front as close as possible to the bottom edge of your work. Leave a 6-inch tail at the back, which you can work away later.

2
Insert the needle into the fabric about ¼ to ½ inch above the edge, and about ¼ to ½ inch to the right of where the first stitch was made. At the same time, hold this loop of yarn down and slip the point of the needle over it (the needle is now coming from behind the fabric). Pull the yarn through till the stitch is taut but not tight.

3
Continue in this way all around the edge of your work. Keep the stitches evenly spaced and make sure that the point where your needle enters the fabric is the same distance from the edge each time. Use your knit stitches as a guide to keep the blanket stitching even.

The Duplicate Stitch
Now here’s a fun trick: You can add colorful stitches to your knit pieces
after
you’ve finished knitting them by simply tracing over each knit stitch with a different color yarn. Use duplicate stitches to add small designs and pictures to your knitting, such as a skull head on the front of a knit cap or a ladybug on a child’s sweater. Duplicate stitch should not be used for really large areas of color, however, because it will make your fabric too thick. Here’s how to do it: