Stitch 'n Bitch: The Knitter's Handbook (22 page)
Read Stitch 'n Bitch: The Knitter's Handbook Online
Authors: Debbie Stoller

3
Pass the yarn needle through the first stitch on the back needle
as if to purl
. Drop the stitch off the needle.

4
Pass the needle through the second stitch on the back needle
as if to knit
. Leave that stitch on the needle.

Repeat steps 1–4 until all the stitches are grafted together. It’s easy to make mistakes on these, so really try to pay attention for the full fifteen minutes (or less) that it will take you to execute the Kitchener stitch.
Now take a look at your work. Like turning water into wine, grafting two pieces of fabric together with the Kitchener stitch seems nothing less than miraculous. Take a bow, turn on some music, and do a jig.
The Three-Needle Bind-off
If you really hate to sew seams, try this one. You’ll need two sets of live stitches on your needles and the same number of stitches in each set.
1
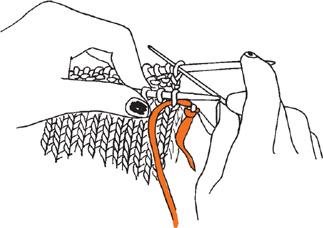
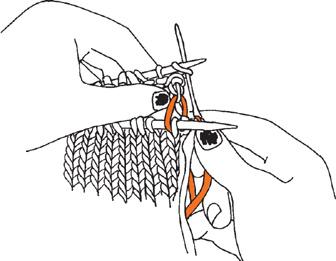
With the right sides of your work facing each other, hold the two knitting needles in your left hand with their points facing to the right. Then, take a third needle and insert it, knitwise, through the first stitch on the front needle and knitwise through the first stitch on the back needle.

2
Knit the two stitches together. Do the same on the next stitch, then leapfrog the first stitch over this second one. Repeat to the end, turn your work right-side out, and you’ll wind up with a relatively flat, neat se am that didn’t even require threading a needle. Hot diggity!

Joining a Top to a Side Edge
W
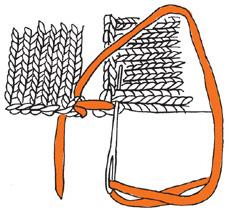
hen you sew a sleeve to the body of a garment, you are connecting a bound-off edge (the top of the sleeve) to a side edge (the side of the front or the back of a sweater). The stitch you need for this is a special combo of the mattress stitch and the fake grafting you learned above.
Start by pinning the pieces together. Now, thread a yarn needle with a nice long piece of yarn, and get ready to start stitchin’.
Lay the two pieces flat in front of you on a table, or on your lap with the sleeve at the right and the side piece at the left. Tack the yarn in place at the bottom left corner of your seam, just like always.
1
Now, draw the needle up through the center loop (or “head”) of the bottommost bound-off stitch on the sleeve piece.

2
Pass it under one or two running bars on the side piece.

3
Then, go back down into the center of the same stitch on the bound-off edge and come up in the center of the next stitch.

4
Push the needle through the same space you came out from on the side piece and pull it back up one (or two) bars later. Repeat until you’re done. As you’re sewing, take one or two bars from the side, as needed, to make the seam sew up flat.

NEVER LOOK A GIFT HAT IN THE MOUTH: THE FINE ART OF KNITTING FOR OTHERS
Remember how, before you knew how to knit, you thought it was so easy? Remember how you never appreciated those lime-green-and-orange-striped sweaters your grandmother made you? Well, you’ll be reminded of all of that when you start knitting presents for your friends and relatives. Give a girlfriend a hat you made, and she may figure you spent an hour on it (instead of a week). And if it’s not exactly her color, her style, or her head shape, she is likely never to wear it. Same goes for scarves, gloves, and especially the time-consuming sweaters that you’ve knit for others. The recipients won’t give you the oohs and aahs you were hoping for, since they can’t possibly know how much work you’ve put into the thing.
SO DO YOURSELF A FAVOR
:
Stick to small items, like hats, for your friends, if you knit for them at all. And save your really extensive knit gifts for your knitting friends—they’re the only ones who will really know what that gift means, and they’ll wear that mohair sweater loud and proud, even if it makes them look like a gorilla.
Learning to Pick Up Stitches
Sometimes you’ll need to pick up stitches from a finished edge to create the collar of a sweater or add a fancy edge to the bottom of a piece. Say you want to add a turtleneck to a sweater: You’d pick up stitches around the entire neckline, and then knit till your neck is as turtley as you want it. You might also pick up stitches along the bottom of your sweater to make it a little longer. And some folks pick up stitches from the armholes and knit the sleeves downward from there, connected right to the sweater from the get-go.
The following are different circumstances in which you have to pick up stitches. But don’t let the task bother you any; it’s as easy as the old in-and-out.
Hold your fabric in your left hand and one needle in your right.
1
With the front of the piece facing you, insert your knitting needle through the center of a stitch (your pattern will usually tell you where to begin).
