Programming Python (192 page)

But wait—there is a
better way to explore parse tree structures.
Figure 19-1
shows the parse
tree generated for the string1 + 3 * (2 * 3 +, displayed in PyTree, the tree visualization GUI described
4)
at the end of
Chapter 18
. This works only
because theparser2module builds the
parse tree explicitly (parser1evaluates during a parse instead) and because PyTree’s code is generic
and reusable.
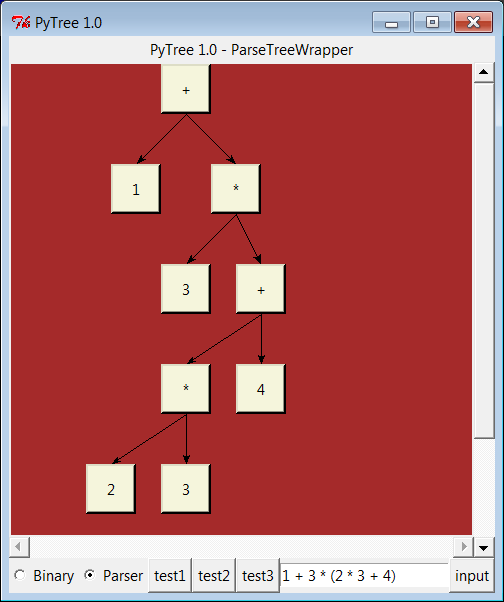
Figure 19-1. PyTree view of parse tree built for 1 + 3 * (2 * 3 + 4)
If you read the last chapter, you’ll recall that PyTree can draw
most any tree data structure, but it is preconfigured to handle binary
search trees and the expression parse trees we’re studying in this
chapter. For parse trees, clicking on nodes in a displayed parse tree
evaluates the subtree rooted there.
PyTree makes it easy to learn about and experiment with the
parser. To determine the tree shape produced for a given expression,
start PyTree, click on its Parser radio button, type the expression in
the input field at the bottom right, and press “input” (or your Enter
key). The parser class is run to generate a tree from your input, and
the GUI displays the result. Depending on the operators used within an
expression, some very differently shaped trees yield the same result
when evaluated.
Try running PyTree on your computer to get a better feel for the
parsing process. (I’d like to show more example trees, but I ran out of
page real estate at this point in
the book.)
The handcoded custom
parser programs we’ve met in this section illustrate some
interesting concepts and underscore the power of Python for
general-purpose programming. Depending on your job description, they may
also be typical of the sort of thing you’d write regularly in a
traditional language such as C. Parsers are an important component in a
wide variety of applications, but in some cases, they’re not as
necessary as you might think. Let me explain why.
So far, we started with an expression parser and added a parse
tree interpreter to make the code easier to modify. As is, the parser
works, but it may be slow compared to a C implementation. If the parser
is used frequently, we could speed it up by moving parts to C extension
modules. For instance, the scanner might be moved to C initially, since
it’s often called from the parser. Ultimately, we might add components
to the grammar that allow expressions to access application-specific
variables and functions.
All of these steps constitute good engineering. But depending on
your application, this approach may not be the best one in Python. Often
the easiest way to evaluate input expressions in Python is to let Python
do it for us, by calling itsevalbuilt-in function. In fact, we can usually replace the entire expression
evaluation program with this one function call. The next section will
show how this can be used to simplify language-based systems in
general.
More important, the next section underscores a core idea behind
the language: if you already have an extensible, embeddable, high-level
language system, why invent another? Python itself can often satisfy
language-based
component needs.
To wrap up
this chapter, I’m going to show you a practical application
for some of the parsing technology introduced in the preceding section.
This section presents PyCalc, a Python calculator program with a graphical
interface, similar to the calculator programs available on most window
systems. Like most of the GUI examples in this book, though, PyCalc offers
a few advantages over existing calculators. Because PyCalc is written in
Python, it is both easily customized and widely portable across window
platforms. And because it is implemented with classes, it is both a
standalone program and a reusable object library.
Before I show you how to write a full-blown calculator, though,
the module shown in
Example 19-17
starts this
discussion in simpler terms. It implements a limited calculator GUI,
whose buttons just add text to the input field at the top in order to
compose a Python expression string. Fetching and running the string all
at once produces results.
Figure 19-2
shows the window
this module makes when run as a top-level script.
Example 19-17. PP4E\Lang\Calculator\calc0.py
"a simplistic calculator GUI: expressions run all at once with eval/exec"
from tkinter import *
from PP4E.Gui.Tools.widgets import frame, button, entry
class CalcGui(Frame):
def __init__(self, parent=None):                   # an extended frame
Frame.__init__(self, parent)                   # on default top-level
self.pack(expand=YES, fill=BOTH)               # all parts expandable
self.master.title('Python Calculator 0.1')     # 6 frames plus entry
self.master.iconname("pcalc1")
self.names = {}                                # namespace for variables
text = StringVar()
entry(self, TOP, text)
rows = ["abcd", "0123", "4567", "89()"]
for row in rows:
frm = frame(self, TOP)
for char in row:
button(frm, LEFT, char,
lambda char=char: text.set(text.get() + char))
frm = frame(self, TOP)
for char in "+-*/=":
button(frm, LEFT, char,
lambda char=char: text.set(text.get()+ ' ' + char + ' '))
frm = frame(self, BOTTOM)
button(frm, LEFT, 'eval',  lambda: self.eval(text) )
button(frm, LEFT, 'clear', lambda: text.set('') )
def eval(self, text):
try:
text.set(str(eval(text.get(), self.names, self.names)))    # was 'x'
except SyntaxError:
try:
exec(text.get(), self.names, self.names)
except:
text.set("ERROR")         # bad as statement too?
else:
text.set('')              # worked as a statement
except:
text.set("ERROR")             # other eval expression errors
if __name__ == '__main__': CalcGui().mainloop()
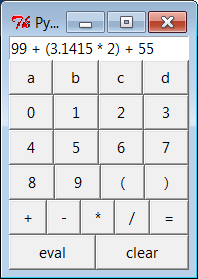
Figure 19-2. The calc0 script in action on Windows 7
(result=160.283)
Now,
this is about as simple as a calculator can be, but it
demonstrates the basics. This window comes up with buttons for entry
of numbers, variable names, and operators. It is built by attaching
buttons to frames: each row of buttons is a nestedFrame, and the GUI itself is aFramesubclass with an attachedEntryand six embedded row frames (grids
would work here, too). The calculator’s frame, entry field, and
buttons are made expandable in the importedwidgetsutility module we coded earlier in
Example 10-1
.
This calculator builds up a string to pass to the Python
interpreter all at once on “eval” button presses. Because you can type
any Python expression or statement in the entry field, the buttons are
really just a convenience. In fact, the entry field isn’t much more
than a command line. Try typingimport, and then
sysdir(sys)to
displaysysmodule attributes in
the input field at the top—it’s not what you normally do with a
calculator, but it is demonstrative nevertheless.
[
71
]
InCalcGui’s constructor,
buttons are coded as lists of strings; each string represents a row
and each character in the string represents a button. Lambdas are used
to save extra callback data for each button. The callback functions
retain the button’s character and the linked text entry variable so
that the character can be added to the end of the entry widget’s
current string on a press.
Notice how we must pass in the loop variable as a
default argument
to some lambdas in this code.
Recall from
Chapter 7
how
references within a lambda (or nesteddef) to names in an enclosing scope are
evaluated when the nested function is called, not when it is created.
When the generated function is called, enclosing scope references
inside the lambda reflect their latest setting in the enclosing scope,
which is not necessarily the values they held when the lambda
expression ran. By contrast, defaults are evaluated at function
creation time instead and so can remember the current values of loop
variables. Without the defaults, each button would reflect the last
iteration of the loop.
Lesson 4: Embedding Beats Parsers
The calculator usesevalandexecto call Python’s parser and
interpreter at runtime instead of analyzing and evaluating
expressions manually. In effect, the calculator runs embedded Python
code from a Python program. This works because Python’s development
environment (the parser and bytecode compiler) is always a part of
systems that use Python. Because there is no difference between the
development and the delivery environments, Python’s parser can be
used by Python programs.
The net effect here is that the entire expression evaluator
has been replaced with a single call toevalorexec. In broader terms, this is a powerful
technique to remember: the Python language itself can replace many
small, custom languages. Besides saving development time, clients
have to learn just one language, one that’s potentially simple
enough for end-user coding.
Furthermore, Python can take on the flavor of any application.
If a language interface requires application-specific extensions,
just add Python classes, or export an API for use in embedded Python
code as a C extension. By evaluating Python code that uses
application-specific extensions, custom parsers become almost
completely
unnecessary
.
There’s also a critical added benefit to this approach:
embedded Python code has access to all the tools and features of a
powerful, full-blown programming language. It can use lists,
functions, classes, external modules, and even larger Python tools
like tkinter GUIs, shelve storage, multiple threads, network
sockets, and web page fetches. You’d probably spend years trying to
provide similar functionality in a custom language parser. Just ask
Guido.
This module
implements a GUI calculator in some 45 lines of code
(counting comments and blank lines). But truthfully, it “cheats.”
Expression evaluation is delegated entirely to Python. In fact, the
built-inevalandexectools do most of the work here:
evalParses,
evaluates, and returns the result of a Python
expression represented as a string.execRuns an
arbitrary Python statement represented as a
string, and has no return value.
Both accept optional dictionaries to be used as global and local
namespaces for assigning and evaluating names used in the code
strings. In the calculator,self.namesbecomes a symbol table for
running calculator expressions. A related Python function,compile, can be used to precompile code
strings to code objects before passing them toevalandexec(use it if you need to run the same
string many times).
By default, a code string’s namespace defaults to the caller’s
namespaces. If we didn’t pass in dictionaries here, the strings would
run in theevalmethod’s namespace.
Since the method’s local namespace goes away after the method call
returns, there would be no way to retain names assigned in the string.
Notice the use of nested exception handlers in the class’sevalmethod:
It first assumes the string is an expression and tries the
built-inevalfunction.If that fails because of a syntax error, it tries evaluating
the string as a statement usingexec.Finally, if both attempts fail, it reports an error in the
string (a syntax error, undefined name, and so on).
Statements and invalid expressions might be parsed twice, but
the overhead doesn’t matter here, and you can’t tell whether a string
is an expression or a statement without parsing it manually. Note that
the “eval” button evaluates expressions, but=sets Python variables by running an
assignment statement. Variable names are combinations of the letter
keys “abcd” (or any name typed directly). They are assigned and
evaluated in a dictionary used to represent the calculator’s namespace
and retained for the session.
Clients that
reuse this calculator are as simple as the calculator
itself. Like most class-based tkinter GUIs, this one can be extended
in subclasses—
Example 19-18
customizes the
simple calculator’s constructor to add extra widgets.
Example 19-18. PP4E\Lang\Calculator\calc0ext.py
from tkinter import *
from calc0 import CalcGui
class Inner(CalcGui):                                          # extend GUI
def __init__(self):
CalcGui.__init__(self)
Label(self,  text='Calc Subclass').pack()              # add after
Button(self, text='Quit', command=self.quit).pack()    # top implied
Inner().mainloop()
It can also be embedded in a container class—
Example 19-19
attaches the
simple calculator’s widget package, along with extras, to a common
parent.
Example 19-19. PP4E\Lang\Calculator\calc0emb.py
from tkinter import *
from calc0 import CalcGui                       # add parent, no master calls
class Outer:
def __init__(self, parent):                               # embed GUI
Label(parent, text='Calc Attachment').pack()          # side=top
CalcGui(parent)                                       # add calc frame
Button(parent, text='Quit', command=parent.quit).pack()
root = Tk()
Outer(root)
root.mainloop()
Figure 19-3
shows the result of running both of these scripts from different
command lines. Both have a distinct input field at the top. This
works, but to see a more practical application of such reuse
techniques, we need to make the underlying calculator more practical,
too.
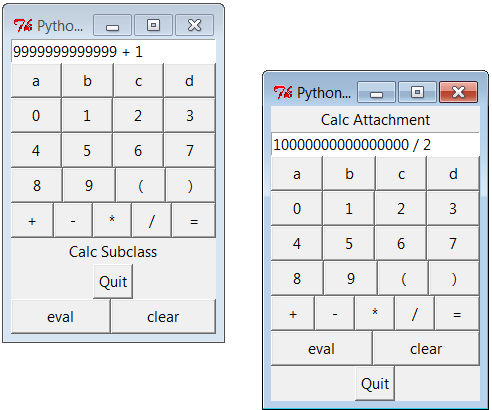
Figure 19-3. The calc0 script’s object attached and extended
Of course, real
calculators don’t usually work by building up expression
strings and evaluating them all at once; that approach is really little
more than a glorified Python command line. Traditionally, expressions
are evaluated in piecemeal fashion as they are entered, and temporary
results are displayed as soon as they are computed. Implementing this
behavior requires a bit more work: expressions must be evaluated
manually and in parts, instead of calling theevalfunction only once. But the end result is
much more useful and intuitive.
Lesson 5: Reusability Is Power
Though simple, attaching and subclassing
the calculator graphically, as shown in
Figure 19-3
, illustrates the
power of Python as a tool for writing reusable software. By coding
programs with modules and classes, components written in isolation
almost automatically become general-purpose tools. Python’s program
organization features promote reusable code.
In fact, code reuse is one of Python’s major strengths and has
been one of the main themes of this book. Good object-oriented design
takes some practice and forethought, and the benefits of code reuse
aren’t apparent immediately. And sometimes we have good cause to be
more interested in a quick fix rather than a future use for the
code.
But coding with some reusability in mind can save development
time in the long run. For instance, the handcoded custom parsers
shared a scanner, the calculator GUI uses thewidgetsmodule from
Chapter 10
we discussed earlier, and the next
section will reuse theGuiMixinclass from
Chapter 10
as well. Sometimes
we’re able to finish part of a job before we start.
This section presents the implementation of PyCalc, a more
realistic Python/tkinter program that implements such a traditional
calculator GUI. It touches on the subject of text and languages in two
ways: it parses and evaluates expressions, and it implements a kind of
stack-based language to perform the evaluation. Although its evaluation
logic is more complex than the simpler calculator shown earlier, it
demonstrates advanced programming techniques and serves as an
interesting finale for this chapter.
As usual,
let’s look at the GUI before the code. You can run
PyCalc from the PyGadgets and PyDemos launcher bars at the top of the
examples tree, or by directly running the file
calculator.py
listed shortly (e.g., click it in a
file explorer, or type it in a shell command line).
Figure 19-4
shows PyCalc’s
main window. By default, it shows operand buttons in black-on-blue
(and opposite for operator buttons), but font and color options can be
passed into the GUI class’s constructor method. Of course, that means
gray-on-gray in this book, so you’ll have to run PyCalc yourself to
see what I mean.
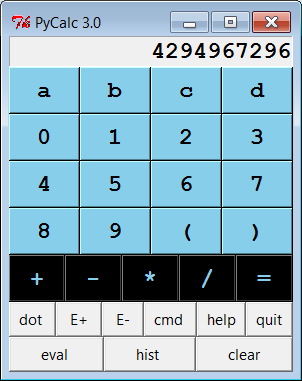
Figure 19-4. PyCalc calculator at work on Windows 7
If you do run this, you’ll notice that PyCalc implements a
normal calculator model—expressions are evaluated as entered, not all
at once at the end. That is, parts of an expression are computed and
displayed as soon as operator precedence and manually typed
parentheses allow. The result in
Figure 19-4
, for instance,
reflects pressing “2”, and then repeatedly pressing “*” to display
successive powers of 2. I’ll explain how this evaluation works in a
moment.
PyCalc’sCalcGuiclass
builds the GUI interface as frames of buttons much like
the simple calculator of the previous section, but PyCalc adds a host
of new features. Among them are another row of action buttons,
inherited methods fromGuiMixin(presented
in
Chapter 10
), a new “cmd” button that
pops up nonmodal dialogs for entry of arbitrary Python code, and a
recent calculations history pop up.
Figure 19-5
captures some of
PyCalc’s pop-up windows.

Figure 19-5. PyCalc calculator with some of its pop ups
You may enter expressions in PyCalc by clicking buttons in the
GUI, typing full expressions in command-line pop ups, or typing keys
on your keyboard. PyCalc intercepts key press events and interprets
them the same as corresponding button presses; typing+is like pressing the+button, the Space bar key is “clear,”
Enter is “eval,” backspace erases a character, and?is like pressing “help.”
The command-line pop-up windows are nonmodal (you can pop up as
many as you like). They accept any Python code—press the Run button or
your Enter key to evaluate text in their input fields. The result of
evaluating this code in the calculator’s namespace dictionary is
thrown up in the main window for use in larger expressions. You can
use this as an escape mechanism to employ external tools in your
calculations. For instance, you can import and use functions coded in
Python or C within these pop ups. The current value in the main
calculator window is stored in newly opened command-line pop ups, too,
for use in typed expressions.
PyCalc supports integers (unlimited precision), negatives, and
floating-point numbers just because Python does. Individual operands
and expressions are still evaluated with theevalbuilt-in, which calls the Python
parser/interpreter at runtime. Variable names can be assigned and
referenced in the main window with the letter,=, and “eval” keys; they are assigned in the
calculator’s namespace dictionary (more complex variable names may be
typed in command-line pop ups). Note the use ofpiin the history window: PyCalc preimports
names in themathandrandommodules into the namespace where
expressions are evaluated.
Now that you have
the general idea of what PyCalc does, I need to say a
little bit about how it does what it does. Most of the changes in this
calculator involve managing the expression display and evaluating
expressions. PyCalc is structured as two classes:
- The
CalcGuiclass Manages the
GUI itself. It controls input events and is in
charge of the main window’s display field at the top. It doesn’t
evaluate expressions, though; for that, it sends operators and
operands entered in the GUI to an embedded instance of theEvaluatorclass.- The
Evaluatorclass Manages two stacks.
One stack records pending
operators
(e.g.,+), and one records pending
operands
(e.g.,3.141). Temporary results are computed
as new operators are sent fromCalcGuiand pushed onto the operands
stack.
As you can see from this, the magic of expression evaluation
boils down to juggling the operator and operand stacks. In a sense,
the calculator implements a little stack-based
language
, to evaluate the expressions being
entered. While scanning expression strings from left to right as they
are entered, operands are pushed along the way, but operators delimit
operands and may trigger temporary results before they are pushed.
Because it records states and performs transitions, some might use the
term
state machine
to describe this calculator
language implementation.
Here’s the general scenario:
When a new operator is seen (i.e., when an operator button
or key is pressed), the prior operand in the entry field is pushed
onto the operands stack.The operator is then added to the operators stack, but only
after all pending operators of higher precedence have been popped
and applied to pending operands (e.g., pressing+makes any pending*operators on the stack fire).When “eval” is pressed, all remaining operators are popped
and applied to all remaining operands, and the result is the last
remaining value on the operands stack.
In the end, the last value on the operands stack is displayed in
the calculator’s entry field, ready for use in another operation. This
evaluation algorithm is probably best described by working through
examples. Let’s step through the entry of a few expressions and watch
the evaluation stacks grow.
PyCalc stack tracing is enabled with thedebugmeflag in the module; if true, the
operator and operand stacks are displayed onstdouteach time theEvaluatorclass is about to apply an
operator and
reduce
(pop) the stacks. Run PyCalc
with a console window to see the traces. A tuple holding the stack
lists(operators,operands)is printed on each stack reduction; tops
of stacks are at the ends of the lists. For instance, here is the
console output after typing and evaluating a simple string:
1) Entered keys: "5 * 3 + 4"
[result = 19]
(['*'], ['5', '3'])
[on '+' press: displays "15"]
(['+'], ['15', '4'])
[on 'eval' press: displays "19"]
Note that the pending (stacked)*subexpression is evaluated when the+is pressed:*operators bind tighter than+, so the code is evaluated immediately
before the+operator is pushed.
When the+button is pressed, the
entry field contains 3; we push 3 onto the operands stack, reduce the*subexpression (5 * 3), push its
result onto operands, push+onto
operators, and continue scanning user inputs. When “eval” is pressed
at the end, 4 is pushed onto operands, and the final+on operators is applied to stacked
operands.
The text input and display field at the top of the GUI’s main
window plays a part in this algorithm, too. The text input field and
expression stacks are integrated by the calculator class. In general,
the text input field always holds the prior operand when an operator
button is pressed (e.g., on5 *);
the text in the input field is pushed onto the operands stack before
the operator is resolved. Because of this, we have to pop results
before displaying them after “eval” or)is pressed; otherwise the results are
pushed onto the stack twice—they would be both on the stack and in the
display field, from which they would be immediately pushed again when
the next operator is input.
For both usability and accuracy, when an operator is seen, we
also have to arrange to erase the input field’s prior value when the
next operand’s entry is started (e.g., on both3and4in5 * 3 + 4). This erasure of the
prior values is also arranged when “eval” or)is applied, on the assumption that a
subsequent operand key or button replaces the prior result—for a new
expression after “eval,” and for an operand following a new operator
after); e.g., to erase the
parenthesized12result on2in5 + (3 * 4) *. Without this erasure, operand buttons and keys simply
2
concatenate to the currently displayed value. This model also allows
user to change temporary result operands after a)by entry of operand instead of
operator.
Expression stacks also defer operations of lower precedence as
the input is scanned. In the next trace, the pending+isn’t evaluated when the*button is pressed: since*binds tighter, we need to postpone the+until the*can be evaluated. The*operator isn’t popped until its right
operand 4 has been seen. There are two operators to pop and apply to
operand stack entries on the “eval” press—the*at the top of operators is applied to the
3 and 4 at the top of operands, and then+is run on 5 and the 12 pushed for*:
2) Entered keys: "5 + 3 * 4"
[result = 17]
(['+', '*'], ['5', '3', '4'])
[on 'eval' press]
(['+'], ['5', '12'])
[displays "17"]
For strings of same-precedence operators such as the following,
we pop and evaluate immediately as we scan left to right, instead of
postponing evaluation. This results in a left-associative evaluation,
in the absence of parentheses:5+3+4is evaluated as((5+3)+4). For+and*operations this is irrelevant because order doesn’t matter:
3) Entered keys: "5 + 3 + 4"
[result = 12]
(['+'], ['5', '3'])
[on the second '+']
(['+'], ['8', '4'])
[on 'eval']
The following trace is more complex. In this case, all the
operators and operands are stacked (postponed) until we press the)button at the end. To make
parentheses work,(is given a
higher precedence than any operator and is pushed onto the operators
stack to seal off lower stack reductions until the)is seen. When the)button is pressed, the parenthesized
subexpression is popped and evaluated ((3 * 4), then (1 + 12)), and 13
is displayed in the entry field. On pressing “eval,” the rest is
evaluated ((3 * 13), (1 +39)), and the final result (40) is shown.
This result in the entry field itself becomes the left operand of a
future operator.
4) Entered keys: "1 + 3 * ( 1 + 3 * 4 )"
[result = 40]
(['+', '*', '(', '+', '*'], ['1', '3', '1', '3', '4'])
[on ')']
(['+', '*', '(', '+'], ['1', '3', '1', '12'])
[displays "13"]
(['+', '*'], ['1', '3', '13'])
[on 'eval']
(['+'], ['1', '39'])
In fact, any temporary result can be used again: if we keep
pressing an operator button without typing new operands, it’s
reapplied to the result of the prior press—the value in the entry
field is pushed twice and applied to itself each time. Press*many times after entering 2 to see how
this works (e.g.,2***). On the
first*, it pushes 2 and the*. On the next*, it pushes 2 again from the entry field,
pops and evaluates the stacked (2 * 2), pushes back and displays the
result, and pushes the new*. And
on each following*, it pushes the
currently displayed result and evaluates again, computing successive
squares.
Figure 19-6
shows how the two stacks look at their highest level while scanning
the expression in the prior example trace. On each reduction, the top
operator is applied to the top two operands and the result is pushed
back for the operator below. Because of the way the two stacks are
used, the effect is similar to converting the expression to a string
of the form+1*3(+1*34and
evaluating it right to left. In other cases, though, parts of the
expression are evaluated and displayed as temporary results along the
way, so it’s not simply a string conversion process.
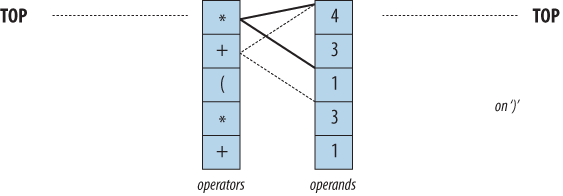
Figure 19-6. Evaluation stacks: 1 + 3 * (1 + 3 * 4)
Finally, the next example’s string triggers an error. PyCalc is
casual about error handling. Many errors are made impossible by the
algorithm itself, but things such as unmatched parentheses still trip
up the evaluator. Instead of trying to detect all possible error cases
explicitly, a generaltrystatement
in thereducemethod is used to
catch them all: expression errors, numeric errors, undefined name
errors, syntax errors, and so on.
Operands and temporary results are always stacked as strings,
and each operator is applied by callingeval. When an error occurs inside an
expression, a result operand of*ERROR*is pushed, which makes all remaining
operators fail inevaltoo.*ERROR*essentially percolates to
the top of the expression. At the end, it’s the last operand and is
displayed in the text entry field to alert you of the mistake:
5) Entered keys: "1 + 3 * ( 1 + 3 * 4"
[result = *ERROR*]
(['+', '*', '(', '+', '*'], ['1', '3', '1', '3', '4'])
[on eval]
(['+', '*', '(', '+'], ['1', '3', '1', '12'])
(['+', '*', '('], ['1', '3', '13'])
(['+', '*'], ['1', '*ERROR*'])
(['+'], ['*ERROR*'])
(['+'], ['*ERROR*', '*ERROR*'])
Try tracing through these and other examples in the calculator’s
code to get a feel for the stack-based evaluation that occurs. Once
you understand the general shift/reduce (push/pop) mechanism,
expression evaluation is
straightforward.