I'm Just Here for the Food (27 page)
Read I'm Just Here for the Food Online
Authors: Alton Brown
Tags: #General, #Courses & Dishes, #Cooking, #Cookery

So we’ve got all these cooking methods that depend on maintaining water or a watery liquid at relatively low temperatures, in some cases for a prolonged period of time. Now, where should the pot itself go? Well, I’ll tell you where it shouldn’t go: the cook top.
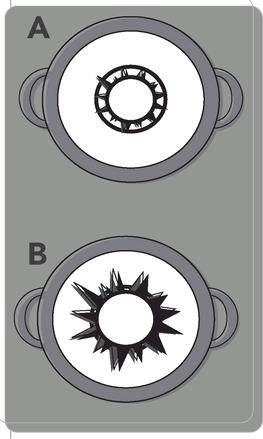
Most ranges, whether gas or electric, have large burners or eyes and a smaller “simmer” eye. The idea here is that since the burner is smaller it will generate less heat, which is true—sort of. The way I see it, natural gas burns at one temperature no matter how much of it there is. Place the tip of a thermometer into the flame of your oven’s pilot light and it’s going to read in the neighborhood of 3,200° F. Now crank your biggest burner and take its temp. They’re the same, right? So what we’re talking about here isn’t so much a matter of the temperature of the heat but the rate at which it’s being produced. That simmer eye, hot though it is, can’t pump out enough heat to bring a large pot of water to a boil in less than a day or two. It can, however, maintain sub-boiling temperatures—but not effectively. That’s because all the heat is being poured into a very small part of the pan (see figure
A
). Since the metal directly over the flame is very hot indeed, the water directly over it heats very quickly and moves upward, creating wicked-fast convection currents (see figure
B
). If it contains something thicker—oatmeal for instance—the water can’t move quickly enough for the heat to convect, so the liquid boils and the oatmeal sticks to the bottom of the pan (see
Clad Pans
).
Such situations require constant management. We have to fiddle with the heat, which is a pain, and we have to stir to keep the heat distributed throughout the pot, which is also a pain because not all foods enjoy being smacked around by a big wooden spoon.
Those of us with high-end electric burners have it a little easier when it comes to sub-boiling because the coils generally have a wider diameter, which makes for more even heating. Still, I’ve yet to meet an electric eye I felt I could trust any more than the average rattlesnake.
So what’s a cook to do? How are we to enjoy those soup beans, that beef stew, or that pilaf? Where can the heat be evenly applied and easily controlled?
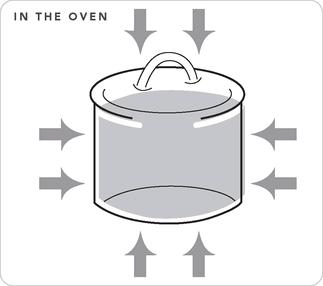
The Oven
When it comes to sub-boil cookery, here’s what I believe: Simmering (including the second act of braising and stewing) means cooking in a water-type liquid held just below the boil, and the best way to maintain that temperature is in an oven. With some exceptions, I do all my simmering in a 250° F oven for the first hour, and then 225° for the rest of the cook time. The oven can maintain sub-boil temperatures for long periods of time (and I’ve got a thermometer to prove it). The heat moves into the vessel from all sides rather than through a small spot on the bottom, so the food inside cooks evenly, with little if any stirring.
Good simmering candidates include dried beans and other legumes, hearty greens, rice dishes, and meat stews and braises. Soup beans are the perfect example. Here’s a very simple food that’s darned good and good for you but that often comes out of the pot smushed to mush. Salt often takes the blame for cracked skin and spilled guts, but I’m not buying it.
With the exception of black beans and lentils, dried beans need to be soaked before cooking. The argument for dumping the soaking liquid has to do with liquid gas—the kind that leads to unfortunate social mishaps. Legumes contain gigantic sugars called oligosaccharides. The human machine lacks an enzyme capable of breaking these megamolecules down into pieces small enough for the intestine to absorb. So they move downstream to the colon. Now, the colon is very different from the small intestine, it’s rather densely populated with bacterial clans, all roaming around in search of a meal. When the oligosaccharides come floating by, the bacteria have themselves a feeding frenzy. One of the by-products of this frenzy is gas, which gathers uncomfortably, gurgles loudly, then, much to the delight of eight-year-old boys everywhere, seeks an exit.
CLAD PANS
Manufacturers of fine cookware are always trying to figure out how to construct pots and pans so that they evenly distribute the heat of a stove top to food. It’s a tough nut to crack. As we discussed earlier, no one metal is ideal for cooking. Iron holds heat, and aluminum and copper conduct it, but all three are vulnerable to the kitchen environment. Stainless steel is tough and easy to care for, but it’s a pretty lousy heat conductor. The answer: a metal sandwich. Take a sheet of aluminum or copper, wrap it in a protective layer of stainless steel, and you’ve got clad cookware. Some manufacturers are content to weld a clad disk onto the bottom of a nonclad, stainless-steel vessel, which does result in better (that is, more even) conduction across the bottom of the vessel, but not the sides. The very best clad vessels are actually formed from the clad metal. That means that everywhere there’s pan, there’s a core of highly conductive metal surrounded by stainless steel. Heat can therefore move easily up the sides of the pan, for more even heating throughout.
The downside of clad cookware is the cost. These are not cheap vessels to make, and you can easily shell out a hundred bucks for a sauce pan. All I can say is that you get what you pay for, and it really depends on how much control you want over your food. I cook my eggs in a twelve-dollar Teflon-coated aluminum pan from a restaurant supply store because I know what to expect from it, but I cook my soup beans (I really like soup beans, by the way) in a 150-dollar sauce pot because it makes a difference. Pick your battles. (See Appendix for more about pots and pans.)
While it’s true that some of the oligosaccharides do leach into the water during soaking, so do a lot of nutrients and more than a little bean flavor. And I hate to see flavor go down the drain. So if you suffer from emission troubles, keep the bean water and pick up a bottle of Beano or one of the other commercial preparations containing alpha-galactosidase, the enzyme that breaks down oligosaccharides.
Dried Beans Experiment
Application: Simmering
Do a quick inspection of the beans: remove beans that are discolored, cracked, or shriveled. Cooking will not improve a bad bean. Give the rest a thorough washing to remove dust and any other undesirables.
Soak the beans overnight in 6 cups of water. If dried beans don’t soak overnight, they’ll take at least twice as long to cook. The exceptions are lentils and split peas, which are fast-cooking to begin with, and black beans, which can squeak by with only a 3- or 4-hour soak. Be prepared: beans will double in volume during soaking, so make sure the soaking water covers them by an inch or two so they stay submerged.
Leave the soaking beans out on the kitchen counter, covered. Although you can refrigerate them, it is slower. Don’t soak for more than 12 hours or you’ll get mushy, flavorless beans. In a rush? You can do a speed soak by bringing the beans and water to a boil, removing from the heat, and letting them soak for about 4 hours.
Drain the beans and season with salt. Put the beans and chicken stock in the pot over medium-high flame and bring to a boil. Meanwhile, in the sauté pan, heat the oil and add the garlic, letting it toast until nice and brown. Add the rosemary for just a few seconds to release its oils, then add the garlic and rosemary to the bean pot. To the pot add the carrots, onion, celery, 2 teaspoons of kosher salt, and a couple of grinds of fresh pepper. Put the lid on the pot and place in a 250° F oven for 1½ hours.
When the beans are done, check the seasoning, correct if necessary, and serve them with style.
Yield: 2 quarts of delicious beans
Software:
1 pound of dried beans
Kosher salt
4 cups chicken stock
Olive oil
2 tablespoons garlic, sliced
2 sprigs rosemary
½ cup diced carrots
¾ cup diced onion
½ cup diced celery
Freshly ground black pepper
Hardware:
5-quart ovenproof pot with lid
Collander
Small sauté pan
Wooden spoon
Alabama Alchemy
Being Southern, I like collard greens. Though there’s a trend toward picking them young and cooking them fast, I still prefer mature greens cooked long and low in a flavorful liquid. In this case, time, liquid, and low heat collaborate to soften the cement that holds the leāf tissues together without turning them to mush. At the same time, the connective tissue of the ham hocks breaks down into gelatin. That gelatin mingles with the collard broth to produce a powerful liquid those who live below the M-D line call “potlikker.”
Could you make this dish without the smoked ham hocks? You could, but no hocks, no alchemy.
Application: Simmering
Preheat the oven to 250° F.
Place the cut collards in a big sink of cold water and wash thoroughly. Using your hands, gently remove the collards from the sink to the large pot. Do not shake off the clinging water. Add the ham hocks, the water, and the vinegar and seal the pot with foil before putting the lid on.
Move the pot to the oven and cook for 2 to 3 hours or until the collards reduce to ¼ of their original mass. (How long this takes depends on the collards; mature plants are heartier and more time will be needed to break down the cell walls.) Move the collards and the hocks, with cooking liquid, to the smaller pot to keep the hocks submerged. Continue cooking for another 2 to 3 hours longer, or until the collards reach the consistency of your choice.
Although collards are often a side dish, I like to serve them in soup bowls, topped with the chopped hock meat, and cornbread on the side.
Yield: A mess o’ greens for 4-6 people and pot likker to dip your cornbread into.
Software:
2 pounds collard greens, stemmed
and cut into 2-inch strips
2 smoked ham hocks
3 cups water
⅓ cup vinegar of your choice (I
like a combination of cider and
rice wine vinegars)
Hardware:
The biggest covered pot you have
that’ll fit in your oven
Heavy-duty aluminum foil
Another covered pot about
half as big
A Quick Mess O’ Greens Place in a pressure cooker in the following order: collards, ham hocks, water, and vinegar. Lock the lid in place and set over high heat. Bring to high pressure (this takes approximately 10 to 15 minutes), then reduce the heat to low and cook for 5 minutes more. Gently release steam. Remove the ham hocks (or pick the meat off the bone and add to the collards) add Kosher salt to taste, and serve.
Pilaf
The word “pilaf” does refer to an actual dish, but more often than not it refers to a procedure, a way of cooking rice or other grains that includes a quick sauté in fat before any moisture is added. The result is far more flavorful than any boiled or steamed rice can muster. So why cook rice any other way? I honestly can’t say.
Application: Simmering
Preheat the oven to 350° F (see
Note
). Add the salt to the liquid and bring to a boil in the kettle.
Heat the sauce pot over medium-high heat, then add the butter. As soon as the foaming subsides, add the onion and garlic. Stir with the wooden spoon until fragrant, about 1 to 2 minutes.