Grow a Sustainable Diet: Planning and Growing to Feed Ourselves and the Earth (23 page)
Read Grow a Sustainable Diet: Planning and Growing to Feed Ourselves and the Earth Online
Authors: Cindy Conner
Tags: #Gardening, #Organic, #Techniques, #Technology & Engineering, #Agriculture, #Sustainable Agriculture

The extra onions and garlic are either braided or in mesh bags and hang on nails I put in the joists in the crawl space. Like the potatoes, they aren’t put there until October. Until then they hang in the barn where I put them after the June harvest. Sometime in July and August, I sort the garlic and set aside what is to be planted in the garden in late October. The multiplier onions are managed the same way and planted out with the garlic. The extra sweet potatoes and winter squash are usually stored in the house, if I have room. The sweet potatoes to plant the next year go under the house, clearly marked, so I don’t use them by mistake. Once fall comes, these things could be stored in your attic, if it is cool and accessible. If it is cool in the winter, it is probably too hot in the summer. With the super-insulated houses of today, I’m not sure how attics accommodate produce. To get into our attic we have to get out a ladder, so we don’t store produce up there.
Obviously, these storage temperatures cannot be maintained throughout the summer using natural methods. Our house is not air
conditioned. We rely on shade trees, cross ventilation, and ceiling fans for cooling. In spite of that, the potatoes, sweet potatoes, winter squash, garlic, and onions survive very well with the plan I’ve told you about.
We have a room off the kitchen that we used to call the utility room, but now it’s the pantry. When the house was built — sometime between 1900 and 1910 — the kitchen was smaller and this room was a room off the porch used for storage. The family who lived here kept two cows and had chickens, selling butter and eggs each week. I imagine some of that was kept in this room, although the butter might have been kept in the cellar that was dug out by hand under the kitchen in the 1930s. About 1960, plumbing was added to the house and the kitchen was enlarged to include the porch, making that storage room part of the new kitchen. By 1984, when we bought the house, washer and dryer hookups were there. Our washing machine is still there, but we have given away the clothes dryer since we rarely used it. We dry our clothes on the line outside or on a wooden rack inside. By removing the clothes dryer, we made space for fermentation crocks and for baskets and crocks of peanuts, hazelnuts, and black walnuts.

This room needs strong shelving. Besides the crocks and baskets on the floor, it holds large and small jars of grain, dry beans, honey, and dried food. It is cool, dry storage. If there was room, I could put the canning jars here, but I keep those in the cellar. Although the furnace sometimes dries out the cellar, other times it’s damp there — not my preferred place for beans, grain, nuts, and dried food, even if they are sealed. Half gallon canning jars are good for storing grains and beans in. The rubber gasket on the canning lids keeps out air and moisture. If you see quart and pint canning jars for sale in a store, but not half-gallons, inquire about having the larger jars ordered for you.
Many things that used to come in large glass jars are now packaged in plastic. My aunt owned an ice cream store and would bring me boxes of gallon and half-gallon jars she had emptied of toppings for the ice cream. At that time, it seemed there was a never-ending supply of those jars. Today those toppings come in plastic containers. You could use those since, obviously, they are food-safe.
Food-safe plastic buckets are good storage containers, especially for grains and beans in large quantities. Bakeries and restaurants get ingredients in them and often make them available to whoever wants them for a small fee or for free. All you have to do is ask. You can find one-gallon and five-gallon buckets this way. Food-safe plastic buckets are very useful on a homestead, both in the pantry and in the garden. One winter when I had some extra time, I called around to see if anyone had any buckets I could have. A donut business said that I could come and get some one-gallon buckets for free. When I arrived they also offered me a whole pallet of five-gallon buckets full of fudge topping that had proven too thick for their machines. I don’t know how long it had been stored there, but they seemed happy I was taking it off their hands and freeing up space. You are probably familiar with the phrase — be careful what you ask for because you might get it. I thought that I would just dump the topping in the compost (it was unsweetened; we tasted it)
and clean out the buckets. I soon learned that it would be better to wait until summer and let that stuff soften in the heat a bit so it wouldn’t be so hard to get out of the buckets. Even then it was a chore, and a messy one at that. It took me more than a year before I got around to emptying all those buckets, but I haven’t had to go looking for buckets since.
There was evidence of an old furnace having been in our pantry, but it had been taken out when the new one was put in the cellar before we moved here. Left from that furnace was a hole in the floor and a larger hole about four feet up for a flue going into a chimney. I always thought I’d enclose an area in that room to make a cooling cabinet, such as the one I had read about in
Home Food Systems
.
1
Eventually, as that room made the transition from utility room to pantry, by getting rid of the unnecessary things and storing more jars of homegrown grain, beans, honey, and dried food, I realized that I could just uncover those holes, screen them to keep out critters, and have the whole room vented. There wasn’t enough room for a separate insulated closet or cabinet in there, anyway. Originally there was a window in the pantry, but that had been taken out when we put an addition on the house. From my research into pantries, windows were common in order to vent and cool the room. Now I had venting again.
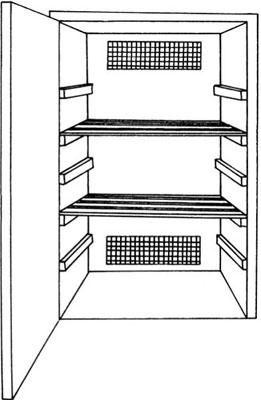
The cooling cabinet I had read about was a description of something that had apparently been common in times before refrigeration in southern California, where the days were hot but the nights were cool. Cool air from under the house was drawn through the cabinet by natural convection to a chimney.
That’s where I got my inspiration for the produce cabinet in the kitchen and why I had thoughts of putting in lower and upper vents.
When living with a diminished supply of fossil fuel, fermentation is a wonderful way of preserving food. Living with a diminished supply of fossil fuel, by the way, has nothing to do with living a diminished life. It is a life of new and exciting opportunities and Sandor Katz is the biggest inspiration I know to help you realize those opportunities. I had read about fermenting vegetables one jar at a time in
Nourishing Traditions
, but hadn’t gotten around to doing it. When I read
Wild Fermentation
by Katz, I just had to try it. The first sauerkraut I made was in a quart jar using the directions in
Nourishing Traditions
. The directions called for shredded cabbage, salt, and whey. You can obtain whey by draining it off yogurt. The whey is added to jump-start the fermentation process, putting folks at ease who are not used to leaving food sit out unrefrigerated. I soon became comfortable with not adding whey. Natural lactic-acid producing bacteria are already present on the cabbage leaves. The salt provides the right conditions to get things going. Although cabbage is the base for sauerkraut, you can add other things, such as radishes, apples, carrots, and onions. Sandor Katz gave a demonstration at the community college in 2007, a public event sponsored by the college sustainable agriculture club, and had my students chopping an assortment of vegetables to accompany the cabbage in the ferment. Add salt, mix well, and pack it into jars is all it takes. I could have just talked to my students about fermentation, but having Sandor there really moved everyone forward along that path. Take a look at his website at
wildfermentation.com
and let Sandor inspire you.
I’ve made sauerkraut in quart jars, old-fashioned crocks, and Harsch crocks (a brand of crocks that have a water trough around the top). The quart jar method is easy and is great if you have a limited quantity of produce to work with. One head of cabbage makes a quart. I enjoy making larger quantities at a time. When I made it in the old-style wide crocks I realized why people were so quick to abandon the crocks when
refrigeration became the norm. You have to know how to manage them and regularly pull the scum off the top, clean the lid (plate and weight) and replace it. The scum looks pretty bad, but it won’t hurt you. The trough around the top of the Harsch crocks is filled with water to help keep out air. It is contact with air that leads to the scum. Check the trough each week and add more water as necessary.
Using plywood and wheels I made small rolling platforms for my crocks so that I can move them around easier. These platforms are like the ones you would put plants on, but sturdier. The fermented vegetables keep for quite a long time in the crocks. Some instructions say to take the fermented food out after six weeks or so, but it is okay to leave it in all winter if you want, as long as it tastes alright. I have eaten sauerkraut that has been in the crock for more than a year. The taste changes as it ages. You may prefer either a young sauerkraut or an aged one. Taste it regularly and enjoy all the flavors. If you need the crock for another food project, put what you have fermented in jars. If you want to stall the fermentation at that taste, store the jars in the refrigerator.
I look forward to making dill pickles — called sour pickles in
Wild Fermentation
— from my cucumbers, garlic, and dill. I have one-gallon and two-gallon jars that I use. If possible, I pick all the cucumbers at just the right size to ferment them whole. If they get too big, I quarter them lengthwise to put in the jar. I put 3–4 pounds of cucumbers in a gallon jar, add 6 tablespoons of sea salt, a few heads of dill, the peeled cloves of several bulbs of garlic, and then fill the jar almost to the top with water. Since I have grapes, I put some grape leaves in the bottom of the jar before I start. They are supposed to keep the pickles crisp. To keep the cucumbers from floating to the top, I add a smaller jar that just fits the opening of the large jar, or fill the space with a water filled zip-lock bag. It keeps the air out and keeps the cucumbers submerged. There is no cooking and no vinegar involved. I leave this on the kitchen counter — deli style. After a couple weeks we begin to help ourselves. That’s when I start the second large jar. Once summer wanes and the pickles are about as tart as I want them, I put what’s left in quart jars and store them in the fridge. I used to can pickles with vinegar and thought I needed to put up enough for all year. Now we celebrate the seasons. Once the pickles are about gone, the sauerkraut is coming along. There
is a season to everything. I could put the sour pickles in a large Harsch crock and have more and for a longer time, but then I wouldn’t have so much fun seeing those large glass jars of pickles in the kitchen.
I salt down snap beans in a crock to preserve them by mixing French-cut beans with sea salt and packing them in a crock. I have a bean frencher to slice the beans, but you could slice them lengthwise with a knife. Pack everything in tight and in a few days the water drawn from the beans will be present as liquid in the crock. I usually can the snap beans produced early in the season, and preserve the ones that come later in the summer in the crock. If you don’t have enough to fill the crock when you start, you can add to it as the beans come in, which is nice if you have a small garden and only harvest a pound at a time. (You can also add cucumbers to the pickle jar/crock after it is started.) Before eating, the beans need to be soaked in plain water for an hour or two to remove excess salt. They will also need to be cooked before eating — steaming will do. You could take them from the crock, chop them smaller, and put them in soup to cook just as they are, without adding salt to the soup. Once when we lost electricity for several days due to a hurricane, I was able to preserve my bean harvest by salting.
We make mead (honey wine) from our honey and grapes, fermenting it in gallon jugs stored on shelves in the pantry. Once you learn to do these things, you will find more ways to use your new skills. Fermented food is good for you. People have told me that they have cured their acid reflux problems by eating naturally fermented sauerkraut. Can you imagine how much money the drug companies would lose if everyone did that? Naturally fermented food has a multitude of health benefits, including fighting cancer.
2
In preserving food with fermentation, you are participating in your own health care. I keep the crocks in the pantry or any odd corner that I can find. The warmer the spot, the faster the fermentation. If you want things to slow down, find a cooler spot.