Grow a Sustainable Diet: Planning and Growing to Feed Ourselves and the Earth (25 page)
Read Grow a Sustainable Diet: Planning and Growing to Feed Ourselves and the Earth Online
Authors: Cindy Conner
Tags: #Gardening, #Organic, #Techniques, #Technology & Engineering, #Agriculture, #Sustainable Agriculture

Okay, so now you know that, as I write this, I don’t have a shed in the garden. I put one on my garden map because our time is opening up this summer to actually build it. As I said, my garden tools are in the corner of the garage, I hang the garlic, onions, peanuts, corn, and bags of beans in the barn, and I put other garden things in the goat shed (no goats there). One shed for everything, in the garden, would be ideal. Once the garden shed is built, it will free up space in these other places,
although I’ll probably still hang the corn, peanuts, and bags of beans in the barn until shelled and threshed.
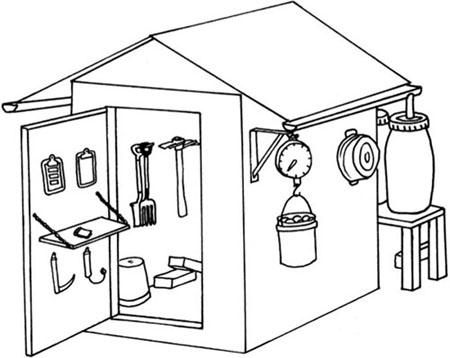
If you are planning a shed, like we are, you need to assess what will go in it. Get out your graph paper and map the footprint and each wall. Gather everything that you will need to put there and measure it. Will it fit? Having defined my garden methods over the years, I know what tools I need. I use a garden spade (flat on the end), a garden fork (thick flat tines), and a mattock for digging chores. Sometimes I’ll use the regular shovel, but we use that for jobs other than in the garden, so that might stay in the garage. My long handled tools include a four-tined cultivator and a hoe. The trowel assortment contains a regular trowel, a soil knife and a Trake (trowel on one end, cultivator/rake on the other). They seem happy living in the mailbox, so that’s where they’ll stay. I have a CobraHead tool that I really like. I will be hanging that in the new shed, along with my Japanese sickle. The machete is stored in a cloth sheath on a belt that will hang in the shed, also. You will find photos of these tools in the color section of this book.
In addition to the tools, I will have a bucket or two to hold soil amendments, wooden flats, a watering wand, and some extra plastic pots. Then there is a homemade six foot measuring stick, my one hundred foot tape measure, a sharpening stone for the sickle, and twine. One side should have a shelf — maybe two — with space underneath for the buckets. And I’ll need a nail to hang a clipboard.
I want to post my garden map somewhere and I think the inside of the door would be a great place. When the door is open, I will be able to see the map and anything else I post there. Of course, a sliding door is nice and takes less space to open. I think I’ll opt for a regular door though. I can also hang some of the small tools there, such as the sickle and CobraHead. Open the door and there they are.
I want the shed to be tall enough to hang the garlic and onions from the rafters to dry. If there is room above the rafters, I could put boards down on part of it, for a loft space providing extra storage. Currently I have a post in the garden that I hang my scale from when I’m weighing things. I want to extend an arm on the outside of the shed to hang the scale from. I’ll have to make sure it’s not somewhere that will hit me in
the head when I walk by. The scale will need a spot inside the shed, also. A shelf to put my notepad on when I’m weighing things would be handy. I have a large galvanized tub that I’ll probably hang on the outside of the shed. If the eaves extend out some, they will provide some protection from the weather for whatever I hang on the outside.
One reason we haven’t built this shed yet (besides being busy with life in general) is because I hadn’t refined what I wanted. If your garden supplies and tools are stored in multiple places like mine, chalk it up to still refining your plan. I didn’t want to put up a plywood structure, so that took some thought. The siding will be 1″ × 6″ boards. The old chicken house and goat shed on our property have oak board siding. I could get oak fence boards from a local sawmill to do the job, but we’ll be getting the lumber from daughter Betsy and her husband, Chris. They have a portable sawmill and can cut whatever size boards we want. The type of wood will be what’s available. Their machine is a Wood-Mizer. If you were interested in buying lumber from a sawmill such as theirs, you could contact the Wood-Mizer company to find owners in your area. Even if they bought the sawmill for their own use, folks like this would be happy to sell some lumber to help pay for their mill. There are other brands of sawmills and I’m sure you could contact the owners in the same manner.
Wherever you have a roof is an opportunity to collect water. The easiest way to collect water is to put buckets or an animal water trough at the drip line of your building. You could also put gutters on the building and direct the water to one central place, either right at the building or a distance away. If rains are few and far between, one barrel of water won’t go far, but it’s handy to have to dip your watercan in for watering things in your cold frame. (Add watercan to the list for the shed contents.) For more storage space you need many barrels or a large holding tank. You can buy them new at farm supply stores or find them advertised used. Make sure whatever you get for storing water has not held anything toxic to your garden.
I might not have had a garden shed, but I’ve had an outdoor washing station since I began selling vegetables in 1992. If you are cleaning vegetables for the markets, you will want to wash them somewhere other than in your kitchen. Washing your produce in your garden keeps the water and the soil there. Make a way to collect the water so you can return the wash water to the garden. Whatever soil washes off the produce also makes its way back to the garden in the process.
The equipment that lasted me for more than the ten years that I sold vegetables was an old bathtub set on cement blocks. I could fit a five-gallon bucket under the drain hole to catch the water, switching it out with another when it filled. I made a frame of 2 × 4s covered with half-inch hardware cloth (also known as rat wire) that fit the top of the tub and was used to drain produce on. Every few years I had to replace the wooden frame, but reused the same wire each time.
Beside that set-up I had built a bench out of scrap wood. It was at the right height to put the buckets of water on that I swished the lettuce in, before putting the lettuce on the wash table to be sprayed with the hose. There are drinking water safe hoses available. Make sure you use them for water that will be used with produce destined for someone’s dinner table. That washing station was located in a spot that received morning shade, which is the time that I would be washing produce. If it was in the sun, I would have needed to have a roof.
I had some large plastic trays like the ones the bread companies use when delivering bread. I could pick tomatoes and peppers in those, set them on my washing screen, and spray with a hose. The tub caught the water, which drained into the buckets. If I had something small like cherry tomatoes or snap beans, I added a piece of quarter-inch hardware cloth, sized to fit inside the tray. That way none of the small vegetables fell through. Once drained, the produce could be packed for the market, with minimal handling in the washing process. If I hadn’t had those plastic bread trays, I would have made picking trays from wooden 2 × 4s and half-inch hardware cloth.
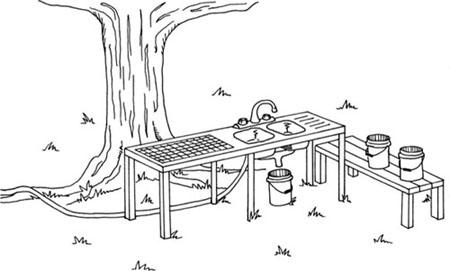
The washing station I have now contains a stainless steel free-standing sink that I found at a yard sale years ago. I clamped a hose onto the pipe going to one of the faucets so I actually have running water there — when the hose is turned on. A bucket by the drain catches the water. I don’t have as large a quantity of produce to clean at one time for our kitchen as I did for the market, but I still think it is a valuable part of the garden. I can wash and cut vegetables for the solar food dryers, filling the dryer trays right in the garden. Since it is not in the shade, this spot needs a roof. We have made a structure out of bamboo, which is fun, but it will eventually be replaced with a permanent metal roof, like the one I’ll put on the garden shed, with gutters to direct the rainwater. I have put down bricks as a floor to define the space. Long range plans for under this roof include an earth oven.
My coldframes are designated places to start seeds for transplant production and used all year long, not just when protection from the weather is needed. We harvest lettuce for the table from there from the fall until time to plant the seeds for the early spring crops. Our hardier winter-harvested greens are under low tunnels in the garden. You can build coldframes from just about anything. All you need is some type of surround to hold the glazing, which could be a piece of clear plastic, an old window, or a specially built top. The sides need to be high enough to provide growing room, but not so high that they shade the inside. I recommend you read
Four Season Harvest
by Eliot Coleman for a better understanding of season extension.
The 12-Month Gardener
by Jeff Ashton is also a good read to get your creative juices flowing for designing your season extension structures. Trust your instincts and use what is available. If you are growing on a large scale and have many structures, you will want to have more uniformity of size to make your work easier, but use what you have to get started. If what you build doesn’t perform to your expectations, study it so you can learn for the next time.
I’m not going to tell you how to build a chicken house, but there are a lot of books out there that will. I will, however, tell you the best tips that I followed for my chicken house way back when.
Gene Logsdon’s Practical Skills
was published in 1985, the year after we bought our five acre farm. Logsdon suggested making it possible to divide the chicken’s living area into two, allowing you to separate your flock. I did and have been pleased with the arrangement ever since. The top of the divider is made from 2″ × 4″ fencing. The bottom of the divider is solid, but can be removed. It is connected to a post on each side with one nail at each place — these are easily pounded out if I want to open up the space. Once my chicks come out of the brooder (an old chicken tractor with a heat lamp) at about a month old, they go into the smaller of the two areas made by that divider. The chicks in this pen have their own run that has smaller wire than the rest of the outside enclosure. All the chickens, young and old, can see each other. When the young ones are ready to join the flock, I take out the divider. Logsdon’s plan shows a larger chicken house with a door between the spaces.
We already had an existing building for a chicken house, or rather, three sides of one. I took that opportunity to build an overhang on that fourth side, since it needed work anyway, and put the rabbit cages there. The chickens could run under those cages on the outside of the building. I store the feed inside the chicken house, which is a lot better than walking to the barn to get it. There are two doors, covered with chicken wire, that separate the feed area from the two chicken areas. I found the doors at a yard sale, just at the time I needed them. If you keep your eyes and mind open and your intentions clear, things will show up for you like that. I built nest boxes that extend into the “feed room” to make egg collection easier. They were made from scrap wood with the tongues of old tennis shoes as hinges.
Although I couldn’t find this in Logsdon’s book when I checked, I’m sure I got the idea to put a loft in the chicken house from something he’d written. That building isn’t tall, but I put some plywood over the chicken area and it makes a great place to store straw from the grain harvest or
grass clippings for the chickens, bringing those birds into the circle of production. I put the straw down as bedding and feed them the dried “grass hay.” When it is time to clean the chicken house, all of that becomes compost, which will go to the garden beds when finished. I cover the chicken droppings with hay or straw throughout the year, cleaning it out only once in the summer. It is important to have plenty of carbon material at all times to add to the chicken droppings. We have an old five foot wooden ladder that I keep folded up in the chicken house. I use that to reach the material in the loft.
You can increase space in your garden by using trellises to get things off the ground. The garden maps in
Chapter 8
show a trellis being used with tomatoes and cucumbers. When I started gardening, I used whatever I could find to hold things up. I don’t like to put up strings to support plants, so I avoid that when possible. What I find most useful as a trellis is a piece of metal fence supported by metal posts that can be moved to the next bed in the rotation each year. Although I have used some homemade tomato cages, I prefer the fence for tomatoes.