CSS: The Definitive Guide, 3rd Edition (5 page)
Read CSS: The Definitive Guide, 3rd Edition Online
Authors: Eric A. Meyer
Tags: #COMPUTERS / Web / Page Design

So far, we've learned
fairly simple techniques for applying a single style to a single selector. But what if
you want the same style to apply to multiple elements? If that's the case, you'll want
to use more than one selector or apply more than one style to an element or group of
elements.
Let's say you wanth2elements and paragraphs
to have gray text. The easiest way to accomplish this is to use the following
declaration:
h2, p {color: gray;}
By placing theh2andpselectors
on the left
side of the rule and separating them with a comma, you've defined a rule where the
style on the right (color:gray;) applies to the elements referenced by both
selectors. The comma tells the browser that there are two different selectors
involved in the rule. Leaving out the comma would give the rule a completely
different meaning, which we'll explore later in "
Descendant Selectors
."
There are really no limits on how many selectors you can group together. For
example, if you want to display a large number of elements in gray, you might use
something like the following rule:
body, table, th, td, h1, h2, h3, h4, p, pre, strong, em, b, i {color: gray;}
Grouping allows an author to drastically compact certain types of style
assignments, which makes for a shorter style sheet. The following alternatives
produce exactly the same result, but it's pretty obvious which one is easier to type:
h1 {color: purple;}
h2 {color: purple;}
h3 {color: purple;}
h4 {color: purple;}
h5 {color: purple;}
h6 {color: purple;}
h1, h2, h3, h4, h5, h6 {color: purple;}
Grouping allows for some interesting choices. For example, all of the groups of
rules in the following example are equivalent—each merely shows a different way of
grouping both selectors and declarations:
/* group 1 */
h1 {color: silver; background: white;}
h2 {color: silver; background: gray;}
h3 {color: white; background: gray;}
h4 {color: silver; background: white;}
b {color: gray; background: white;}
/* group 2 */
h1, h2, h4 {color: silver;}
h2, h3 {background: gray;}
h1, h4, b {background: white;}
h3 {color: white;}
b {color: gray;}
/* group 3 */
h1, h4 {color: silver; background: white;}
h2 {color: silver;}
h3 {color: white;}
h2, h3 {background: gray;}
b {color: gray; background: white;}
Any of these will yield the result shown in
Figure 2-5
. (These styles use grouped declarations, which are explained in
the upcoming section, "
Grouping
Declarations
.")

Figure 2-5. The result of equivalent style sheets
selector
CSS2 introduced a new simple selector called the
universal selector
, displayed as an asterisk (*). This selector matches any element at all, much
like a wildcard.
For example, to
make every single element in a document red, you would
write:
* {color: red;}
This
declaration is equivalent to a grouped selector that lists every single element
contained within the document. The universal selector lets you assign thecolorvalueredto
every element in the document in one efficient stroke. Beware, however: although
the universal selector is convenient, it can have unintended consequences, which
I'll discuss in the next chapter.
Since you
can group selectors together into a single rule, it follows that you can also group
declarations.
Assume that you want allh1elements to appear in purple, 18-pixel-high Helvetica
text on an aqua background (and you don't mind blinding your readers). You could
write your styles like this:
h1 {font: 18px Helvetica;}
h1 {color: purple;}
h1 {background: aqua;}
But this method is inefficient; imagine creating such a list for an element that
will carry 10 or 15 styles! Instead, you can group your declarations together:
h1 {font: 18px Helvetica; color: purple; background: aqua;}
This will have exactly the same effect as the three-line style sheet just shown.
Note that using semicolons at the end of each declaration is crucial when you're
grouping them. Browsers ignore whitespace in style sheets, and the user agent must
rely on correct syntax to parse the style sheet. You can fearlessly format styles
like the following:
h1 {
font: 18px Helvetica;
color: purple;
background: aqua;
}
If the second semicolon is omitted, however, the user agent will interpret the
style sheet as follows:
h1 {
font: 18px Helvetica;
color: purple  background: aqua;
}
Becausebackground: is not a valid value forcolor, and becausecolorcan be given only one keyword, a user agent will ignore thecolordeclaration (including thebackground: aquapart) entirely. It might renderh1s as purple text without an aqua background,
but more likely, you won't even get purpleh1s.
Instead, they will be the default color (which is usually black) with no background
at all. (The declarationfont: 18px Helveticawill
still take effect since it was correctly terminated with a semicolon.)
Although it is not technically necessary to follow the last declaration of a
rule with a semicolon, it is generally good practice to do so. First, it will keep
you in the habit of terminating your declarations with semicolons, the lack of
which is one of the most common causes of rendering errors. Second, if you decide
to add another declaration to a rule, you won't have to worry about forgetting to
insert an extra semicolon. Finally, some older browsers such as Internet Explorer
3.x have a greater tendency to become confused if the semicolon is left off the
final declaration in a rule. Avoid all these problems—always follow a declaration
with a semicolon, wherever the rule appears.
As with selector grouping,
declaration
grouping is a convenient way to keep your style sheets short, expressive, and easy to
maintain.
You
now know that you can group selectors, and you can group declarations. By combining
both kinds of grouping in single rules, you can define very complex styles using only
a few statements. Now, what if you want to assign some complex styles to all the
headings in a document, and you want the same styles to be applied to all of them?
Here's how to do it:
h1, h2, h3, h4, h5, h6 {color: gray; background: white; padding: 0.5em;
border: 1px solid black; font-family: Charcoal, sans-serif;}
You've grouped the selectors, so the styles on the right side of the rule will be
applied to all the headings listed, and grouping the declarations means that all of
the listed styles will be applied to the selectors on the left side of the rule. The
result of this rule is shown in
Figure
2-6
.
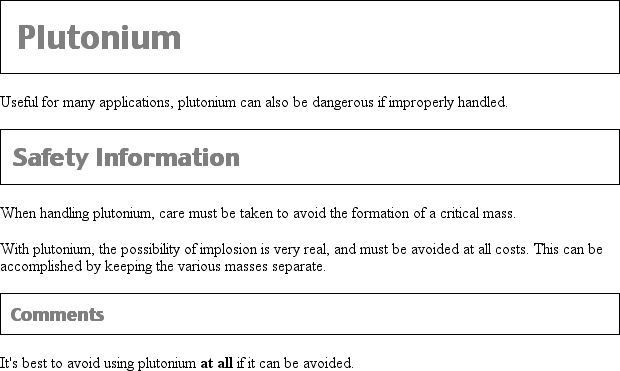
Figure 2-6. Grouping both selectors and rules
This approach is preferable to the drawn-out alternative, which would begin with
something like this:
h1 {color: gray;}
h2 {color: gray;}
h3 {color: gray;}
h4 {color: gray;}
h5 {color: gray;}
h6 {color: gray;}
h1 {background: white;}
h2 {background: white;}
h3 {background: white;}
and continue for many lines. You
can
write out your styles
the long way, but I wouldn't recommend it—editing them would be as tedious as usingfonttags everywhere!
It's possible to add even more expression to selectors and to apply styles in a
way that cuts across elements in favor of types of information. Of course, to get
something so powerful, you'll have to do a little work in return, but it's well worth
it.
So far, we've been grouping selectors and declarations together in a variety of ways,
but the selectors we've been using are still simple ones that refer only to document
elements. They're fine up to a point, but there are times when you need something a
little more specialized.
In addition to raw document elements, there are two other types of selectors:
class selectors
and
ID selectors
, which let
you assign styles in a way that is independent of document elements. These selectors can
be used on their own or in conjunction with element selectors. However, they work only
if you've marked up your document appropriately, so using them generally involves a
little forethought and planning.
For example, say you're drafting a document that discusses ways of handling
plutonium. The document contains various warnings about safely dealing with such a
dangerous substance. You want each warning to appear in boldface text so that it will
stand out. However, you don't know which elements these warnings will be. Some warnings
could be entire paragraphs, while others could be a single item within a lengthy list or
a small section of text. So, you can't define a rule using simple selectors of any kind.
Suppose you tried this route:
p {font-weight: bold;}
All
paragraphs would be bold, not just those that contain warnings.
You need a way to select only the text that contains warnings, or more precisely, a way
to select only those elements that are warnings. How do you do it? You apply styles to
parts of the document that have been marked in a certain way, independent of the
elements involved, by using class selectors.
The most common way to apply styles without worrying
about the elements involved is to use class selectors. Before you can use them,
however, you need to modify your actual document markup so that the class selectors
will work. Enter theclassattribute:
When handling plutonium, care must be taken to avoid
the formation of a critical mass.With plutonium, the possibility of implosion is
very real, and must be avoided at all costs. This can be accomplished
by keeping the various masses separate.
To associate the styles of a class selector with an element, you must assign aclassattribute to the appropriate value. In
the previous code, a class value ofwarningwas
assigned to two elements: the first paragraph and thespanelement in the second paragraph.
All you need now is a way to apply styles to these classed elements. In HTML
documents, you can use a very compact notation where the name of aclassis preceded by a period (.) and can be joined with
a simple selector:
*.warning {font-weight: bold;}
When combined with the example markup shown earlier, this simple rule has the
effect shown in
Figure 2-7
. That is, the
style offont-weight: boldwill be applied to
every element (thanks to the presence of the universal selector) that carries aclassattribute with a value ofwarning.

Figure 2-7. Using a class selector
As you can see, the class selector works by directly referencing a value that will
be found in theclassattribute of an element.
This reference is
always
preceded by a period (.), which marks
it as a class selector. The period helps keep the class selector separate from
anything with which it might be combined—such as an element selector. For example,
you may want boldface text only when an entire paragraph is a warning:
p.warning {font-weight: bold;}
The selector now matches anypelements that
have aclassattribute containing the wordwarning, but no other elements of any kind,
classed or otherwise. The selectorp.warningtranslates to: "Any paragraph whoseclassattribute contains the wordwarning." Since thespanelement is not a paragraph, the rule's
selector doesn't match it, and it won't be converted to bold text.
If you did want to assign different styles to thespanelement, you could use the selectorspan.warning:
p.warning {font-weight: bold;}
span.warning {font-style: italic;}
In this case, the warning paragraph is boldfaced, while the warningspanis italicized. Each rule applies only to a specific
type of element/class combination, so it does not leak over to other elements.
Another option is to use a combination of a general class selector and an
element-specific class selector to make the styles even more useful, as in the
following markup:
.warning {font-style: italic;}
span.warning {font-weight: bold;}
The results are shown in
Figure 2-8
.
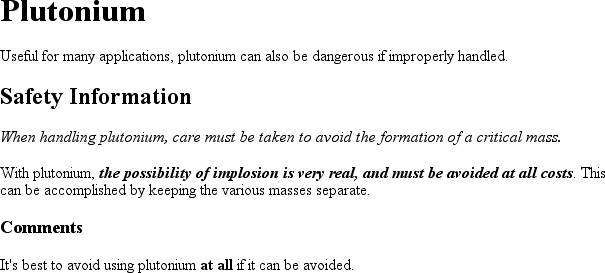
Figure 2-8. Using generic and specific selectors to combine styles
In this situation, any warning text will be italicized, but only the text within aspanelement and text with aclassofwarningwill
be boldfaced and italicized.
Notice the format of the general class selector in the previous example: it's
simply a class name preceded by a period without any element name. In cases where you
only want to select all elements that share a class name, you can omit the universal
selector from a class selector without any ill effects.
In the previous section, we dealt withclassvalues that contained a single word. In HTML, it's
possible to have a space-separated list of words in a singleclassvalue. For example, if you want to mark a particular element as
being both urgent and a warning, you could write:
When handling plutonium, care must be taken to
avoid the formation of a critical mass.With plutonium, the possibility of implosion is
very real, and must be avoided at all costs. This can be accomplished
by keeping the various masses separate.
The order of the words doesn't actually matter;warningwould also suffice.
urgent
Now let's say you want all elements with aclassofwarningto be boldface, those
with aclassofurgentto be italic, and those elements with both values to have a silver
background. This would be written as follows:
.warning {font-weight: bold;}
.urgent {font-style: italic;}
.warning.urgent {background: silver;}
By chaining two class selectors together, you can select only those elements that
have both class names, in any order. As you can see, the HTML source containsclass="urgent warning"but the CSS selector is
written.warning.urgent. Regardless, the rule will
still cause the "When handling plutonium . . . " paragraph to have a silver
background, as illustrated in
Figure 2-9
.
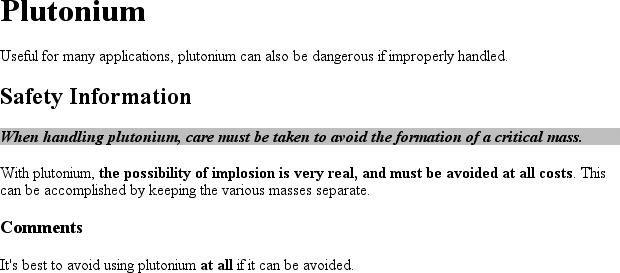
Figure 2-9. Selecting elements with multiple class names
If a multiple class selector contains a name that is not in the space-separated
list, then the match will fail. Consider the following rule:
p.warning.help {background: red;}
As you would expect, the selector will match only thosepelements with aclasscontaining the
wordswarningandhelp. Therefore, it will not match apelement with just the wordswarningandurgentin itsclassattribute. It would, however, match the following:
Help me!
In versions previous to IE7, Internet Explorer for both platforms has problems
with correctly handling multiple class selectors. In these older versions,
although you can select a single class name out of a list, selecting based on
multiple names in a list does not work properly. Thus,p.warningwould work as expected, butp.warning.helpwould match anypelements that have aclassattribute with the
wordhelpbecause it comes last in the
selector. If you wrotep.help.warning, then
older versions of Explorer would match anypelements that havewarningin theirclassvalue, whether or nothelpappears in the same value.
In some ways,
ID selectors
are similar to class selectors,
but there are a few crucial differences. First, ID selectors are preceded by an
octothorpe (#)—also known as a pound sign, hash
mark,
or tic-tac-toe board—instead of a
period. Thus, you might see a rule like this one:
*#first-para {font-weight: bold;}
This rule applies boldface text to any element whoseidattribute has a value offirst-para.
The second difference is that instead of referencing values of theclassattribute, ID selectors refer, unsurprisingly, to
values found inidattributes. Here's an example
of an ID selector in action:
*#lead-para {font-weight: bold;}
This paragraph will be boldfaced.
This paragraph will NOT be bold.
Note that the valuelead-paracould have been
assigned to any element within the document. In this particular case, it is applied
to the first paragraph, but you could have applied it just as easily to the second or
third paragraph.
As with class selectors, it is possible to omit the universal selector from an ID
selector. In the previous example, you could also have written:
#lead-para {font-weight: bold;}
The effect of this selector would be the same.
You may assign classes to any number of elements, as
demonstrated earlier; the class namewarningwas
applied to both apand aspanelement, and it could have been applied to many more elements.
IDs, on the other hand, are used once, and only once, within an HTML document.
Therefore, if you have an element with anidvalue
oflead-para, no other element in that document
can have anidvalue oflead-para.
In the real world, browsers don't usually check for the uniqueness of
IDs in
HTML, which means that if you sprinkle an HTML document with several elements, all
of which have the same value for their ID attributes, you'll probably get the same
styles applied to each. This is incorrect behavior, but it happens anyway. Having
more than one of the same ID value in a document also makes DOM scripting more
difficult, since functions likegetElementById()depend on there being one, and only one, element with
a given ID value.
Unlike class selectors, ID selectors can't be combined, since ID attributes do not
permit a space-separated list of words.
On a purely syntactical level, the dot-class notation
(e.g.,.warning) is not guaranteed to work for XML documents. As of this writing,
the dot-class notation works in HTML, SVG, and MathML, and it may well be permitted
in future languages, but it's up to each language's specification to decide that. The
hash-ID notation
(e.g.,#lead) will work in any document language that has an
attribute that enforces uniqueness within a document. Uniqueness can be enforced with
an attribute calledid, or indeed anything else,
as long as the attribute's contents are defined to be unique within the document.
Another difference betweenclassandidnames is that IDs carry more weight when you're
trying to determine which styles should be applied to a given element. I'll explain
this in greater detail in the next chapter.
As with classes, IDs can also be selected independently of an element. There may
be circumstances in which you know that a certain ID value will appear in a document,
but you don't know the element on which it will appear (as in the plutonium-handling
warnings), so you'll want to declare standalone ID selectors. For example, you may
know that in any given document, there will be an element with an ID value ofmostImportant. You don't know whether that most
important thing will be a paragraph, a short phrase, a list item, or a section
heading. You know only that it will exist in each document, occur in an arbitrary
element, and appear no more than once. In that case, you would write a rule like
this:
#mostImportant {color: red; background: yellow;}
This rule would match any of the following elements (which, as I noted before,
should
not
appear together in the same document because they all
have the same ID value):
This is important!
This is important!
- This is important!
Also note that class and ID selectors may be case-sensitive, depending on the
document language. HTML and XHTML define class and ID values to be case-sensitive, so
the capitalization of your class and ID values must match that found in your
documents. Thus, in the following pairing of CSS and HTML, the element will not be
boldfaced:
p.criticalInfo {font-weight: bold;}
Don't look down.
Because of the change in case for the letter
i
, the selector
will not match the element shown.
Some older browsers did not treat class and ID names as case-sensitive, but all
browsers current as of this writing enforce case sensitivity.