CSS: The Definitive Guide, 3rd Edition (4 page)
Read CSS: The Definitive Guide, 3rd Edition Online
Authors: Eric A. Meyer
Tags: #COMPUTERS / Web / Page Design

Thestyleelement is one way to include a style sheet, and
it appears in the document itself:
tag. It is also possible to
give thestyleelement amediaattribute, with the same allowed values as previously discussed
for linked style sheets.The styles between the opening and closing
styletags are referred to as the
document style
sheet
, or the
embedded
style sheet
since this style sheet is embedded within the
document. It will contain many of the styles that will apply to the document, but it
can also contain multiple links to external style sheets
using the@importdirective.
Now we'll
discuss the stuff that is found inside thestyletag. First, we have something very similar tolink: the@importdirective:
@import url(sheet2.css);
Just likelink,@importcan be used to direct the web browser to load an external style
sheet and use its styles in the rendering of the HTML document. The only major
difference is in the actual syntax and placement of the command. As you can see,@importis found inside thestylecontainer. It must be placed there, before the
other CSS rules, otherwise it won't work at all. Consider this example:
Likelink, there can be more than one@importstatement in a document. Unlikelink, however, the style sheets of every@importdirective will be loaded and used; there is no
way to designate alternate style sheets with@import. So, given the following markup:
@import url(sheet2.css);
@import url(blueworld.css);
@import url(zany.css);
all three external style sheets will be loaded, and all of their style rules will
be used in the display of the document.
Many older browsers cannot process varying forms of the@importdirective. This fact can actually be used to
one's advantage in "hiding" styles from these browsers. For more details, see
http://w3development.de/css/hide_css_from_browsers
.
As withlink, you can restrict imported style
sheets to one or more media by listing the media to which it should be applied after
the style sheet's URL:
@import url(sheet2.css) all;
@import url(blueworld.css) screen;
@import url(zany.css) projection, print;
@importcan be highly useful if you have an
external style sheet that needs to use the styles
found
in other external style sheets. Since external style sheets cannot contain any
document markup, thelinkelement can't be
used—but@importcan. Therefore, you might have an
external style sheet that contains the following:
@import url(http://example.org/library/layout.css);
@import url(basic-text.css);
@import url(printer.css) print;
body {color: red;}
h1 {color: blue;}
Well, maybe not those exact styles, but you get the idea. Note the use of both
absolute and relative URLs in the previous example. Either URL form can be used, just
as withlink.
Note also that the@importdirectives appear at
the beginning of the style sheet, as they did in our example document. CSS requires
the@importdirective to come before any other
rules in a style sheet. An@importthat comes
after other rules (e.g.,body {color:red;}) will be ignored by conforming user agents.
Internet Explorer for Windows does not ignore any@importdirective, even those that come after other rules. Since
other browsers do ignore improperly placed@importdirectives, it is easy to mistakenly place the@importdirective incorrectly and thus alter the
display in other browsers.
After
the@importstatement in our example, we find some
ordinary style rules.
What they mean
doesn't actually matter for this discussion, although you can probably guess that
they seth1elements to be maroon andbodyelements to have a yellow background:
h1 {color: maroon;}
body {background: yellow;}
Styles such as these comprise the bulk of any embedded style sheet—simple and
complex, short and long. Rarely will you have a document where thestyleelement does not contain any rules.
For those of you concerned about making your documents accessible to older
browsers, there is an important warning to consider. You're probably aware that
browsers ignore tags they don't recognize; for example, if a web page contains abloopertag, browsers will completely ignore
the tag because it isn't one they recognize.
The same is true with style sheets. If a browser does not recognize
declarations within those tags will not necessarily be ignored because they look
like ordinary text as far as the browser is concerned. So your style declarations
will appear at the top of your page! (Of course, the browser should ignore the
text because it isn't part of thebodyelement,
but this is never the case.)
To combat this problem, it is recommended that you enclose your declarations in
a comment tag. In the example given here, the beginning of the comment tag appears
just after the openingstyletag, and the end
of the comment appears just before the closingstyletag:
This should cause older browsers to completely ignore the declarations as well
as thestyletags because HTML
comments
are not displayed. Meanwhile, those
browsers that understand CSS will still be able to read the style sheet.
CSS also allows for comments. These are very
similar to C/C++ comments in that they are surrounded by/*and*/:
/* This is a CSS1 comment */
Comments can span multiple lines, just as in C++:
/* This is a CSS1 comment, and it
can be several lines long without
any problem whatsoever. */
It's important to remember that CSS comments
cannot be nested. So, for example, this would not be correct:
/* This is a comment, in which we find
another comment, which is WRONG
/* Another comment */
and back to the first comment */
However, it's hardly ever desirable to nest comments, so this limitation is no big
deal.
One way to create "nested" comments accidentally is to temporarily comment out
a large block of a style sheet that already contains a comment. Since CSS doesn't
permit nested comments, the "outside" comment will end where the "inside" comment
ends.
If you wish to place comments on the same line as markup, then you need to be
careful about how you place them. For example, this is the correct way to do it:
h1 {color: gray;}   /* This CSS comment is several lines */
h2 {color: silver;} /* long, but since it is alongside */
p {color: white;}   /* actual styles, each line needs to */
pre {color: gray;}  /* be wrapped in comment markers. */
Given this example, if each line isn't marked off, then most of the style sheet
will become part of the comment and thus will not work:
h1 {color: gray;}   /* This CSS comment is several lines
h2 {color: silver;}  long, but since it is not wrapped
p {color: white;}    in comment markers, the last three
pre {color: gray;}   styles are part of the comment. */
In this example, only the first rule (h1:
{colorgray;}) will be applied to the
document. The rest of the rules, as part of the comment, are ignored by the browser's
rendering engine.
Moving on with the example, you see some more CSS information actually found
inside an XHTML tag!
For cases where you want to simply assign a few
styles to one individual element, without the need for embedded or external style
sheets, employ the HTML attributestyleto set an
inline style
:
The most wonderful of all breakfast foods is
the waffle--a ridged and cratered slab of home-cooked, fluffy goodness...
Thestyleattribute can be associated with any
HTML tag whatsoever, except for those tags that are found outside ofbody(headortitle, for instance).
The syntax of astyleattribute is fairly
ordinary. In fact, it looks very much like the declarations found in thestylecontainer, except here the curly braces are
replaced by double quotation marks. Somaroon; background:yellow;">will set the text color to be
maroon and the background to be yellow
for that paragraph only
.
No other part of the document will be affected by this declaration.
Note that you can only place a declaration block, not an entire style sheet,
inside an inlinestyleattribute. Therefore, you
can't put an@importinto astyleattribute, nor can you include any complete rules.
The only thing you can put into the value of astyleattribute is what might go between the curly braces of a rule.
Use of thestyleattribute is not generally
recommended. Indeed, it is marked as deprecated by XHTML 1.1 and is very unlikely to
appear in XML languages other than XHTML. Some of the primary advantages of CSS—the
ability to organize centralized styles that control an entire document's appearance
or the appearance of all documents on a web server—are negated when you place styles
into astyleattribute. In many ways, inline
styles
are not much better than thefonttag, although they do have a good deal
more flexibility.
With CSS, it is possible to completely change the way elements are presented by a
user agent. This can be executed at a basic level with thedisplayproperty, and in a different way by associating style sheets with
a document. The user will never know whether this is done via an external or embedded
style sheet, or even with an inline style. The real importance of external style sheets
is the way in which they allow authors to put all of a site's presentation information
in one place, and point all of the documents to that place. This not only makes site
updates and maintenance a breeze, but it helps to save bandwidth since all of the
presentation is removed from documents.
To make the most of the power of CSS, authors need to know how to associate a set of
styles with the elements in a document. To fully understand how CSS can do all of this,
authors need a firm grasp of the way CSS selects pieces of a document for styling, which
is the subject of the next chapter.
One of the primary advantages of CSS—particularly to designers—is its ability to easily
apply a set of styles to all elements of the same type. Unimpressed? Consider this: by
editing a single line of CSS, you can change the colors of all your headings. Don't like
the blue you're using? Change that one line of code, and they can all be purple, yellow,
maroon, or any other color you desire. That lets you, the designer, focus on design, rather
than grunt work. The next time you're in a meeting and someone wants to see headings with a
different shade of green, just edit your style and hit Reload.
Voilà!
The results are accomplished in seconds and there for everyone to see.
Of course, CSS can't solve all your problems—you can't use it to change the color of
your GIFs, for example—but it can make some global changes much easier. So let's begin with
selectors
and structure.
As I've stated, a central feature of CSS is its ability
to apply certain rules
to an entire set of element types in a document. For example, let's say that you want to
make the text of allh2elements appear gray. Using
old-school HTML, you'd have to do this by insertingh2elements:
This is h2 text
Obviously, this is a tedious process if your document contains a lot ofh2elements. Worse, if you later decide that you want all
thoseh2s to be green instead of gray, you'd have to
start the manual tagging all over again.
CSS allows you to create rules that are simple to change, edit, and apply to all the
text elements you define (the next section will explain how these rules work). For
example, simply write this rule once to make all yourh2elements gray:
h2 {color: gray;}
If you want to change allh2text to another
color—say, silver—simply alter the rule:
h2 {color: silver;}
To illustrate the concept of
rules in more detail, let's break down the structure.
Each rule has two fundamental parts, the
selector
and the
declaration block
.
The declaration block is
composed of one or more
declarations
,
and each declaration is a pairing of
a
property
and a
value
. Every style sheet
is made up of a series of rules.
Figure
2-1
shows the parts of
a rule.
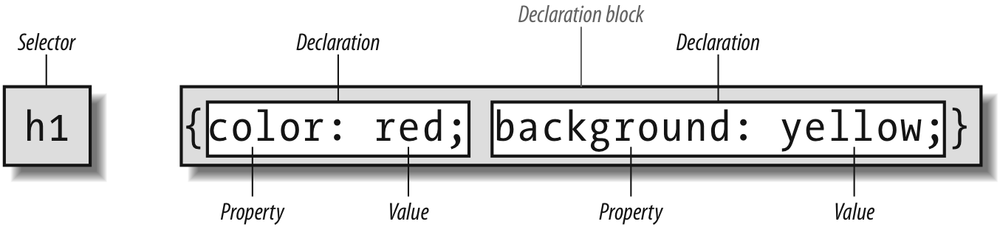
Figure 2-1. The structure of a rule
The selector, shown on the left side of the rule, defines which piece of the
document will be affected. In
Figure 2-1
,h1elements are selected. If the selector werep, then allp(paragraph) elements would be selected.
The right side of the rule contains the declaration block, which is made up of one
or more declarations. Each declaration is a combination of a CSS property and a value
of that property. In
Figure 2-1
, the
declaration block contains two declarations. The first states that this rule will
cause parts of the document to have acolorofred, and the second states that part of the
document will have abackgroundofyellow. So, all of theh1elements in the document (defined by the selector) will be styled in
red text with a yellow background.
A selector is most often an HTML element, but not always. For example, if a CSS
file contains styles for an XML document, a selector might look something like this:
QUOTE {color: gray;}
BIB {color: red;}
BOOKTITLE {color: purple;}
MYElement {color: red;}
In other words, the elements of the document serve as the most basic selectors. In
XML, a selector could be anything, since XML allows for the creation of new markup
languages that can have just about anything as an element name. If you're styling an
HTML document, on the other hand, the selector will generally be one of the many HTML
elements such asp,h3,em,a, or evenhtmlitself. For example:
html {color: black;}
h1
{color
: gray;}
h2 {color: silver;}
The results of this style sheet are shown in
Figure 2-2
.
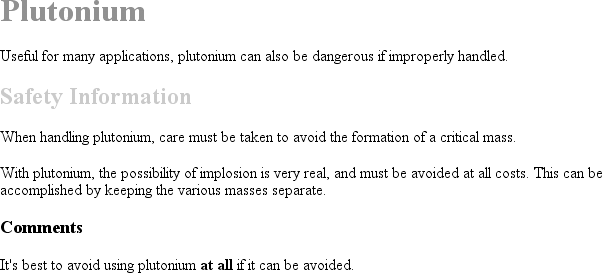
Figure 2-2. Simple styling of a simple document
Once you've globally applied styles directly to elements, you can shift those
styles from one element to another. Let's say you decide that the paragraph text, not
theh1elements, in
Figure 2-2
should be gray. No problem. Simply
change theh1selector top:
html {color: black;}
p {color: gray;}
h2 {color: silver;}
The results are shown in
Figure 2-3
.
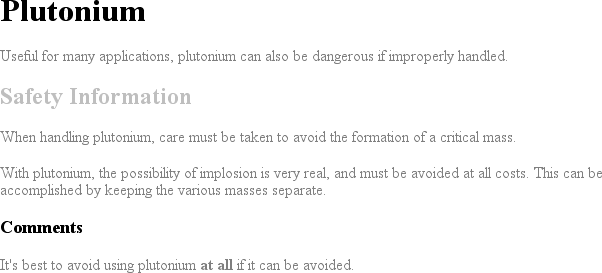
Figure 2-3. Moving a style from one element to another
The
declaration block
contains
one or more declarations.
A declaration is
always formatted as a property followed by a colon and then a
value
followed by a semicolon. The colon and semicolon can be
followed by zero or more spaces. In nearly all cases, a value is either a single
keyword or a space-separated list of one or more keywords that are permitted for that
property. If you use either an incorrect property or value in a declaration, the
whole thing will be ignored. Thus, the following two declarations would fail:
brain-size: 2cm;  /* unknown property */
color: ultraviolet;  /* unknown value */
In an instance where you can use more than one keyword for a property's value, the
keywords are usually separated by spaces. Not every property can accept multiple
keywords, but many, such as thefontproperty,
can. Let's say you want to define medium-sized Helvetica for paragraph text, as
illustrated in
Figure 2-4
.
Figure 2-4. The results of a property value with multiple keywords
The rule would read as follows:
p {font: medium Helvetica;}
Note the space betweenmediumandHelvetica, each of which is a keyword (the first is the
font's size and the second is the actual font name). The space allows the user agent
to distinguish between the two keywords and apply them correctly. The semicolon
indicates that the declaration has been concluded.
These space-separated words are referred to as keywords because, taken together,
they form the value of
the property in question. For instance, consider the
following fictional rule:
rainbow: red orange yellow green blue indigo violet;
There is no such property asrainbow, of
course, and two of the colors used aren't valid either, but the example is useful for
illustrative purposes. The value ofrainbowisred orange yellow green blue indigo violet, and
the seven keywords add up to a single, unique value. We can redefine the value forrainbowas follows:
rainbow: infrared red orange yellow green blue indigo violet ultraviolet;
Now we have a new value forrainbowcomposed of
nine keywords instead of seven. Although the name of the two values is the same, they
are as unique and different as zero and one.
As we've seen, CSS keywords are separated by spaces—except in one instance. In
the CSS propertyfont, there is exactly one
place where a forward slash (/) can be used to
separate two specific keywords. Here's an example:
h2 {font: large/150% sans-serif;}
The slash separates the keywords that set the element's font size and line
height. This is the only place the slash is allowed to appear in thefontdeclaration. All of the other keywords allowed
forfontare separated by spaces.
Those are the basics of simple declarations, but they can get much more complex.
The next section begins to show you just how powerful CSS can be.